

Drone Compass Error Fix: Get Your UAV Back in the Air NOW!
That flashing red "Compass Error" isn't a sign your drone is broken; it's a warning that 90% of the time, your environment is the enemy. You've driven an hour to the perfect shoot location, the light is hitting the horizon just right, and suddenly, your screen is a mess of warnings. It's frustrating, it's stressful, and it feels like your client deadline is slipping away while you're stuck on the ground. We've all been there, staring at technical jargon while the perfect shot disappears.
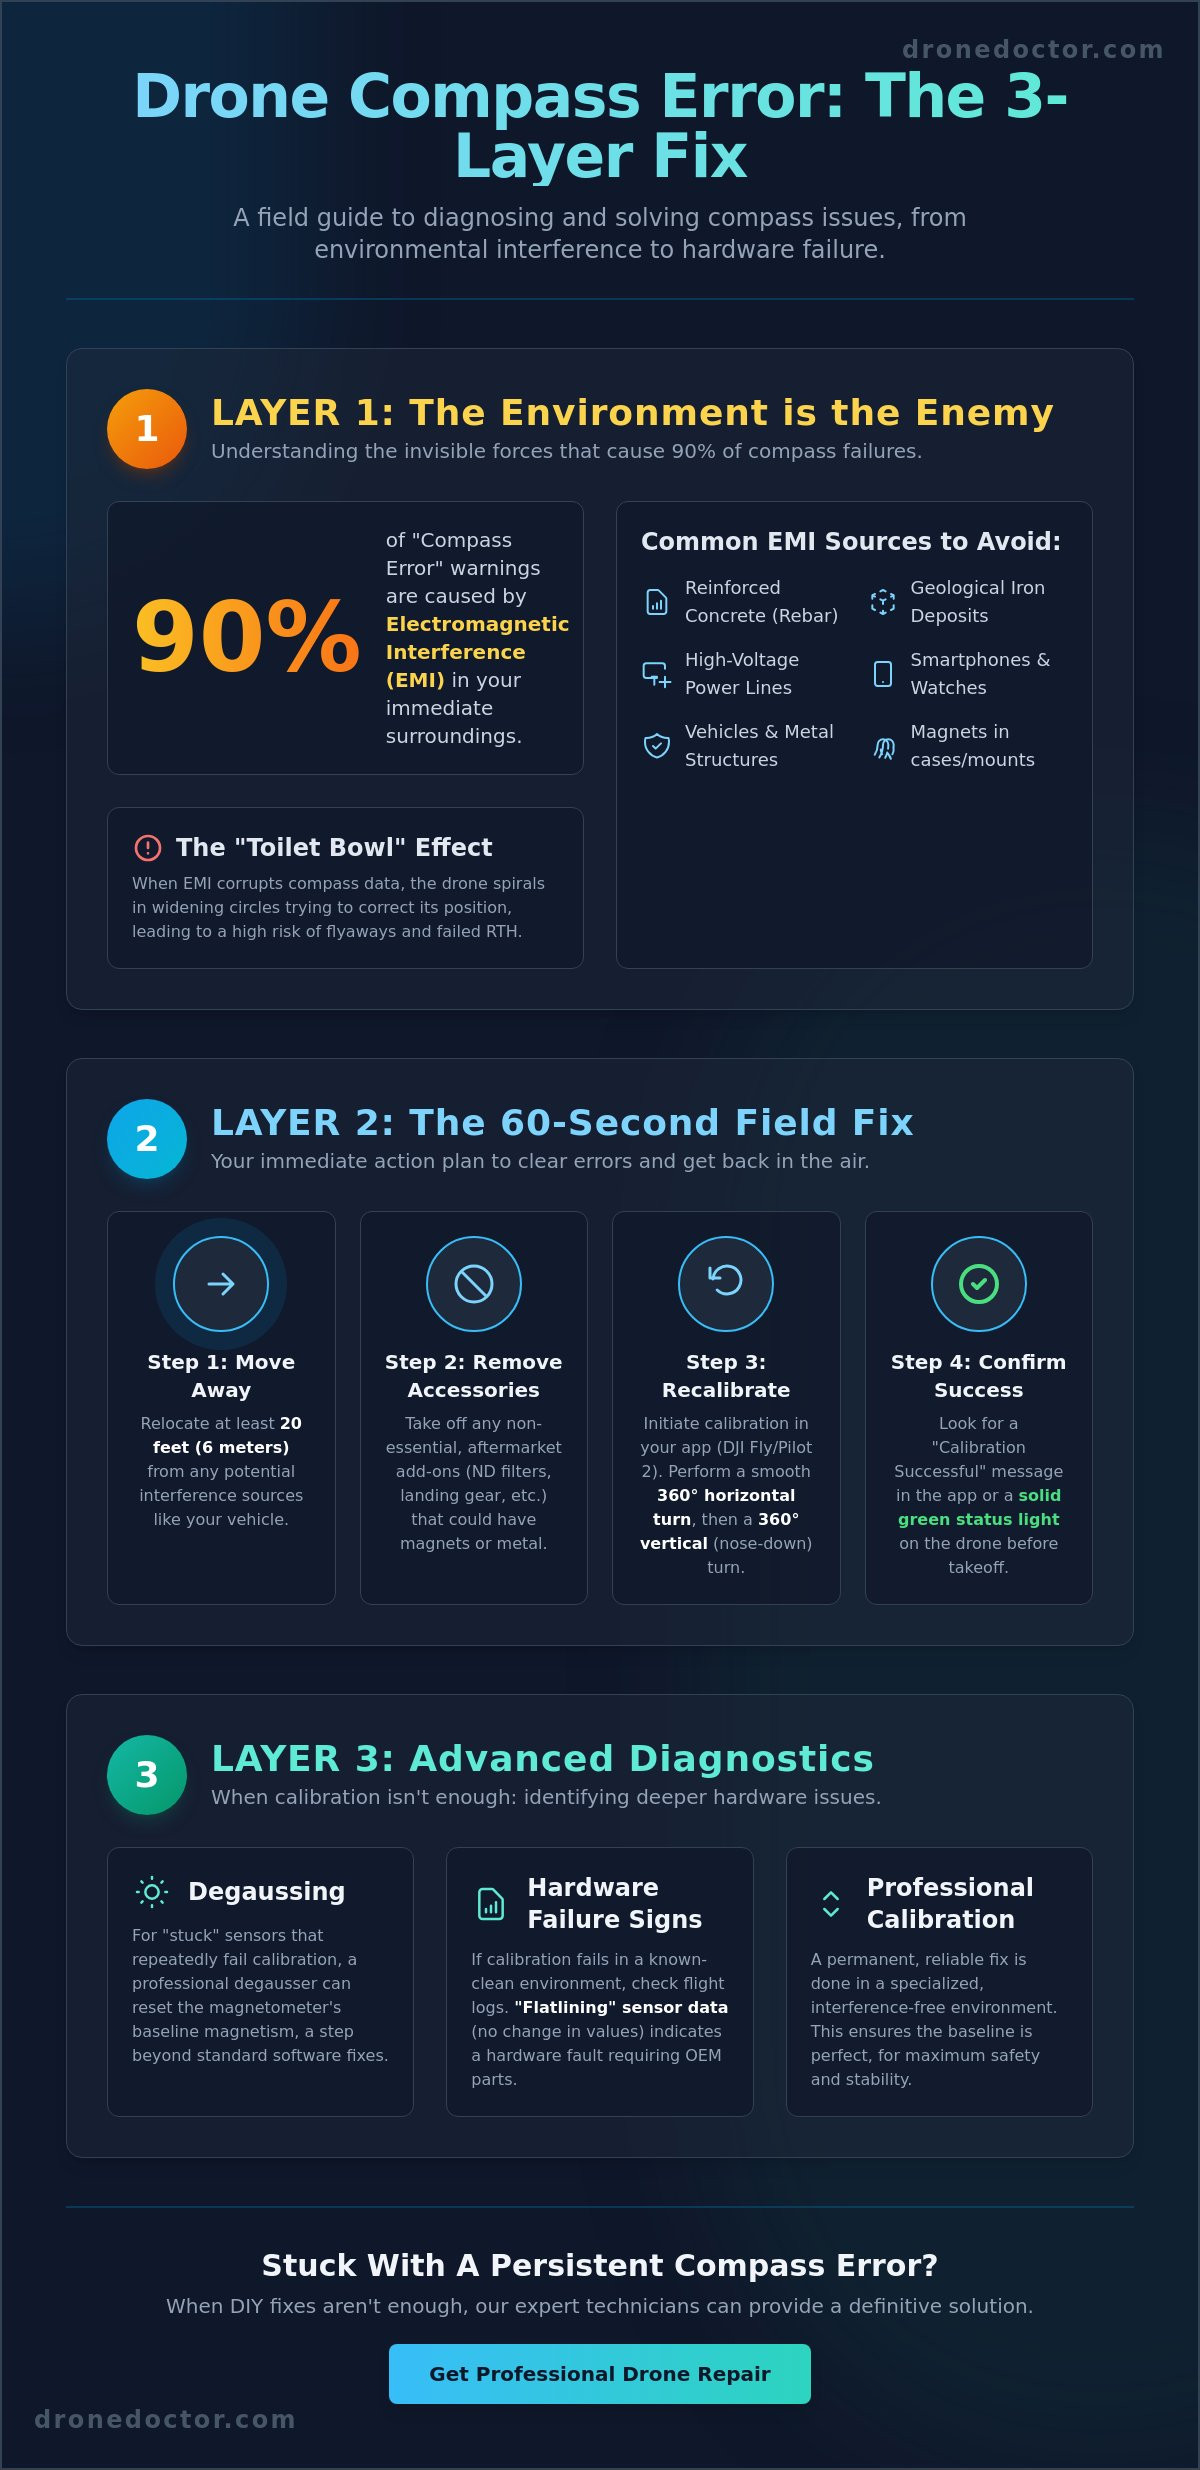
We're going to get you back in the sky immediately. You'll master the definitive drone compass error fix by learning our "Three-Layer Fix" strategy, ensuring you never have to fear a flyaway or a wasted trip again. Whether you're flying the DJI Mini 5 Pro on the May 11, 2026 firmware v01.00.0600 or a DJI Air 3S on v01.00.1600, these steps guarantee a clear takeoff signal every time. We'll cover everything from magnetic interference and the latest May 2026 stability updates to professional degaussing techniques. Stop the anxiety and start your motors; your quick field-fix checklist starts now.
Key Takeaways
- Identify why Electromagnetic Interference (EMI) is the leading cause of takeoff failures and how your magnetometer interacts with the environment.
- Execute a 60-second drone compass error fix by clearing your flight path of hidden metal objects and electronic interference.
- Learn to use a handheld degausser to reset "stuck" sensors when standard calibration fails to solve the issue in the field.
- Recognize the signs of hardware failure, such as "flatlining" flight logs, to determine when you need professional repair services or OEM replacement parts.
- Discover why specialized, interference-free environments are essential for a reliable, permanent calibration that keeps your UAV safe and stable.
Why Your Drone is Throwing a Compass Error (and How to Avoid It)
Your drone is a masterpiece of engineering, but it relies on one tiny, sensitive component to stay stable: the magnetometer. A magnetometer is the sensor that measures Earth's magnetic field. This allows the flight controller to know exactly which way is North. Without this data, your UAV is essentially flying blind. Understanding UAV sensors helps you realize that even small environmental shifts can trigger a system-wide alert. Electromagnetic Interference (EMI) stands as the #1 killer of successful takeoffs, often lurking in places you'd least expect.
Many pilots make the mistake of launching from "stable" surfaces like concrete sidewalks or parking lots. This is a trap. Most modern concrete is reinforced with steel rebar, a hidden grid of metal that screams at your drone's compass sensors. This interference is why you're searching for a drone compass error fix before you've even left the ground. You need to distinguish between two common warnings. A "Calibration Required" prompt usually means your drone has moved to a new geographical location and needs a quick baseline. A "Compass Error" warning is more serious; it means the current magnetic data is so skewed the drone refuses to trust its own sensors.
Common Sources of Magnetic Interference
Interference isn't always visible. Large metal structures like cars, bridges, and shipping containers are obvious culprits, but smaller items are just as guilty. Your smartwatch, smartphone, and even the magnets in your drone's carrying case can cause a drift. If you're flying near high-voltage power lines, the massive electrical flow creates a localized magnetic field that can overpower the Earth's natural signal. Even nature can be a foe. Certain geological formations, particularly those with high iron or magnetite deposits, can make some mountains "no-fly" zones for sensitive equipment.
How EMI Leads to the Dreaded 'Toilet Bowl' Effect
When your compass provides bad data, the flight controller enters a state of panic. It sees the GPS saying the drone is stationary, but the compass says it's rotating. The result is the "Toilet Bowl" effect. Your drone will begin to spiral in widening circles as it attempts to correct its position. This is a massive safety risk. If the compass is compromised, your Return to Home (RTH) accuracy drops to zero. Instead of landing at your feet, a confused drone might fly full speed in the wrong direction. Mastering the environment is the only way to ensure reliable performance and total peace of mind during every mission.
The 60-Second Fix: Environmental Clearing and Re-Calibration
Stop the panic and start the fix. You don't need a laboratory to perform a professional drone compass error fix; you just need a clear space and a bit of patience. Start by moving at least 20 feet away from any significant metal objects. Your truck, bridge railings, and even the phone in your pocket are primary sources of trouble. Next, remove all aftermarket accessories. ND filters, clip-on lights, or heavy-duty landing gear can contribute to magnetic interference from drone electronics, confusing the magnetometer before it even starts. Once you're in a "clean" zone, initiate the calibration sequence. This "drone dance" requires a full 360-degree horizontal rotation followed by a 360-degree vertical rotation. Keep your movements smooth and steady. Speeding through the rotation often leads to a failure message. Finally, monitor your status light. A solid green signal or a clear "Calibration Successful" pop-up is your ticket to a safe flight.
Calibrating in DJI Fly vs. DJI Pilot 2 Apps
The interface you use depends on your gear. For consumer drones like the Mini 5 Pro or Air 3S, you'll navigate through the DJI Fly app. Go to Settings, tap the Safety tab, and scroll down to the Compass section to find the "Calibrate" button. Enterprise users on the Matrice series or Mavic 3 Enterprise will use DJI Pilot 2. This app offers a more detailed health management system (HMS) where you can check the specific interference levels of multiple sensors. If the app "hangs" or the calibration status gets stuck at 99%, it's usually a communication glitch. Restart your mobile device and the controller to clear the cache and try again in a new spot.
The 'Golden Rule' of Field Calibration
Consistency is your best friend. Calibrate your compass every time you travel more than 30 miles from your last flight location or after the drone has been in storage for more than a month. Never use a metal picnic table or a rooftop as a launchpad. These surfaces are magnets for trouble. Instead, use a professional drone landing pad to create a physical and magnetic buffer between the ground and your sensors. If you've tried these steps and the error persists, you might be dealing with a hardware issue. Getting a reliable drone compass error fix is often a matter of moving away from ground-level interference, but sometimes the problem is internal. If the standard "dance" doesn't work, seeking expert drone repair services is the safest way to protect your investment.
Advanced Troubleshooting: Degaussing and Firmware Resets
Sometimes the environment isn't the problem; your drone is. If you've moved to a clear field and still can't get a green light, your magnetometer might have developed a permanent magnetic charge. This happens when the aircraft sits too close to powerful speakers, magnets in your car's trunk, or even high-voltage industrial equipment. This "stuck" state means the sensor is no longer reading the Earth's magnetic field correctly because its own internal charge is drowning it out. This is where advanced troubleshooting provides the definitive drone compass error fix that basic guides miss.
Modern enterprise drones and high-end consumer models often feature dual magnetometers for redundancy. In your app's sensor health menu, you might see "Compass 1" and "Compass 2" listed separately. If one sensor shows high interference while the other is green, the flight controller will likely block takeoff to prevent a mid-air discrepancy. You need both sensors in agreement. Often, a full IMU (Inertial Measurement Unit) reset is required to re-sync these modules with the drone's internal orientation sensors, ensuring the aircraft knows exactly where it is in three-dimensional space.
The Handheld Degausser Trick
If your compass values remain "red" regardless of your location, it's time to degauss. First, identify the compass location on your specific model. On a DJI Mini 5 Pro, it's tucked away in the rear; on a Matrice 350, it's often located in the landing gear or GPS stalks. Plug in a handheld degausser, hold the trigger, and move it in small circular patterns near the sensor before slowly pulling it away. Degaussing is a non-invasive fix for sensors exposed to strong magnets. This process "scrambles" the permanent magnetic charge, allowing the sensor to return to its neutral state and accept a new calibration.
Firmware as a Last-Ditch Software Fix
If hardware tricks fail, look at the code. As of May 11, 2026, DJI released firmware v01.00.0600 for the Mini 5 Pro and v01.00.1600 for the Air 3S. These updates specifically target stability and bug fixes that can resolve sensor communication lag. Using DJI Assistant 2 on a PC or Mac allows you to "Refresh" the firmware. This process wipes the sensor's temporary calibration data and forces a clean slate. Sometimes, a "downgrade and upgrade" cycle is necessary to jumpstart a stubborn module. This forces the flight controller to rewrite its sensor parameters, which often acts as a software-level drone compass error fix when all else fails. Always check for app-side updates on your controller as well, as outdated software can misinterpret perfectly healthy sensor data.
Identifying Hardware Failure: When DIY Isn't Enough
If you've performed the "drone dance" in three different counties and tried the degausser trick without success, you're likely facing a physical hardware failure. A drone compass error fix isn't always a matter of software or surroundings. Sometimes, the internal components simply give up. Your flight logs are the first place to look for hard evidence of a terminal issue. Open your flight records and examine the magnetometer data. If those values are "flatlining" or showing zero change while you rotate the aircraft, the sensor is likely dead. A recent hard landing or even a minor clip against a branch can jar the GPS/Compass module loose or snap a delicate internal ribbon cable. Pay close attention to the specific wording in your app. An "Interference" warning usually points to the environment, but a "Hardware Error" or "Compass Disconnected" message is a clear signal that your UAV needs technical intervention.
The global drone fault repair market was valued between $430 million and $690 million in 2026, reflecting how common these technical failures have become as hardware gets more complex. For those brave enough to open the shell, a visual inspection of the internal ribbon cables might reveal a loose connection. However, these cables are thinner than a human hair and incredibly easy to tear. If the module itself is cracked or shows signs of heat stress, no amount of recalibration will bring it back to life. At this stage, continuing to attempt a DIY drone compass error fix is a waste of your valuable time.
Symptoms of a Broken Compass Module
A failing sensor behaves very differently from one that's just confused by metal. If your drone constantly switches to ATTI mode during flight, it means the flight controller has lost confidence in its directional data and disabled GPS hold for safety. You might also notice the map view shows the drone facing North when it's actually facing South. If your calibration fails instantly, regardless of your location or how many times you've refreshed the firmware, the sensor module has likely suffered a permanent internal short.
The Cost of Ignoring a Hardware Error
Ignoring a hardware warning is a recipe for disaster. When the compass fails mid-flight, the drone loses its ability to calculate its position relative to the takeoff point. This is the primary cause of high-speed flyaways. The aircraft doesn't know where "home" is, so it may drift uncontrollably into obstacles or restricted airspace. Beyond the risk of a total loss, erratic flight behavior makes getting professional-grade footage impossible. If your hardware is failing, it's time for professional drone repair to ensure safety and restore your peace of mind before your next mission.
Expert Drone Repair: Why Professional Calibration Matters
When field-level troubleshooting reaches its limit, professional intervention is the only way to guarantee your UAV's safety. Professional technicians don't just "do the dance" in a parking lot. They utilize specialized, interference-free environments designed to isolate the aircraft from every possible magnetic distraction. This level of precision is impossible to achieve in the wild. A true drone compass error fix in a lab setting involves stripping away the noise of urban life to ensure the magnetometer's baseline is factory-perfect. This controlled setup is why a pro-calibrated drone feels more locked-in and responsive from the very first hover.
Don't settle for cheap, third-party components. We've seen countless pilots try to save a few dollars on "compatible" compass modules only to have the flight controller reject the part mid-flight. Genuine OEM parts are essential because they are manufactured to strict magnetic tolerances that sync perfectly with your drone's specific motherboard. At Drone Doctor LLC, we prioritize the synergy between your IMU, Barometer, and Compass. These sensors work as a team. If one is slightly out of alignment, the whole system suffers. Our comprehensive health checks ensure every sensor is talking to the flight controller with 100% accuracy.
Drone Doctor LLC's Repair Process
Our workflow is built for speed and reliability. We start with diagnostic testing using factory-level software tools that go far deeper than the consumer apps. Whether you're flying a DJI Mavic 3 Pro, an Autel Evo, or high-end Enterprise models, we provide precision module replacements that meet original manufacturer standards. We know your time is money. That's why we focus on fast turnaround times to get you back in the air before your next big weekend project. Every single repair includes a real-world flight test. We don't just fix the hardware; we prove it works in the sky so you can fly with total confidence.
Get a Quote Today
Stop stressing over glitchy sensors and inconsistent flight behavior. A compromised compass isn't just an annoyance; it's a crash waiting to happen. Your equipment represents a significant investment, and risking a total loss over a faulty module simply isn't worth it. Contact our US-based team today for a transparent, honest repair estimate. We'll help you identify exactly what's wrong and provide a clear path to recovery. Get your drone repaired by the experts at Drone Doctor LLC! and experience the peace of mind that comes with professional-grade drone compass error fix results.
Take Command of Your Flight Path Today
You now possess the definitive roadmap to diagnose and resolve magnetometer issues before they ground your operations. From recognizing hidden rebar in concrete to executing the advanced degaussing trick, you've learned that most errors are environmental hurdles rather than permanent failures. However, understanding when to stop the DIY attempts is just as vital as knowing how to calibrate. A reliable drone compass error fix is the difference between a successful cinematic shoot and a catastrophic flyaway that costs you your equipment and your reputation.
If your logs still show flatlining values or persistent hardware warnings, don't leave your next flight to chance. As Authorized DJI Repair Specialists, we provide the industrial-grade calibration and OEM parts required for total mission success. We offer fast US-based shipping and a commitment to certified flight testing on every single repair. You can trust the pros at Drone Doctor LLC to restore your UAV to factory standards with speed and precision. Grab your controller, clear your takeoff zone, and get back to the skies with absolute peace of mind.
Frequently Asked Questions
How do I fix a compass error on a DJI drone?
The most effective drone compass error fix involves moving the aircraft at least 20 feet away from any metal structures or electronic interference and performing a fresh calibration. Open your flight app, navigate to the safety settings, and follow the on-screen prompts to rotate the drone 360 degrees horizontally and vertically. If the error persists, try refreshing your firmware through DJI Assistant 2 or using a handheld degausser to reset the sensor's magnetic state.
Can I fly my drone if it has a compass error?
You should never attempt to fly with an active compass error. The flight controller relies on the magnetometer to maintain a stable heading and execute accurate Return to Home commands. Ignoring this warning often results in the drone switching to ATTI mode, where it will drift with the wind and lose its ability to hover in place. This creates a massive risk for flyaways and mid-air collisions that could destroy your equipment.
Why does my drone say 'Compass Interference' in the middle of a field?
Interference isn't always visible to the naked eye. You might be standing over underground power lines, reinforced concrete with steel rebar, or soil with high concentrations of magnetic minerals like magnetite. Even the smartphone in your pocket or the smartwatch on your wrist can trigger this alert if they are too close to the aircraft during the startup sequence. Move your launch point by 30 feet and try again.
What is the difference between IMU and compass calibration?
The IMU calibration focuses on the drone's internal attitude sensors, like the accelerometer and gyroscope, to ensure it stays level and balanced. The compass calibration specifically tunes the magnetometer to Earth's magnetic field for directional accuracy. Think of the IMU as the drone's inner ear for balance and the compass as its eyes for knowing which way is North. Both must be perfectly synced for reliable flight performance.
How often should I calibrate my drone's compass?
Calibrate your compass every time you travel more than 30 miles to a new flight location or after installing major firmware updates. It is also a smart move to recalibrate if the drone has been in storage for over a month or if you've recently flown near high-voltage power lines. Routine calibration ensures the sensor data remains accurate despite changes in local magnetic declination, keeping your missions safe and predictable.
Will a phone or watch cause a drone compass error?
Yes, mobile devices are primary sources of local magnetic interference. Smartphones have internal speakers with magnets, and many smartwatches use magnetic charging ports or bands that scream at your drone's sensitive magnetometer. Always keep your personal electronics at least 20 feet away from the aircraft when you are trying to perform a drone compass error fix or initiating a takeoff sequence.
What happens if I don't calibrate the compass correctly?
A poor calibration leads to erratic flight behavior, most notably the "toilet bowl effect" where the drone spirals in widening circles. The aircraft becomes difficult to control because its GPS data and compass data no longer agree on its position. In extreme cases, the drone may fail to return to the correct home point, leading to a total loss of the aircraft in unfamiliar terrain.
How much does it cost to replace a drone compass module?
The cost of replacing a compass module depends entirely on your specific drone model and the extent of the internal damage. Enterprise-grade sensors for the Matrice series are more complex and costly than the modules found in consumer drones like the Mini series. Because this repair requires delicate handling of micro-ribbon cables, you should contact a professional technician for a diagnostic and a transparent repair estimate.