

Reparación de gimbals de drones: tu guía definitiva para arreglar videos inestables
No hay nada más frustrante. Has preparado la toma perfecta, tu dron está volando por el cielo, pero cuando revisas el video, es un desastre tembloroso, inclinado e inutilizable. O peor aún, el temido error de "Sobrecarga del gimbal" parpadea en tu pantalla, dejándote completamente en tierra. Te preguntas si es un simple fallo o un desastre costoso. Antes de empezar a buscar precios para un dron nuevo o arriesgarte a un intento de bricolaje que podría empeorar las cosas, ¡detente! Como líderes en servicio y soporte de drones, sabemos que una exitosa reparación de gimbal de dron es a menudo más rápida y asequible de lo que piensas.
¡Prepárate para tomar el control! Esta guía definitiva es tu botiquín de primeros auxilios para metraje inestable. Te capacitaremos para diagnosticar con confianza los problemas más comunes del gimbal, te guiaremos a través de reparaciones sencillas y seguras que puedes hacer tú mismo, y te ayudaremos a decidir exactamente cuándo es el momento de llamar a los expertos. ¡Vamos a estabilizar tu cámara y a hacer que vuelvas a volar con ese video suave como la mantequilla que tanto te gusta, rápido!
Puntos Clave
- Identifica rápidamente problemas comunes del gimbal, desde horizontes inclinados hasta mensajes de error, y comprende lo que significan para tu dron.
- Domina una lista de verificación previa al vuelo de calibraciones y reinicios simples que pueden arreglar instantáneamente el metraje inestable sin necesidad de herramientas.
- Aprende la diferencia crítica entre una solución simple y un problema complejo para decidir si debes intentar una reparación de gimbal de dron por tu cuenta o llamar a los expertos.
- Descubre la tranquilidad que viene con un servicio profesional, asegurando que tu dron vuelva a volar de forma segura y con resultados garantizados.
¿Está tu Gimbal Roto? Síntomas Comunes y lo que Significan
El gimbal de tu dron es el héroe anónimo de la cinematografía aérea. Esta increíble pieza de tecnología, un sistema multieje diseñado para mantener tu cámara perfectamente estable (puedes leer un análisis profundo sobre qué es un gimbal y su historia aquí), es lo que diferencia un video tembloroso y amateur de un metraje profesional y suave como la mantequilla. Cuando falla, tu contenido se resiente. ¡Pero no entres en pánico! No todos los fallos significan una catástrofe.
Los problemas del gimbal suelen dividirse en tres categorías: fallos de software, daños físicos por un accidente o simplemente desgaste. Antes de empezar a buscar un servicio de reparación de gimbal de dron, vamos a diagnosticar el problema. Aquí tienes una lista de verificación rápida de los síntomas más comunes que vemos en Drone Doctor LLC y lo que significan.
Metraje Tembloroso, Irregular o Vibrante
Esta es la queja número 1 de los pilotos. Puede variar desde micro-temblores de alta frecuencia que dan a tu video un efecto de "gelatina" hasta un temblor violento e incontrolable. A menudo, la causa no es el gimbal en sí, sino algo que lo desequilibra. Revisa primero las hélices desequilibradas, los soportes de hélice agrietados o los amortiguadores de vibraciones de goma desgastados. Si todo eso está bien, es posible que tengas un problema interno con el motor del gimbal.
Horizonte Inclinado o Torcido
¿Tu metraje está constantemente torcido, por mucho que vueles con cuidado? Esto significa que el gimbal no se está nivelando correctamente con el horizonte. La buena noticia es que esto suele ser un problema de software o de sensor. La causa más común es una IMU (Unidad de Medición Inercial) sin calibrar. Un aterrizaje forzoso también puede desalinear los sensores o, en el peor de los casos, doblar físicamente un brazo del gimbal.
Mensajes de Error de Sobrecarga del Gimbal o del Motor
Si tu controlador o aplicación de vuelo (como DJI Fly) muestra un error de "Sobrecarga del Gimbal" o "Motor del Gimbal", ¡detente inmediatamente! Este mensaje significa que los motores están forzándose más allá de sus límites. La causa más común es una simple obstrucción: ¿olvidaste quitar el protector del gimbal? También puede ser causado por daños de un accidente que impiden el movimiento libre o un cable flexible defectuoso que interrumpe el flujo de energía.
Gimbal Flojo o Que No Responde
Este es difícil de pasar por alto. Cuando enciendes tu dron, el gimbal debería hacer un pequeño "baile" para inicializarse y estabilizarse. Si simplemente cuelga, completamente flojo y sin vida, tienes un problema grave de hardware. La causa principal es casi siempre un cable flexible del gimbal desconectado o roto, que transporta datos y energía del dron a la cámara. Este síntoma es una señal clara de que necesitas una reparación física.
Soluciones Rápidas que Puedes Intentar AHORA: Pasos de Solución de Problemas DIY
¿El gimbal está fallando? ¡No entres en pánico! Antes de empezar a buscar servicios profesionales de reparación de gimbal de dron, repasa esta lista de verificación esencial de primeros auxilios. Como líderes en servicio de drones, podemos decirte que un sorprendente número de problemas de gimbal, desde un horizonte torcido hasta movimientos erráticos, se resuelven con estos sencillos pasos. Piensa en esto como tu lista de verificación previa al vuelo para la solución de problemas.
¡La seguridad primero! Realiza siempre estos pasos en una superficie plana y nivelada con las hélices quitadas para evitar accidentes.
Paso 1: Realiza una Calibración del Gimbal y la IMU
El gimbal de tu dron es una maravilla de la ingeniería, realizando constantemente microajustes para mantener tu toma estable. La complejidad del diseño y la tecnología moderna del gimbal significa que se basa en datos precisos de los sensores de la Unidad de Medición Inercial (IMU). Un aterrizaje forzoso o incluso cambios de temperatura pueden descalibrarlo. La calibración restablece la posición "nivelada" del gimbal y realinea los sensores.
- Navega hasta el menú de configuración en la aplicación de vuelo de tu dron (como DJI Fly o Autel Sky).
- Busca una sección de "Control" o "Seguridad" y encuentra "Calibración del Gimbal" y "Calibración de la IMU".
- Ejecuta primero la calibración del gimbal. Para la IMU, es crítico que el dron esté en una superficie perfectamente inmóvil y nivelada.
Paso 2: Busca Actualizaciones de Firmware
Los fabricantes están refinando constantemente su software. A menudo, se lanza una actualización de firmware específicamente para corregir errores que causan temblores, desviaciones u otros fallos del gimbal. ¡Esta es una de las soluciones más fáciles que puedes hacer! Antes de asumir que necesitas una reparación física del gimbal de tu dron, busca actualizaciones.
En tu aplicación de vuelo, busca actualizaciones para la aeronave, el control remoto e incluso las baterías de vuelo inteligentes. Consejo Pro: Asegúrate de que todas tus baterías estén cargadas al menos al 50% antes de iniciar cualquier actualización de firmware para evitar que falle a mitad de camino.
Paso 3: Limpia e Inspecciona el Conjunto del Gimbal
Tu gimbal es un instrumento delicado con motores sensibles. Incluso una pequeña partícula de arena, hierba o suciedad puede restringir su movimiento y hacer que se sobrecargue o se comporte de forma extraña. Apaga tu dron e inspecciona suavemente todo el conjunto.
- Usa un cepillo de cerdas suaves o una lata de aire comprimido para eliminar con cuidado cualquier residuo de los motores y brazos.
- Mueve manualmente (¡y suavemente!) el gimbal a través de todo su rango de movimiento para detectar cualquier roce o restricción física.
- Busca cualquier grieta fina o daño de un accidente reciente.
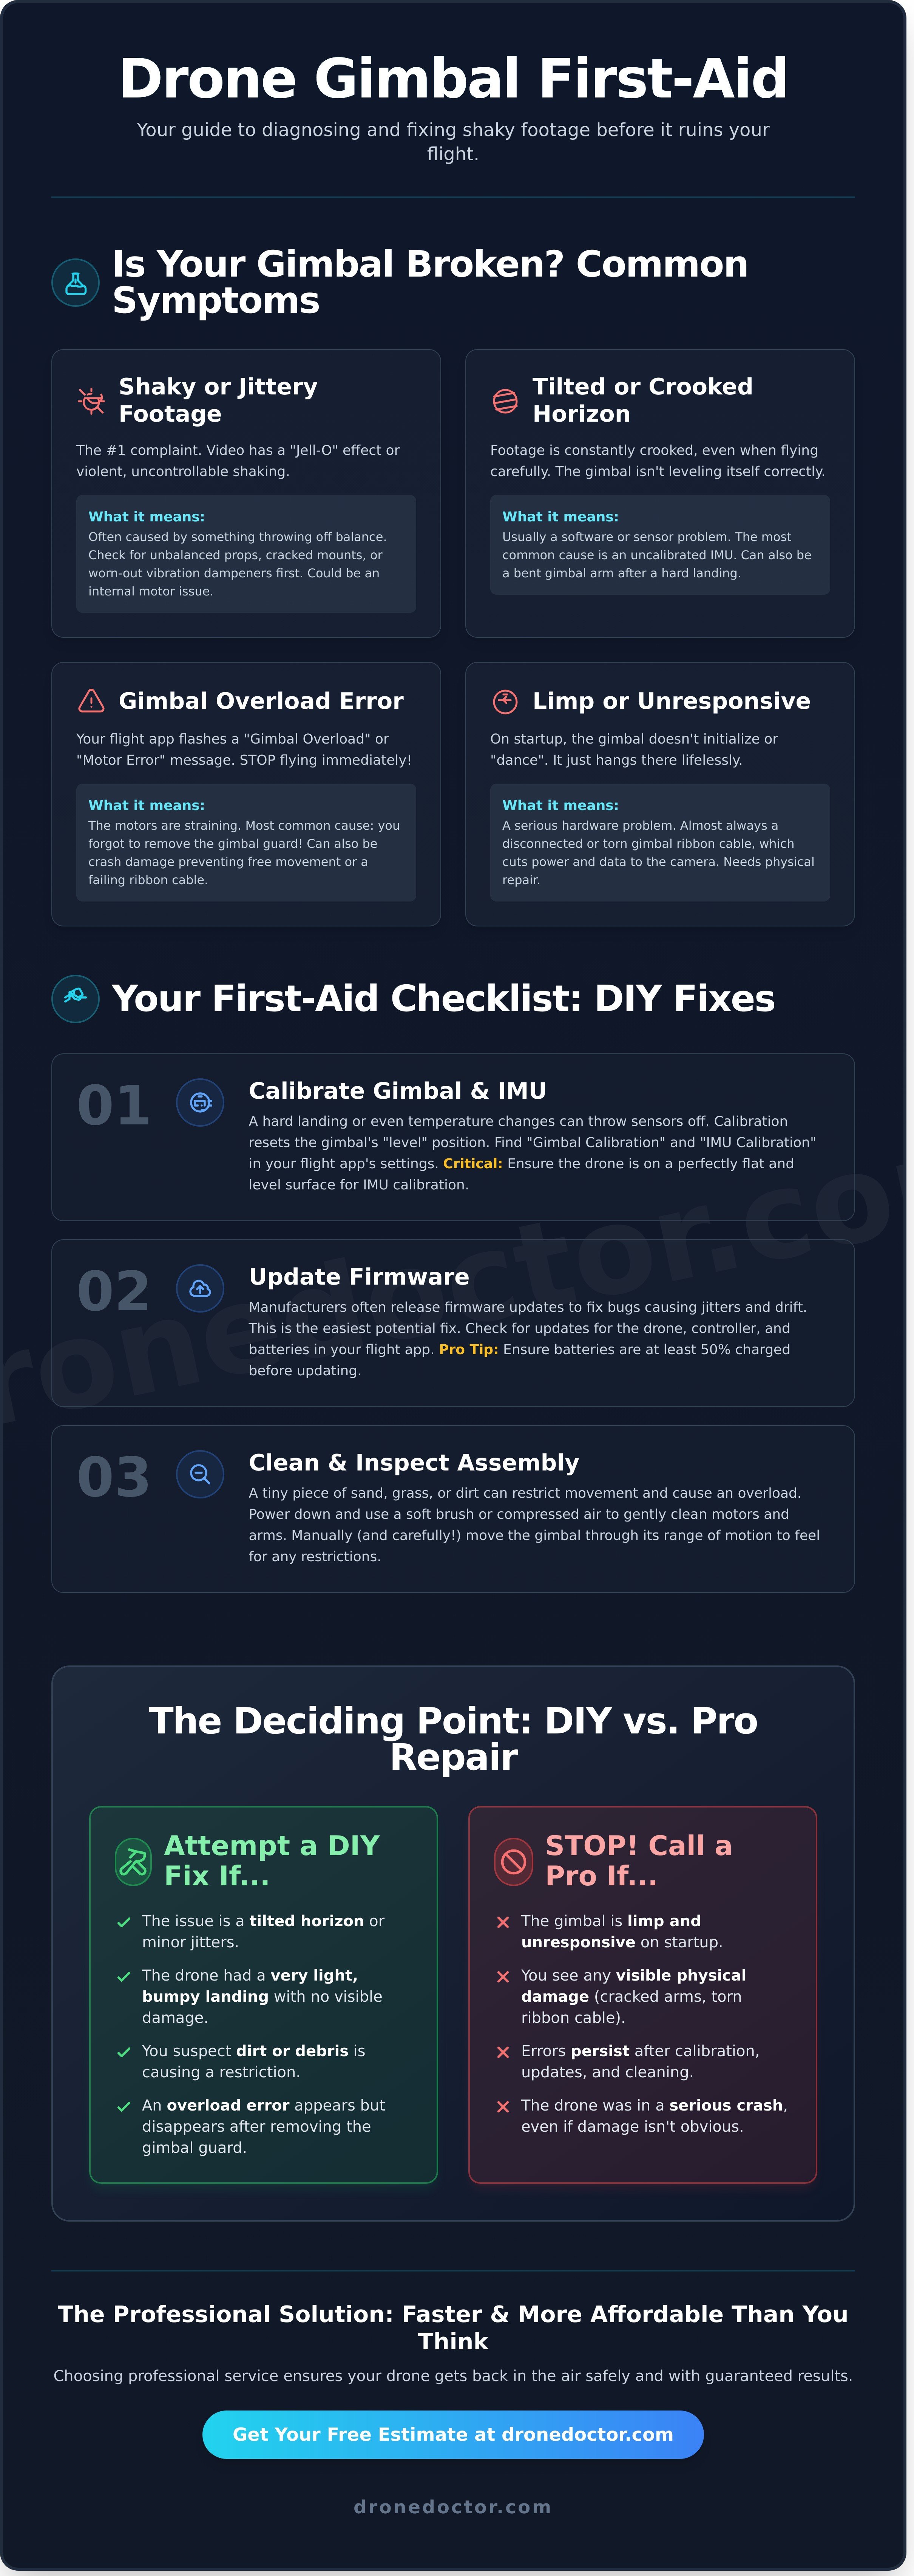
Reparación de Gimbal DIY: Cuándo Intentarlo (y Cuándo DETENERSE)
Lo entendemos. La tentación de abordar una reparación de gimbal de dron por tu cuenta, ahorrar unos cuantos dólares y volver a volar RÁPIDO es fuerte. Para algunos pilotos, un poco de trabajo de bricolaje es una insignia de honor. Pero cuando se trata de la compleja mecánica de un gimbal de dron, la clave para esas tomas suaves como la mantequilla, la línea entre una solución rápida y un desastre costoso es muy fina. El papel del gimbal en la avanzada estabilización de cámaras en UAVs es increíblemente sofisticado, involucrando delicados motores y sensores trabajando en perfecta armonía. Un movimiento equivocado puede dejar tu dron inoperativo para siempre.
Escenarios en los que el DIY Podría Ser Factible
Antes de sacar el juego de herramientas, seamos muy claros: la mayoría de los problemas del gimbal requieren un profesional. Sin embargo, podrías ser capaz de manejar una reparación si se encuadra en una de estas categorías específicas de bajo riesgo:
- Sustitución de amortiguadores de goma: Después de un golpe menor, los amortiguadores de vibración de goma pueden salirse o romperse. Cambiarlos suele ser una solución sencilla que no requiere abrir el cuerpo principal del dron.
- Sustitución de un componente simple: Las piezas externas, de conexión, como una cubierta de gimbal a presión o un filtro de lente agrietado, están diseñadas para un fácil reemplazo por parte del usuario.
- Tienes experiencia previa: Si ya te sientes cómodo trabajando con microconectores, cables flexibles y tienes experiencia en la reparación de productos electrónicos, estás mejor equipado que la mayoría para evaluar el riesgo.
Señales de Advertencia: Cuándo Dejar el Destornillador
Reconocer tus límites es la habilidad más importante en cualquier reparación de drones. Si encuentras alguna de estas señales de alerta, DETENTE inmediatamente y busca ayuda profesional. Seguir adelante no vale la pena el riesgo.
- La reparación implica soldar o manipular un cable flexible frágil y delgado como el papel. Estos son increíblemente fáciles de rasgar o doblar, causando una falla total.
- Ves un error de 'Sobrecarga del Motor del Gimbal'. Esto casi siempre apunta a daños internos graves que un simple cambio de pieza no solucionará.
- Tu dron aún está bajo garantía. Cualquier intento de reparación no autorizado anulará instantáneamente la garantía del fabricante. Punto.
- No tienes las herramientas adecuadas. Si no tienes un juego de destornilladores de precisión, espátulas de plástico y una alfombrilla antiestática, no estás equipado para el trabajo.
Los Costos Ocultos de una Reparación DIY Fallida
Intentar ahorrar $50 en una reparación puede terminar fácilmente costándote $500. Un pequeño error, como pellizcar el cable flexible del gimbal durante el reensamblaje, puede provocar un cortocircuito y quemar la placa base del dron, una falla catastrófica. También podrías gastar dinero pidiendo piezas de repuesto en línea, solo para descubrir que no resuelven la causa raíz del problema.
Lo peor de todo es que un intento de bricolaje fallido a menudo hace que la reparación profesional sea más compleja y costosa, ya que nuestros técnicos primero tienen que diagnosticar y deshacer el nuevo daño. No dejes que una simple reparación se convierta en una pérdida total.
No te arriesgues. ¡Obtén una cotización de reparación profesional sin compromiso hoy mismo!
La Solución Profesional: Por Qué Elegir Drone Doctor para tu Reparación
Si bien una solución DIY puede ser tentadora, un intento fallido puede provocar daños más complejos y costes más elevados. Cuando hay mucho en juego, un servicio profesional no es solo una reparación, es una inversión en el rendimiento y la longevidad de tu dron. En Drone Doctor, eliminamos la incertidumbre y el riesgo de la ecuación, brindándote la tranquilidad que proviene de saber que tu equipo está en manos de expertos certificados. Somos los líderes en ventas, reparación y servicio por una razón.
Técnicos Expertos y Herramientas Especializadas
El gimbal de tu dron es una maravilla de la ingeniería y merece un toque experto. Nuestros técnicos han reparado con éxito miles de gimbals de líderes de la industria como DJI y Autel, habiendo visto todos los problemas imaginables. No solo adivinamos; utilizamos software de diagnóstico de nivel profesional para identificar la raíz exacta del problema. Todas las reparaciones se realizan en un entorno de sala limpia y antiestática, protegiendo los delicados componentes electrónicos de una sola chispa perdida que podría causar una falla catastrófica.
Piezas OEM Originales y Garantía de Calidad
¿Por qué arriesgar un dron de alto rendimiento con una pieza de baja calidad? Utilizamos exclusivamente piezas originales del fabricante (OEM) para garantizar una compatibilidad perfecta y un rendimiento a nivel de fábrica. Este compromiso con la calidad significa que tu dron volará y filmará como lo hacía el primer día. Cada reparación de gimbal de dron que completamos está respaldada por nuestra garantía de servicio integral. Antes de enviártelo de vuelta, tu dron se somete a una rigurosa inspección multipunto y una prueba de vuelo para garantizar un funcionamiento impecable.
Tiempo de Respuesta Rápido para que Vuelvas a Volar
Lo entendemos: el tiempo de inactividad es frustrante. Ya seas un piloto profesional con un trabajo en juego o un aficionado que se pierde días perfectos para volar, necesitas tu dron de vuelta lo antes posible. Nuestro proceso de reparación simplificado está diseñado para la velocidad y la eficiencia, desde el momento en que nos contactas hasta el vuelo de prueba final. Ofrecemos una comunicación clara y constante y un número de seguimiento para que nunca te quedes con la duda sobre el estado de tu reparación. Nuestro objetivo es simple: hacer que vuelvas a volar, más rápido.
Cómo Funciona Nuestro Proceso de Reparación de Gimbal de Drones
¿Te preocupa un proceso de reparación complicado y largo? No te preocupes. En Drone Doctor, hemos simplificado todo para que sea rápido, transparente y completamente centrado en ti. Somos líderes en servicios de drones por una razón: hacemos que sea sencillo que tu equipo vuelva a estar en óptimas condiciones. Aquí tienes un vistazo paso a paso de cómo funciona nuestro experto servicio de reparación de gimbal de dron, desde tu primer clic hasta tu próximo vuelo.
Paso 1: Obtén tu Presupuesto Gratuito en Línea
Todo comienza con nuestro sencillo formulario en línea. Simplemente cuéntanos el problema que estás experimentando con el gimbal de tu dron. Basándonos en tu descripción, nuestro equipo te enviará rápidamente una estimación inicial gratuita y sin compromiso. Obtendrás una idea clara del coste potencial de inmediato y sin compromiso. Es la forma más rápida y sencilla de obtener respuestas y comenzar tu viaje de reparación.
Paso 2: Envíanos tu Dron de Forma Segura
Una vez que estés listo para seguir adelante, es hora de enviar. Te proporcionamos instrucciones claras sobre cómo empaquetar tu dron y gimbal de forma segura para evitar cualquier daño durante el tránsito. ¡Nuestro conveniente servicio de reparación por correo está disponible para pilotos de todo el país! En el momento en que tu dron llegue a nuestras modernas instalaciones, te enviaremos un correo electrónico de confirmación para que sepas que está en manos seguras y expertas.
Paso 3: Diagnóstico, Reparación y Devolución
Aquí es donde nuestros técnicos certificados toman el relevo. Tu dron se somete a una inspección de diagnóstico completa para confirmar la falla y verificar cualquier otro problema potencial. Siempre tienes el control: te contactaremos con un presupuesto final y detallado para tu aprobación antes de que comience cualquier trabajo. Después de que nos des luz verde, completamos la reparación y sometemos tu dron a una rigurosa prueba de vuelo multipunto para garantizar que todo funcione perfectamente. Luego lo empaquetamos de forma segura y te lo enviamos de vuelta, listo para la acción.
¿Listo para empezar? ¡Hagamos que tu dron vuelva a volar!
¡Tu Ruta de Vuelo hacia el Metraje Perfecto Comienza Aquí!
El metraje tembloroso, inclinado o que no responde no tiene por qué significar el fin de la carrera de tu dron. Ahora tienes el conocimiento para detectar problemas comunes del gimbal e incluso probar algunas soluciones rápidas por ti mismo. Lo más importante, sabes cuándo detener un intento de bricolaje y llamar a un profesional para proteger tu inversión de mayores daños.
Cuando necesitas un socio en quien puedas confiar, Drone Doctor es tu solución. Somos los líderes en reparación profesional de gimbal de drones, haciendo que vuelvas a volar con confianza. Nuestros técnicos certificados expertos ofrecen un tiempo de respuesta rápido y confiable, y respaldamos nuestro trabajo con una garantía de servicio en todas las reparaciones. ¡Tu satisfacción es nuestra máxima prioridad!
Deja de permitir que un gimbal defectuoso arruine tus tomas. Da el siguiente paso hacia un video nítido y obtén la ayuda experta que tu dron merece. ¡Actúa AHORA!
¡Obtén tu Presupuesto Gratuito para la Reparación de Gimbal AHORA!
Un metraje perfectamente estable e impresionante está a solo una reparación de distancia. ¡Hagamos que vuelvas a volar alto!
Preguntas Frecuentes sobre la Reparación de Gimbals de Drones
¿Cuánto cuesta una reparación típica de gimbal de dron?
El costo de una reparación de gimbal de dron puede variar mucho según el modelo del dron y el alcance del daño. Una solución sencilla, como reemplazar un cable flexible en un dron de la serie DJI Mini, podría costar entre $100 y $150. Sin embargo, una reparación más compleja que implique el reemplazo del motor o la cámara en un modelo de gama alta como un Mavic 3 podría oscilar entre $300 y $500+. ¡Siempre proporcionamos un presupuesto rápido y gratuito para que sepas el costo exacto antes de que empecemos a trabajar!
¿Cuánto tiempo suele tardar un servicio de reparación de gimbal?
¡Sabemos que quieres volver a volar! Nuestro tiempo de respuesta estándar para la mayoría de las reparaciones de gimbal es de 3 a 5 días hábiles después de recibir tu dron. Esto incluye nuestro completo proceso de diagnóstico, la reparación física y una prueba de vuelo completa para garantizar un rendimiento perfecto. Si necesitamos pedir una pieza especial, podría tardar un poco más, pero nuestro equipo te mantendrá informado en cada paso del camino. ¡Tu satisfacción es nuestra máxima prioridad!
¿Vale la pena reparar un gimbal en un dron antiguo como un DJI Mavic Pro?
¡Absolutamente! El DJI Mavic Pro es un dron fantástico y fiable, y reparar su gimbal es casi siempre más rentable que comprar una aeronave nueva. Si el resto de tu dron está en buen estado de funcionamiento, una reparación profesional del gimbal del dron puede añadir años a su vida por una fracción del costo de un reemplazo. Es una forma inteligente de proteger tu inversión original y mantener un caballo de batalla clásico volando alto para todos tus proyectos.
¿Se puede reparar un gimbal dañado por agua?
Los daños por agua son un desafío, ¡pero la reparación suele ser posible si actúas rápido! El paso más importante es apagar el dron inmediatamente y no intentar volver a encenderlo. Llévalo a un técnico profesional que pueda realizar una limpieza profunda para detener la corrosión. Si bien una inmersión severa o en agua salada puede causar daños permanentes, muchos gimbals con exposición menor al agua pueden ser recuperados con éxito por nuestro equipo de expertos. Te daremos un diagnóstico honesto.
¿Anulará la garantía de mi dron DJI una reparación casera?
Sí, realizar una reparación casera no autorizada en tu dron casi con toda seguridad anulará la garantía del fabricante de DJI. La garantía está diseñada para cubrir defectos de fabricación, no daños accidentales que intentes arreglar tú mismo. Si tu dron aún está bajo su garantía original o cubierto por un plan DJI Care Refresh, te aconsejamos encarecidamente que primero acudas a los canales oficiales de DJI. Para cualquier problema fuera de garantía, ¡somos tu socio de confianza para reparaciones!
¿Cuál es la pieza más común que falla en el gimbal de un dron?
Sin duda, el componente más común que reemplazamos es el cable plano del gimbal. Este delicado cable plano es responsable de transmitir video y datos, pero puede romperse o dañarse fácilmente durante un accidente o incluso un aterrizaje brusco. La segunda falla más frecuente que vemos es un brazo de gimbal agrietado o un motor quemado, que generalmente son causados por un impacto directo que ejerce demasiada tensión en las partes mecánicas del conjunto del gimbal.