

Reparación de la placa base de un dron: La guía definitiva para salvar tu tecnología en 2026
¿Y si ese "Error de estado del ESC" que parpadea en tu controlador no es una sentencia de muerte para tu dron? Probablemente hayas oído que una placa de circuito quemada significa que tus días de vuelo han terminado a menos que desembolses dinero por un reemplazo total. Es un temor común, especialmente con el alto costo de las reparaciones del fabricante y la complejidad de los modernos sistemas de vuelo de 2026. Sin embargo, dominar la reparación de la placa base del dron es el secreto definitivo para mantener tu tecnología en el cielo sin agotar tu cuenta bancaria.
Estamos de acuerdo en que mirar una pequeña placa de circuito es intimidante. No quieres convertir un pequeño fallo en un pisapapeles permanente con un soldador inestable. Esta guía promete desmitificar el proceso de diagnóstico, ayudándote a identificar si tu placa está realmente terminal o solo necesita una reparación de componentes de precisión. Haremos una vista previa de las últimas técnicas de microsoldadura, explicaremos cómo las regulaciones de la FCC de 2026 afectan la adquisición de tus piezas y te mostraremos por qué un cambio de placa base podría requerir que actualices tu registro de la FAA dentro de los 14 días. ¡Hagamos que tu tecnología vuelva a volar!
Puntos Clave
- Domina las señales de alerta de diagnóstico de fallas en la placa principal para identificar problemas de energía y desconexiones de sensores antes de que paralicen tu flota.
- Evalúa la dificultad de "Nivel 10" de las reparaciones de bricolaje y aprende a proteger tus componentes electrónicos sensibles de descargas electrostáticas fatales.
- Explora el proceso de microsoldadura de alta intensidad utilizado en la reparación profesional de placas base de drones para rescatar MOSFET quemados y condensadores en cortocircuito.
- Usa la "Regla del 50%" para calcular si una reparación de precisión o un reemplazo completo es la medida más rentable para tu tecnología de 2026.
- Conéctate con técnicos expertos que utilizan laboratorios de última generación para restaurar las placas DJI y Autel a su rendimiento de fábrica óptimo.
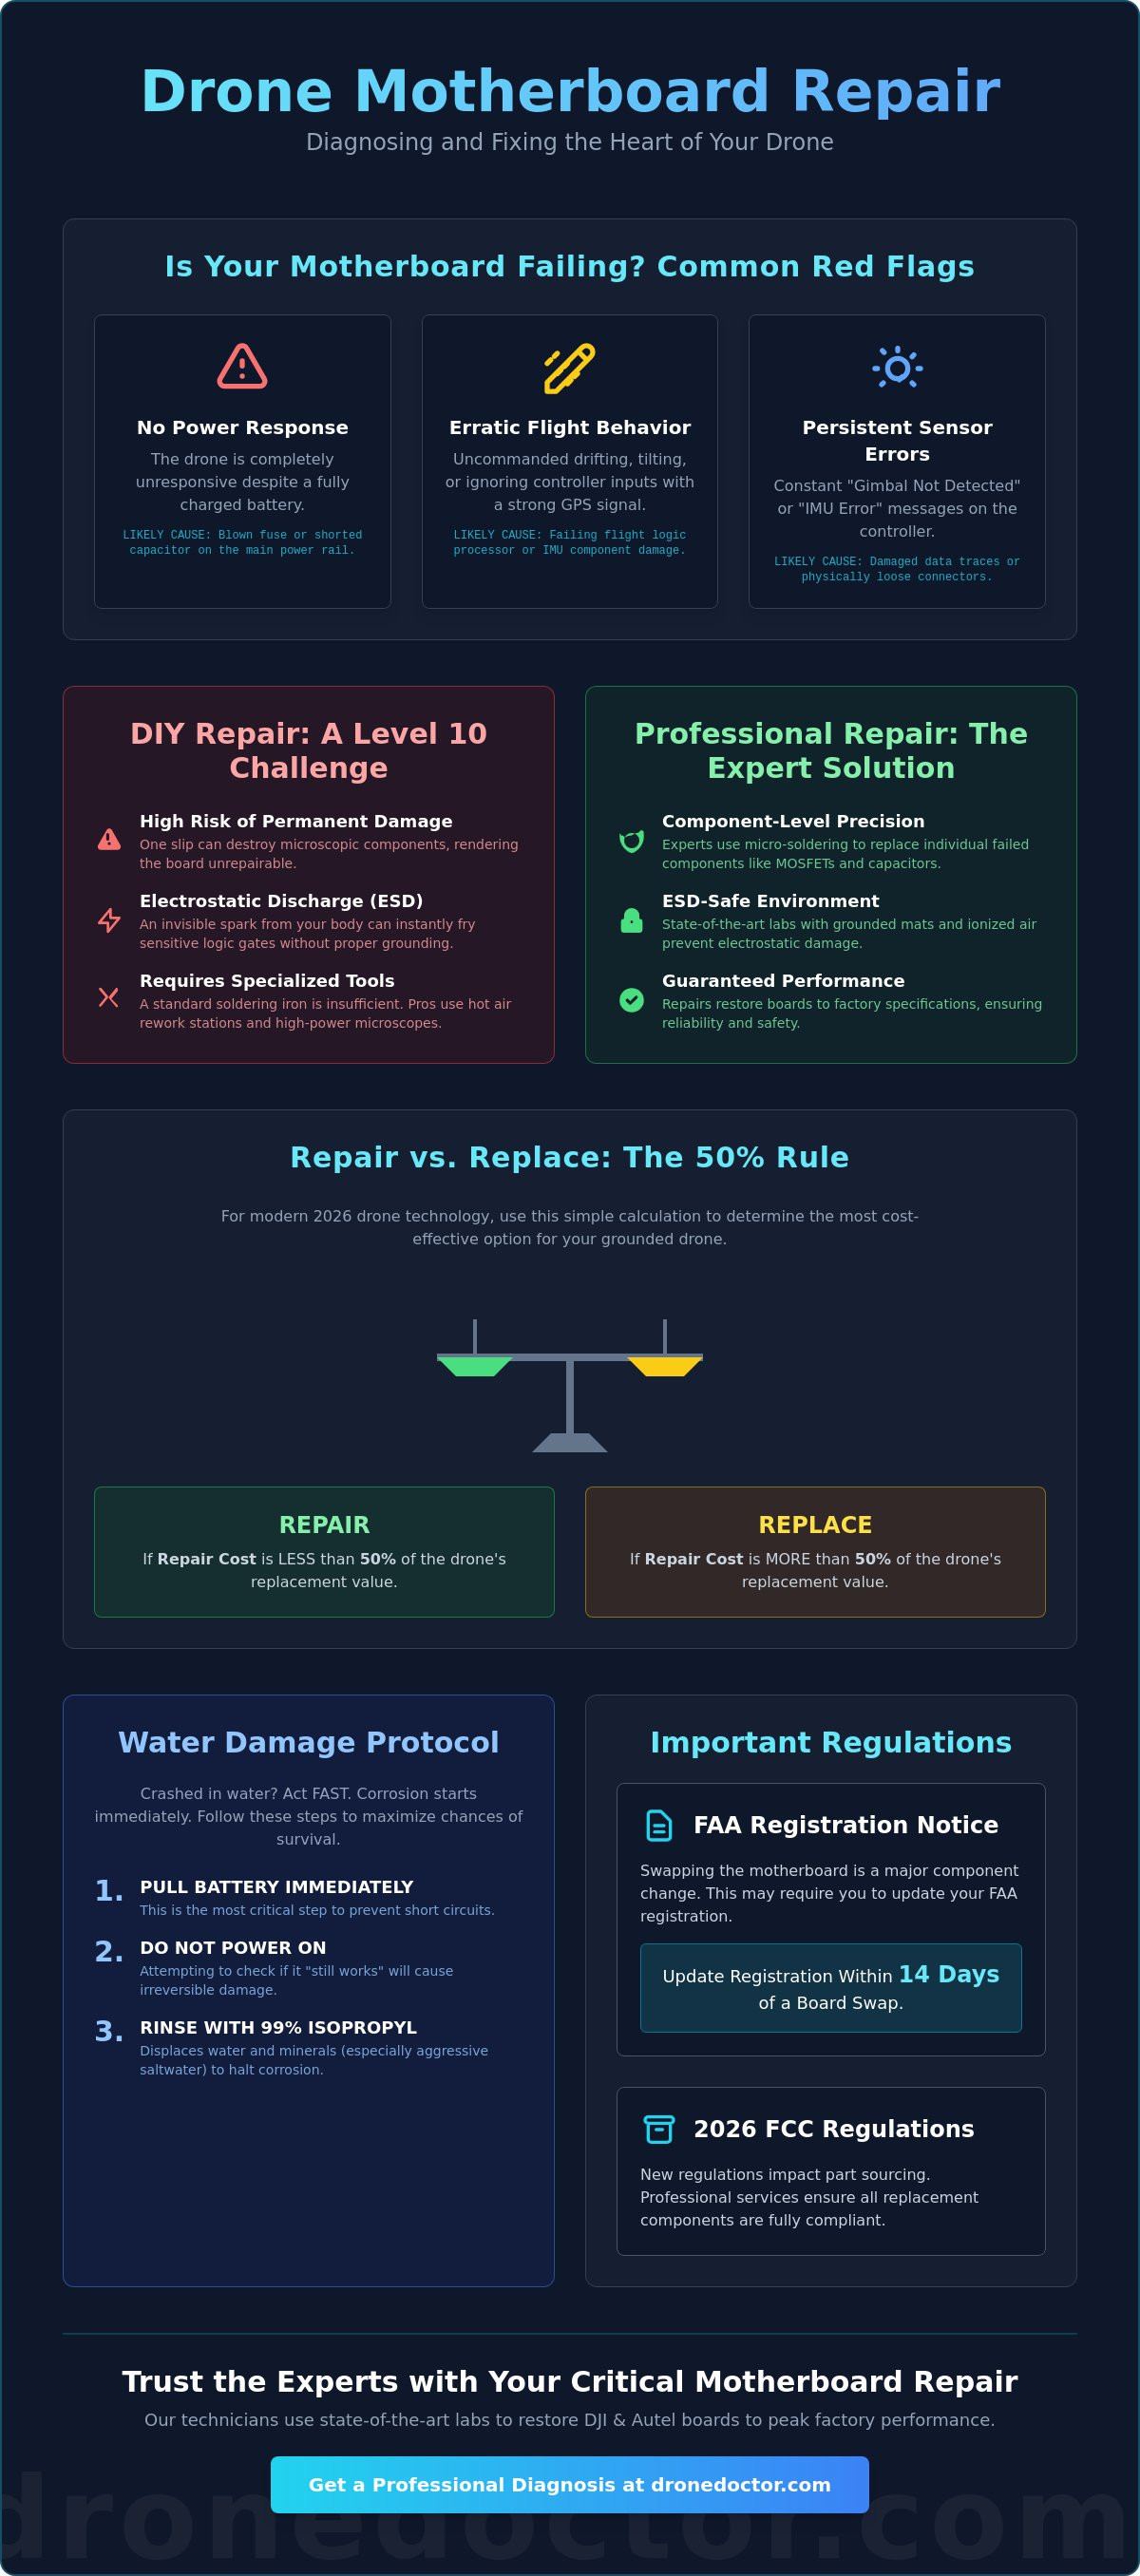
¿Qué causa la falla de la placa base de un dron? Síntomas y diagnósticos
La placa base de tu dron es el sistema nervioso central de tu aeronave. Esta placa de circuito impreso (PCB) especializada orquesta el flujo de energía, los datos del GPS y los comandos del motor simultáneamente. Cuando este componente central falla, tu inversión de alta tecnología se convierte en un pisapapeles caro. Comprender el "porqué" de la falla es el primer paso hacia una exitosa reparación de la placa base del dron. La mayoría de los problemas provienen de tres áreas: impacto físico, sobretensiones eléctricas del controlador de velocidad electrónico (ESC) o exposición ambiental.
No asumas que una pantalla oscura significa una pérdida total. La lógica de diagnóstico es tu mejor amiga aquí. Comienza por verificar estos síntomas comunes de falla:
- Sin respuesta de energía: La batería está llena, pero el dron permanece en silencio. Esto a menudo indica un fusible quemado o un condensador en cortocircuito en el riel de alimentación principal.
- Comportamiento de vuelo errático: Si tu dron se desvía o ignora comandos a pesar de una señal GPS fuerte, el procesador de lógica de vuelo podría estar fallando.
- Desconexiones de sensores: Los mensajes constantes de "Gimbal no detectado" o "Error de IMU" suelen indicar trazas dañadas o conectores sueltos en la placa.
El ESC juega un papel masivo en la salud de la placa base. Administra el alto voltaje de salida a tus motores. Si un motor se detiene o golpea un objeto, el pico de energía resultante puede viajar hacia atrás, quemando los MOSFET de tu placa base. Antes de comprometerte con una reparación de hardware, verifica que no sea un fallo de firmware. Una placa "bloqueada" a veces ocurre después de una actualización fallida. Intenta un restablecimiento de fábrica forzado a través del software de tu asistente de escritorio primero. Si la placa sigue sin responder, es probable que estés lidiando con una falla física de hardware que requiere una reparación profesional de la placa base del dron.
Códigos de error comunes y qué significan
Las aplicaciones modernas como DJI Fly son sorprendentemente específicas. Un "Error de conexión de la placa principal" es una señal directa de que el procesador no se está comunicando con sus periféricos. Si ves un "Error de estado del ESC", es probable que estés viendo una falla del MOSFET. Estos pequeños componentes regulan el voltaje; cuando explotan, el circuito se rompe. Utiliza los registros de diagnóstico internos de tu dron para buscar irregularidades de voltaje. Las caídas repentinas en rieles de energía específicos casi siempre confirman que un componente de la placa ha llegado al final de su vida útil.
El impacto del daño por agua y sal
La corrosión es un asesino lento. Incluso si tu dron vuela después de un chapuzón rápido, los minerales en el agua comienzan a puentear las trazas microscópicas de tu PCB inmediatamente. El agua salada es especialmente agresiva, actuando como un electrolito que acelera la electrólisis. Si te estrellas en el agua, retira la batería al instante. No intentes encenderlo para "ver si funciona". Enjuaga la placa con alcohol isopropílico al 99% para desplazar el agua y detener la reacción química. La limpieza profesional en un baño ultrasónico suele ser la única forma de salvar la placa de futuras fallas.
Reparación de la placa base del dron: ¿Bricolaje o profesional? Los riesgos involucrados
¿Estás pensando en abordar una reparación de la placa base de un dron en la mesa de tu cocina? Es hora de un baño de realidad. Si bien cambiar una carcasa o reemplazar un motor es una reparación de "Nivel 3", trabajar en la placa central es un "Nivel 10" sólido. Las placas base de los drones modernos están repletas de miles de componentes del tamaño de un grano de arena. Un solo resbalón de un destornillador o un segundo de demasiado calor puede convertir una placa de $400 en chatarra al instante. Esto no se trata solo de seguir un video de YouTube. Se trata de tener las manos firmes de un cirujano y el entorno adecuado.
La descarga electrostática (ESD) es el enemigo oculto en cualquier intento de bricolaje. No puedes verla, sentirla ni oírla, pero una pequeña chispa de tu dedo puede destruir puertas lógicas sensibles. Los profesionales utilizan alfombrillas con conexión a tierra, correas de muñeca antiestáticas y aire ionizado especializado para prevenir este asesino invisible. Si no estás correctamente conectado a tierra, te estás jugando el todo o nada cada vez que tocas la PCB. Solo este riesgo es la razón por la que la mayoría de los aficionados deberían pensarlo dos veces antes de abrir el núcleo de su dron.
El éxito también requiere un costoso arsenal de herramientas especializadas. Un soldador estándar de la ferretería no será suficiente. Necesitas una estación de retrabajo de aire caliente digital para levantar chips sin destruir las pistas circundantes. Los microscopios de alta magnificación son esenciales solo para ver las uniones de soldadura microscópicas en las que estás trabajando. También necesitas fundente pegajoso de alta calidad para asegurar que el calor se transfiera uniformemente a través del componente. Si te cuesta ver las piezas o si tu soldadura no fluye suavemente, detente inmediatamente. Continuar suele llevar a un "desprendimiento de almohadillas", lo que hace que la placa sea irreparable incluso para los técnicos más experimentados.
La realidad de la microsoldadura
Los soldadores estándar son demasiado romos para los drones modernos. Descargan demasiado calor en la placa, lo que provoca que las delicadas capas de cobre se delaminen. La mayoría de los modelos de drones de 2026 utilizan chips Ball Grid Array (BGA). Estos procesadores tienen cientos de pequeñas bolas de soldadura ocultas debajo del propio chip. Reemplazar o "reflujar" uno requiere equipos de reboleado profesionales y perfiles térmicos precisos. Usar la aleación de soldadura incorrecta es otro error común. Los componentes sometidos a estrés de vuelo necesitan aleaciones específicas sin plomo o con plata para soportar las vibraciones y la expansión térmica del vuelo de alto rendimiento.
Problemas de calibración y vinculación de software
Incluso si suelda con éxito un nuevo componente, es posible que encuentre un muro digital. DJI y otras marcas importantes utilizan la serialización de componentes patentada. Esto significa que una nueva placa base podría negarse a "hablar" con su gimbal o controlador remoto existente sin una autorización de software de nivel profesional. Este dolor de cabeza de "vinculación" es la razón por la que muchos aficionados terminan con un dron que se enciende pero se niega a despegar. Si está atascado en un bloqueo digital, nuestros servicios de reparación de drones brindan el soporte de calibración necesario para sincronizar su hardware y volver a volar de manera segura.
El proceso de reparación a nivel de componentes: cómo los expertos arreglan las placas
La mayoría de los centros de servicio del fabricante te dirán que un reemplazo completo de la unidad es la única forma de manejar un dron "muerto". Nosotros no estamos de acuerdo. Si bien se enfocan en reemplazos de alto volumen, los técnicos expertos utilizan precisión quirúrgica para realizar la reparación de la placa base del dron a nivel de componentes. Este proceso te ahorra dinero y mantiene hardware perfectamente bueno fuera de los vertederos. Reparar un solo chip dañado en lugar de tirar toda la placa es el estándar de oro para la sostenibilidad tecnológica en 2026. Aquí está el flujo de trabajo exacto de cinco pasos que los profesionales usan para resucitar tu equipo.
- Paso 1: Limpieza ultrasónica profunda. Antes de que comience cualquier prueba, la placa se somete a un baño de alta frecuencia para eliminar el polvo microscópico, las marcas de carbono de los cortocircuitos y la oxidación.
- Paso 2: Prueba con multímetro. Los técnicos usan multímetros de alta precisión para "buscar" cortocircuitos. Al verificar la resistencia en los rieles de alimentación principales, pueden identificar exactamente qué condensador o MOSFET ha fallado.
- Paso 3: Extracción de componentes de precisión. Usando una estación de retrabajo de aire caliente digital, el técnico calienta cuidadosamente el área objetivo. Se utilizan pinzas especializadas para levantar el componente fallido sin perturbar las piezas circundantes de tamaño 0201.
- Paso 4: Microsoldadura. Se suelda un nuevo componente de grado de fábrica en la PCB original. Esto requiere una mano firme y ópticas de alta magnificación para asegurar que las uniones sean perfectas.
- Paso 5: Pruebas de estrés. La placa no solo se enciende; se lleva al límite. Los técnicos verifican la estabilidad del voltaje bajo carga para asegurar que la reparación de la placa base del dron resistirá durante maniobras de vuelo agresivas.
Limpieza ultrasónica para daños por líquidos
Los daños por líquidos requieren algo más que un simple secado con toalla. Utilizamos ondas sonoras de 40 kHz en un baño químico especializado para crear millones de burbujas microscópicas que "implosionan" contra la placa. Este proceso, conocido como cavitación, llega profundamente debajo de los chips BGA para eliminar la corrosión que la limpieza manual no puede alcanzar. Siempre seguimos esto con un enjuague de alcohol isopropílico al 99% para desplazar cualquier solución de limpieza restante. Para ser claros, enterrar tu dron en un cuenco de arroz es un mito total que en realidad acelera la corrosión interna al atrapar la humedad contra las delicadas pistas.
Imágenes térmicas en el diagnóstico
Los diagnósticos en 2026 dependen en gran medida de la tecnología térmica FLIR. Al inyectar una pequeña cantidad de voltaje en un riel "en cortocircuito", los técnicos pueden observar la placa a través de una cámara térmica. El componente fallido brillará en blanco brillante en la pantalla, mostrando exactamente dónde se está desperdiciando la energía en forma de calor. Este enfoque basado en datos evita el reemplazo innecesario de componentes y nos permite visualizar el flujo de energía. Es la forma más fiable de verificar una reparación antes de autorizar el dron para un vuelo de prueba.
Reparar vs. Reemplazar: Un análisis costo-beneficio para 2026
Decidir entre una reparación de la placa base del dron y un reemplazo completo es la elección financiera más crítica que harás para tu flota. En 2026, la "Regla del 50%" sigue siendo el estándar de oro de la industria para la toma de decisiones inteligentes. Si el costo de tu reparación supera el 50% del valor minorista actual del dron, una actualización suele ser el mejor camino. Por ejemplo, con un DJI Mini 4 Pro que se vende a $759 en marzo de 2026, cualquier presupuesto de reparación superior a $380 sugiere que deberías considerar una nueva unidad. Sin embargo, la mayoría de las reparaciones a nivel de componentes caen muy por debajo de este umbral, lo que convierte la restauración en la clara ganadora para tu bolsillo.
Elegir reparar no se trata solo de dinero; es la opción más ecológica. Desechar una placa base crea residuos electrónicos innecesarios e ignora el valor de las piezas de alto rendimiento restantes de su dron. Una placa reparada profesionalmente tampoco disminuye su valor de reventa. De hecho, los datos de fuentes de la industria muestran que el 92% de las reparaciones certificadas funcionan exactamente como nuevas, lo que da a los compradores la confianza de que la tecnología está lista para volar. Si bien una garantía del fabricante puede parecer segura, las garantías de talleres de reparación especializados a menudo brindan un soporte más personalizado para modelos más antiguos que los fabricantes podrían retirar debido a los cambios regulatorios de 2026.
Cálculo del retorno de la inversión en reparaciones
Compara los números antes de comprometerte. Un cambio completo de gimbal en un Mavic 3 Pro promedia $415, mientras que un reemplazo de placa base puede superar fácilmente los $300. La reparación de la placa base de un dron a nivel de componente a menudo cuesta una fracción de un cambio total de placa. No olvides tener en cuenta los deducibles de los programas de "renovación", que a veces pueden ser más altos que una reparación específica. Si tu dron está totalmente inutilizable y las cuentas no cuadran, consulta nuestra guía sobre drones en venta para encontrar tu próxima actualización.
Consideraciones para drones empresariales e industriales
Para los usuarios empresariales, lo que está en juego es enorme. Reparar un DJI Matrice 350 RTK de $12,500 por $1,850 es una inversión obvia. El costo real no son las piezas; es el tiempo de inactividad. Para una empresa de inspección de puentes, un dron en tierra resulta en $3,200 de ingresos facturables perdidos por día. Una reparación rápida de componentes supera la espera de semanas por los plazos de entrega del fabricante. Nuestro equipo garantiza que sus registros de vuelo y datos confidenciales permanezcan seguros durante todo el proceso. ¿Listo para volver al trabajo? Confíe en los expertos para sus servicios de reparación de drones y detenga la fuga de ingresos hoy mismo.
Confíe en Drone Doctor LLC para sus reparaciones críticas de placas base
Deja de estresarte por tu tecnología en tierra y deja que los profesionales se encarguen del trabajo pesado. En Drone Doctor LLC, nuestros técnicos viven y respiran la electrónica de drones, especializándose en el complejo circuito de las placas DJI, Autel y FPV personalizadas. Hemos pasado años perfeccionando nuestro oficio para garantizar que cada reparación de placa base de dron cumpla con los más altos estándares de la industria. Nuestro laboratorio de microsoldadura de última generación está específicamente equipado para la tecnología de 2026, con lo último en óptica de alta magnificación y sistemas de gestión térmica de precisión.
Entendemos que enviar tu equipo costoso requiere una inmensa confianza. Por eso, Drone Doctor LLC opera con una política de diagnóstico transparente de "No hay reparación, no hay tarifa". Si nuestros expertos determinan que tu placa está verdaderamente más allá de la salvación, no se te cobrará por el intento. Nos enfocamos en que vuelvas a volar de inmediato, priorizando tiempos de respuesta rápidos sin sacrificar la calidad. Has invertido mucho en tu equipo; no te conformes con un taller local que "cree" que puede arreglarlo cuando puedes trabajar con una autoridad dedicada.
- Especialistas expertos: Manejamos todo, desde la serie Mini de consumo hasta las placas Matrice Enterprise de alta capacidad.
- Estándares de laboratorio de 2026: Nuestras instalaciones utilizan filtración de aire ionizado y entornos seguros contra ESD para proteger sus delicadas puertas lógicas.
- Precios transparentes: Sabrá exactamente qué necesita ser reparado antes de que tomemos un soldador.
- Resultados probados: Nos centramos en reparaciones a nivel de componentes que le ayudan a evitar el alto coste de un reemplazo completo de la unidad.
Nuestro proceso de reparación por correo
Enviar tu dron no debería sentirse como enviarlo a un agujero negro. Hemos optimizado nuestro sistema de envío por correo para que sea tan fluido como un vuelo de gimbal estabilizado. Comienza empacando tu dron de forma segura en su estuche original o en una caja resistente y acolchada. Una vez que llegue a nuestras instalaciones, recibirás actualizaciones de seguimiento en tiempo real a medida que tu placa base avance por nuestras bahías de diagnóstico y reparación. No solo soldamos y enviamos. Cada placa se somete a una rigurosa verificación aérea mediante pruebas de vuelo finales. Nos aseguramos de que tu GPS, la evitación de obstáculos y los sistemas de energía estén 100% estables antes de que tu tecnología salga de nuestro laboratorio.
Por qué la experiencia es importante en la electrónica de drones
La diferencia entre un rescate exitoso y una pérdida total a menudo se reduce a la experiencia del técnico con diseños de placas específicos. El equipo de Drone Doctor LLC tiene un historial probado de rescates exitosos a nivel de componentes que otros talleres consideraron imposibles. Nos negamos a usar componentes de imitación de terceros baratos. Nuestro compromiso con tu seguridad significa que solo usamos piezas con especificaciones OEM o de mayor calidad para cada reparación de placa base de dron. Esta dedicación a la excelencia es la razón por la que la comunidad de drones confía en nosotros con su hardware más crítico. Deja de esperar y vuelve a volar. ¡Obtén tu presupuesto gratuito de reparación de placa base de dron hoy mismo!
Toma el control de tu futuro de vuelo hoy
Su dron es una inversión en precisión y rendimiento. No permita que una falla en la placa base lo convierta en una pieza de exhibición permanente. Ya ha visto que los diagnósticos expertos pueden identificar la falla exacta, revelando a menudo que un solo componente diminuto es todo lo que se interpone entre usted y su próximo vuelo. Al optar por una reparación profesional de la placa base de su dron, elige un camino más inteligente y sostenible que los costosos reemplazos de la unidad. Se trata de maximizar la vida útil de su hardware manteniendo los costos manejables y su tecnología fuera del vertedero.
Nuestro laboratorio experto en microsoldadura utiliza los últimos estándares tecnológicos de 2026 para resucitar incluso las placas más dañadas. Somos distribuidores autorizados de piezas DJI y empresariales, lo que garantiza que su equipo sea reparado con los componentes de la más alta calidad disponibles. Además, nuestro rápido servicio de envío a nivel nacional significa que volverá a estar en el aire antes de lo que cree. Estamos aquí para brindarle la tranquilidad de saber que su tecnología está en manos de expertos apasionados que valoran cada vuelo. Deje de estresarse y comience a volar de nuevo.
¡Salva tu dron ahora – Obtén una cotización de reparación profesional!
Preguntas Frecuentes
¿Se puede reparar la placa base de un dron después de un daño por agua?
Sí, la placa base de un dron a menudo se puede salvar después de un daño por agua si actúa rápidamente. La clave es quitar la batería inmediatamente y evitar el "truco del arroz", que en realidad atrapa la humedad y acelera la corrosión. Los técnicos profesionales utilizan limpiadores ultrasónicos especializados para eliminar los minerales de debajo de los componentes microscópicos. Si el líquido no ha corroído físicamente las pistas del circuito, la microsoldadura de precisión a menudo puede restaurar la funcionalidad completa de la placa.
¿Cuánto cuesta reparar la placa base de un dron?
El costo de una reparación de placa base varía según los componentes específicos que fallaron y el modelo de su aeronave. Si bien los reemplazos completos de la placa suelen ser la opción más cara, las reparaciones a nivel de componente suelen ofrecer ahorros significativos. Debe sopesar cualquier presupuesto de reparación con la "regla del 50 %" mencionada anteriormente en esta guía. Si la reparación cuesta menos de la mitad del precio de un dron nuevo, es una inversión inteligente para mantener su tecnología en vuelo.
¿Es mejor reemplazar la placa base o comprar un dron nuevo?
Decidir entre una reparación y una nueva compra depende del valor de mercado actual de su dron y de la gravedad del daño. Para los modelos empresariales de gama alta, una reparación de la placa base del dron es casi siempre la decisión financiera más inteligente debido al alto costo de reemplazo. Para los modelos de consumo, quédese con la reparación si el costo es inferior al 50 % del precio de una unidad nueva. Este enfoque le ahorra dinero y reduce los desechos electrónicos ambientales.
¿Cuáles son los signos de una placa base de dron defectuosa?
Los signos comunes incluyen que el dron se niegue a encenderse a pesar de tener la batería llena, errores persistentes de "conexión de la placa central" o un comportamiento de vuelo errático. También puede notar que sensores específicos como el gimbal o el GPS no se conectan incluso después de las actualizaciones de software. Si ve marcas de quemaduras visuales en la PCB u huele un olor eléctrico distinto, estos son indicadores definitivos de que su placa necesita atención profesional de un experto en microsoldadura.
¿Puedo usar una placa base de un modelo de dron diferente?
No, no puede intercambiar placas base entre diferentes modelos de drones. Cada placa está diseñada con precisión para un marco, un conjunto de motores y una matriz de sensores específicos. Incluso dentro de la misma serie, las revisiones de hardware menores a menudo hacen que las placas sean incompatibles con carcasas más antiguas o más nuevas. Intentar forzar la placa de un modelo diferente probablemente resultará en "bloqueos" de software o daños físicos a sus componentes debido a desajustes de voltaje y diferencias de conectores.
¿Cuánto tiempo suele tardar una reparación profesional de la placa base?
La mayoría de las reparaciones profesionales de placas base tardan entre tres y siete días hábiles una vez que la unidad llega a un laboratorio especializado. Este plazo incluye la fase de diagnóstico profundo, la microsoldadura de precisión y las rigurosas pruebas de vuelo posteriores a la reparación. Los casos complejos que implican daños extensos por líquidos o el suministro de componentes raros pueden tardar un poco más. Priorizamos que vuelva a volar rápidamente, asegurándonos de que cada unión de soldadura sea perfecta y estable en vuelo.
¿Ofrecen garantía en los servicios de microsoldadura de placas base?
Sí, ofrecemos una garantía dedicada en nuestros servicios de reparación de placas base de drones para brindarle total tranquilidad. Respaldamos nuestra experiencia técnica y los componentes de alta calidad que utilizamos. Si la pieza específica que reparamos falla dentro del período de garantía en condiciones de vuelo normales, abordaremos el problema. Este compromiso garantiza que su dron siga siendo una herramienta confiable para sus necesidades profesionales o recreativas.
¿Mi dron necesitará recalibración después de una reparación de la placa base?
Sí, su dron casi con certeza necesitará recalibración después de cualquier reparación de la placa central. La reparación o el reemplazo de los componentes lógicos restablece los datos del sensor que el dron utiliza para la estabilidad. Deberá realizar calibraciones IMU, de brújula y de gimbal a través de su aplicación de vuelo antes de su primer despegue. Nuestro equipo se encarga de estas calibraciones críticas como parte de nuestro servicio estándar para garantizar que su primer vuelo sea perfectamente estable y seguro.