

Cómo reparar una hélice de dron rota: Guía de seguridad y pasos de reparación (2026)
Ese *chasquido* nauseabundo. En un momento estás capturando imágenes aéreas épicas, al siguiente tu dron está en tierra con una hélice dañada. La frustración es real, ¿es seguro volar? ¿Qué reemplazo necesitas? El miedo a una falla catastrófica en pleno vuelo puede mantener en tierra incluso al piloto más experimentado. Esperar semanas para que llegue una pequeña pieza es inaceptable. Por eso, saber exactamente cómo arreglar una hélice de dron rota no es solo una habilidad útil; es una parte esencial para volar con confianza. Estamos aquí para devolverte al asiento del piloto, rápido.
Como líderes en reparación y servicio de drones, hemos incluido en esta guía todo lo que necesitas. ¡Olvídate de las conjeturas! Aprenderás cómo diagnosticar instantáneamente cualquier daño en la hélice y obtendrás un "sí/no" claro sobre si es reparable. Te guiaremos a través del proceso de reemplazo preciso, paso a paso, e incluso compartiremos nuestros consejos profesionales para evitar futuras roturas. Hagamos que tu dron esté listo para volar y regrese al cielo donde pertenece. ¡Tu próxima aventura te espera! 🔥
Puntos Clave
- Aprende la regla de seguridad #1: descubre por qué pegar una hélice es una receta garantizada para un choque más catastrófico debido a las RPM extremas.
- Distingue entre un simple problema de aspa y un eje de motor doblado más grave utilizando nuestra "Prueba de giro manual" rápida antes de pedir piezas.
- Domina el procedimiento correcto para arreglar una hélice de dron rota, desde el uso de las herramientas adecuadas hasta su extracción sin dañar los tornillos del motor.
- Identifica las señales críticas de daño interno que significan que una solución casera no es suficiente y es hora de llamar a un profesional de Drone Doctor LLC.
Tabla de Contenidos
- Identificación del daño: grietas, astillas y problemas de "no gira"
- La regla de oro: por qué NUNCA debes pegar una hélice rota
- Más allá de la hélice: Solución de problemas del motor y el ESC
- Guía paso a paso para reemplazar las hélices de tu dron
- Reparación profesional de drones: cuando el "hazlo tú mismo" no es suficiente
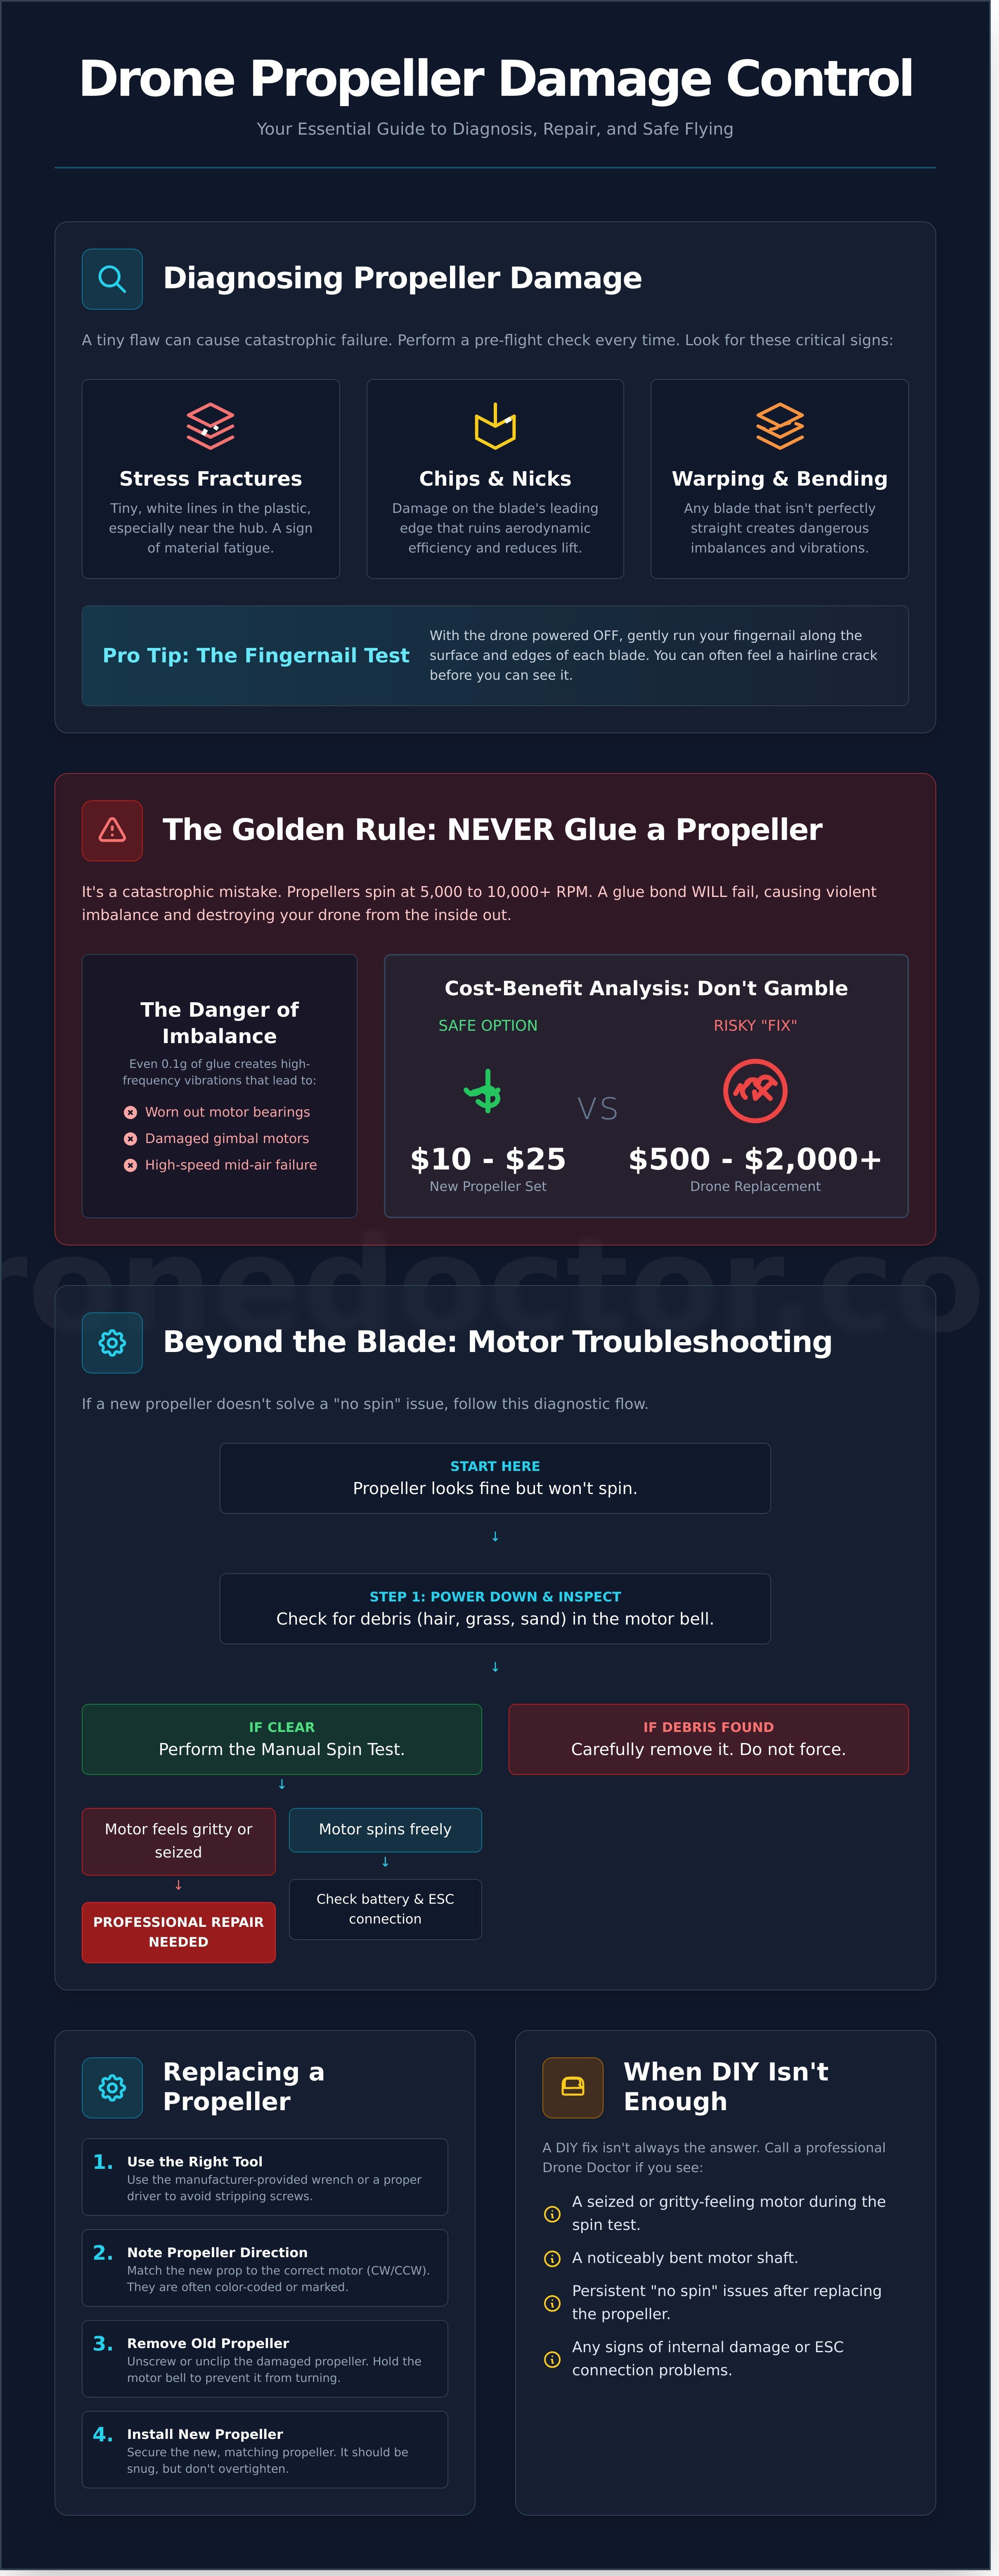
Identificación del daño: grietas, astillas y problemas de "no gira"
Antes de que puedas volar tu vehículo aéreo no tripulado (UAV), una revisión exhaustiva previa al vuelo de sus hélices es innegociable. Una hélice dañada no es solo un defecto estético; es una falla crítica que espera suceder. El primer paso para aprender cómo arreglar una hélice de dron rota es diagnosticar correctamente el problema, porque incluso un pequeño desequilibrio puede provocar vibraciones graves, inestabilidad en el vuelo y una falla catastrófica en el aire. No arriesgues tu equipo costoso; ¡aprende a detectar las señales de peligro ahora!
¿Qué hace que una hélice esté "rota"? Es más que solo un chasquido limpio. Busca estas señales:
- Fracturas por tensión: Pequeñas líneas, a menudo blancas, en el plástico, generalmente cerca del buje donde se aplica la mayor fuerza.
- Astillas y mellas: Cualquier daño en el borde de ataque de la pala, lo que arruina su eficiencia aerodinámica.
- Deformación o doblado: Una pala que ya no está perfectamente recta creará desequilibrios peligrosos.
Para daños invisibles, utiliza la Prueba de la uña. Apaga tu dron, luego pasa suavemente la uña por la superficie y los bordes de cada pala. A menudo sentirás una grieta fina mucho antes de poder verla. Si encuentras una, esa hélice está en tierra. Punto.
Señales visuales de fatiga de la hélice
Tus ojos son tu mejor herramienta. Durante la inspección previa al vuelo, busca marcas de tensión blancas en las palas de policarbonato, especialmente alrededor del soporte del motor. Revisa los bordes de ataque en busca de cualquier astilla que pueda interrumpir el flujo de aire y reducir la sustentación. Finalmente, verifica si hay problemas de "seguimiento de la pala" girando la hélice lentamente con la mano. Si la punta de una pala se asienta notablemente más alta o más baja que la otra, la hélice está doblada y debe reemplazarse inmediatamente.
Cuando la hélice parece estar bien pero no gira
A veces el problema no es la hélice en sí. Si una hélice no gira pero parece intacta, es posible que tengas un problema mecánico o eléctrico. Primero, apaga completamente y verifica si hay residuos como cabello, hierba o arena enredados en la campana del motor. Si está limpia, intenta girar suavemente el motor con la mano. Un motor atascado o que se siente áspero necesita un servicio profesional. Si el motor gira libremente, verifica que la batería esté completamente cargada y que el ESC (Controlador Electrónico de Velocidad) esté correctamente conectado.
La regla de oro: por qué NUNCA debes pegar una hélice rota
Cuando los pilotos buscan cómo arreglar una hélice de dron rota, a menudo encuentran "trucos" peligrosos en línea que involucran superpegamento. Seamos perfectamente claros: esto es un error catastrófico a punto de ocurrir. Las hélices de tu dron son perfiles aerodinámicos de ingeniería de precisión que giran a una increíble velocidad de 5,000 a 10,000+ RPM. A estas velocidades, las palas están sometidas a una inmensa fuerza centrífuga, y una simple unión con pegamento, por muy fuerte que parezca, fallará de forma espectacular.
El verdadero peligro radica en el equilibrio. Una hélice de fábrica está perfectamente equilibrada hasta una fracción de gramo. Agregar incluso 0.1 g de pegamento a una pala crea un desequilibrio violento. Esta vibración constante y de alta frecuencia no solo arruina tus imágenes de video; destruye activamente tu dron desde adentro hacia afuera al desgastar los cojinetes del motor y dañar los delicados motores del gimbal. ¡No conviertas un pequeño problema en una reparación importante!
El mito del superpegamento y el bicarbonato de sodio
Si bien este popular truco de bricolaje crea una unión dura similar al plástico, compromete por completo la integridad estructural y el perfil aerodinámico de la hélice. La reacción química añade un peso impredecible y crea un punto débil frágil justo donde la pala necesita flexionarse. Este desequilibrio es un camino directo a la falla prematura del motor, video gelatinoso por la vibración del gimbal y, en última instancia, un desmontaje aéreo a alta velocidad. Es un riesgo que nunca vale la pena correr.
Análisis costo-beneficio: pieza de $10 vs. choque de $1,000
Hagamos las cuentas. Un nuevo juego de hélices oficiales DJI suele costar entre $10 y $25. Un reemplazo completo de dron después de un accidente puede costar entre $500 y más de $2,000. Para los pilotos profesionales de la Parte 107, el factor de "tranquilidad" no tiene precio; su reputación y negocio dependen de equipos confiables. Intentar una reparación arriesgada con pegamento para ahorrar unos pocos dólares es una apuesta que simplemente no vale la pena.
En última instancia, como piloto al mando, eres responsable de la aeronavegabilidad de tu aeronave. Volar con una hélice modificada o reparada incorrectamente podría dar lugar a graves problemas de responsabilidad en caso de accidente. Seguir las recomendaciones de mantenimiento oficiales de la FAA y realizar una inspección exhaustiva previa al vuelo no es solo una buena práctica, es esencial para una operación segura, legal y profesional. La única respuesta real a cómo arreglar una hélice de dron rota es simple: reemplázala.
Más allá de la hélice: Solución de problemas del motor y el ESC
De acuerdo, piloto, has cambiado una hélice nueva, pero tu dron sigue sonando mal o se niega a volar recto. ¿Qué pasa? Un choque fuerte no solo rompe el plástico; envía una onda de choque por el eje del motor y hacia la electrónica sensible. Saber cómo arreglar una hélice de dron rota es el primer paso, pero la verdadera resolución de problemas significa buscar el daño oculto dejado por el impacto. ¡Vamos a la raíz del problema y volvamos al aire de forma segura!
Prueba para un eje de motor doblado
Tu primer paso es la Prueba de giro manual. Con el dron completamente APAGADO, gira suavemente el motor con el dedo. Siente si hay algún roce, clic o resistencia áspera. Un motor sano gira suave y silenciosamente. Cualquier aspereza es una señal de alarma importante de que los cojinetes internos se dañaron en el choque.
Si la prueba manual se siente bien, procede a la Prueba del lápiz. Con la hélice aún quitada, enciende el dron y acelera lentamente lo suficiente para que el motor gire. Acerca con cuidado la punta de un bolígrafo o lápiz a la parte superior de la campana del motor. Si el lápiz vibra o se tambalea, el eje del motor está doblado. Continuar volando con un eje doblado causará vibraciones severas, sobrecalentará el motor y provocará una falla total. Asegúrate siempre de que tu dron esté seguro y de que sigues las directrices básicas de seguridad de drones de la FAA antes de encenderlo para cualquier prueba.
Errores del controlador electrónico de velocidad (ESC)
Si el motor parece mecánicamente sano, el problema podría ser eléctrico. Tu aplicación DJI Fly o el controlador son tu primera herramienta de diagnóstico. ¡No ignores esos códigos de error!
- Error de sobrecarga/bloqueo del motor: Esto suele aparecer cuando un eje ligeramente doblado o un cojinete dañado obligan al motor a consumir demasiada energía.
- Error de ESC: Esto apunta directamente a un problema con el controlador electrónico de velocidad, el componente que regula la velocidad del motor. Esto podría ser una falla de software o un daño físico.
Después de un golpe significativo, también es aconsejable inspeccionar visualmente las uniones de soldadura en el brazo del dron donde el motor se conecta al ESC. Una conexión agrietada o suelta puede causar energía intermitente e impedir que la nueva hélice gire correctamente. Como último paso, intenta recalibrar la IMU (Unidad de Medición Inercial) del dron a través de la aplicación para borrar cualquier error de control de vuelo provocado por el accidente.
¡Ante la duda, detente! Una reparación de motor o ESC por tu cuenta va mucho más allá de una simple guía sobre cómo arreglar una hélice de dron rota y puede provocar daños más costosos o una pérdida de control peligrosa. Si has encontrado un eje doblado, ves daños físicos en una placa de circuito o no puedes borrar un código de error, es hora de dejar que los profesionales se hagan cargo. Nuestros técnicos expertos tienen las herramientas y la experiencia para hacerlo bien. ¡Tu seguridad es nuestra máxima prioridad!
Guía paso a paso para reemplazar las hélices de tu dron
¿Listo para volver al aire? Esta guía desglosa los pasos esenciales sobre cómo arreglar una hélice de dron rota de forma rápida y segura. ¡No dejes que una pequeña rotura detenga tu vuelo! Antes de empezar, asegúrate de que tu dron esté completamente apagado y la batería retirada.
Primero, reúne tus herramientas de misión crítica:
- El destornillador especializado que venía con tu dron o hélices de repuesto.
- Un juego de hélices de repuesto genuinas, aprobadas por el fabricante. Usar hélices de terceros puede afectar la estabilidad y eficiencia del vuelo. ¿Necesitas un juego certificado? Compra con confianza en Drone Doctor para todas las marcas principales.
Con tu equipo listo, sujeta firmemente el motor conectado a la hélice dañada. Desatornilla cuidadosamente los dos tornillos de retención, aplicando una presión firme hacia abajo mientras giras para evitar dañar las delicadas cabezas de los tornillos. Una vez sueltos, retira los tornillos y el conjunto de la hélice rota.
Identificación de las marcas CW y CCW
Este es un paso innegociable para una reparación exitosa. Los drones utilizan hélices en sentido horario (CW) y antihorario (CCW). ¡Instalar el tipo incorrecto en un motor hará que el dron se vuelque instantáneamente al despegar! La mayoría de los drones DJI utilizan un sistema simple: los motores y las hélices con un círculo/raya plateado o blanco forman un par, y los sin marcar forman otro par. Asegúrate siempre de que el borde de ataque (más grueso) de la nueva hélice mire en la dirección de rotación.
Par de apriete adecuado y seguridad de los tornillos
Tu kit de hélices de repuesto incluye tornillos nuevos por una razón: a menudo tienen un compuesto de fijación de roscas preaplicado (como Loctite) para evitar que se aflojen en pleno vuelo. ¡Utiliza siempre estos tornillos nuevos! Apriétalos hasta que estén ajustados y luego dale un último cuarto de vuelta suave. Advertencia: ¡No aprietes demasiado! Apretar con demasiada fuerza puede agrietar el buje de plástico, lo que provocará una falla catastrófica en el aire.
Una vez que la nueva pala esté segura, realiza una verificación previa al vuelo final. Dale un suave golpecito a la hélice para asegurarte de que gira libremente. Cuando estés listo para volar, comienza con un vuelo estacionario a baja altitud durante 30 segundos y escucha cualquier sonido o vibración inusual. Si todo está bien, ¡tienes autorización para despegar!
Reparación profesional de drones: cuando el "hazlo tú mismo" no es suficiente
Has dominado lo básico, y saber cómo arreglar una hélice de dron rota es una habilidad crucial para cualquier piloto. Pero, ¿qué pasa con un choque que va más allá de un simple cambio de hélice? Un impacto fuerte puede causar daños invisibles que dejan tu dron en tierra para siempre si no los aborda un experto. Cuando te enfrentes a algo más que una hélice mellada, es hora de llamar a un "Doctor de Drones" profesional.
Un accidente grave puede comprometer sistemas críticos. Aunque veas una hélice rota, los problemas reales podrían ser internos. Presta atención a los signos de daños más profundos en:
- El cardán: ¿Tu cámara está inestable o no responde? El delicado mecanismo del cardán suele ser la primera víctima interna en un impacto grave.
- GPS y sensores: ¿El dron se desvía o no logra adquirir una señal de satélite? El impacto puede desalinear o dañar componentes de navegación vitales.
- La carcasa y el bastidor: Incluso las grietas finas en el cuerpo del dron pueden comprometer su integridad estructural y resistencia a la intemperie durante el vuelo.
En Drone Doctor, vivimos según nuestra filosofía "De vuelta al aire RÁPIDO". Entendemos que el tiempo de inactividad te cuesta tiempo, dinero y oportunidades de vuelo. Por eso, nuestros técnicos expertos se dedican a que tu equipo sea reparado y devuelto con una velocidad increíble, lo que nos convierte en el líder en reparación y servicio de drones.
El proceso de reparación de Drone Doctor
Nuestro proceso va mucho más allá de una simple verificación visual. Cada reparación comienza con un diagnóstico exhaustivo para descubrir cualquier problema oculto. Utilizamos solo piezas originales de DJI y de nivel empresarial para asegurar que tu dron funcione como nuevo. Ya seas un piloto profesional con un plazo de entrega o un aficionado ansioso por volar, nuestros rápidos tiempos de respuesta son los mejores del sector. ¡Tu satisfacción es nuestra máxima prioridad!
Compra repuestos originales y drones nuevos
¿Te sientes seguro de tus habilidades de reparación? Encuentra todo lo que necesitas con nuestra venta oficial de piezas para drones para tus proyectos de bricolaje. O, si es hora de una actualización, explora nuestra línea de drones empresariales de última generación diseñados para uso profesional de alta exigencia. No esperes al próximo accidente. ¡Actúa AHORA para asegurar tus accesorios imprescindibles antes de tu próximo vuelo!
Domina la reparación de tu dron y vuelve a volar
Ahora tienes el conocimiento esencial para abordar una hélice dañada de forma segura y efectiva. Recuerda las dos reglas de oro: nunca intentes pegar una hélice rota y siempre diagnostica el problema más allá de la hélice para verificar si hay daños en el motor. Saber cómo arreglar una hélice de dron rota de la manera correcta significa priorizar la seguridad y el rendimiento en cada vuelo.
Si te enfrentas a una reparación compleja o simplemente quieres la tranquilidad que te brinda una reparación experta, ¡no te quedes en tierra! Como líder en ventas, reparación y servicio, nuestros técnicos certificados están listos para hacerte volar RÁPIDO. Utilizamos solo piezas originales de DJI y empresariales y ofrecemos un soporte amable y bilingüe (Se Habla Español) para que tu experiencia sea perfecta. ¡Tu satisfacción es nuestra máxima prioridad!
Obtén servicios profesionales de reparación de drones - ¡De vuelta al aire RÁPIDO!
No dejes que un pequeño contratiempo te corte las alas. Repáralo correctamente, vuela con confianza y sigue capturando esas increíbles vistas desde arriba.
Preguntas Frecuentes
¿Puedo volar un dron con una pequeña astilla en la hélice?
¡Absolutamente no! Incluso una pequeña astilla o grieta desequilibra la hélice. Esto crea vibraciones intensas que pueden provocar un vuelo inestable, imágenes de video temblorosas (el temido "efecto gelatina") y ejercer una gran presión sobre el motor de tu dron. Es una solución barata y fácil, así que no arriesgues tu costoso dron por una pieza de $5. Reemplaza siempre una hélice dañada de inmediato: ¡tu satisfacción y la seguridad de tu dron dependen de ello!
¿Cómo sé si el motor de mi dron está roto o solo la hélice?
Aquí tienes un truco de diagnóstico rápido de los profesionales. Primero, retira la hélice del motor en cuestión. Gira suavemente la campana del motor con el dedo. Si gira suavemente y en silencio, es probable que tu motor esté bien. Si sientes algún chirrido, aspereza o resistencia, o si el eje del motor está doblado, entonces el problema es el motor mismo. Esta simple comprobación puede ahorrarte mucho tiempo y frustración antes de comenzar una reparación.
¿Qué pasa si coloco las hélices al revés?
Tu dron no volará, ¡y podría dar un giro dramático al despegar! Los drones usan hélices en sentido horario (CW) y en sentido antihorario (CCW) para lograr una elevación estable. Si las mezclas, el empuje se dirige incorrectamente. En lugar de despegar, es probable que tu dron se vuelque instantáneamente o patine incontrolablemente por el suelo. Siempre haz coincidir la hélice con el símbolo de rotación del motor correspondiente en los brazos del dron para garantizar un vuelo seguro y exitoso.
¿Es seguro usar hélices de terceros (del mercado de accesorios)?
¡Puede ser, pero tienes que comprar con inteligencia! Apégate a marcas de posventa reconocidas por su control de calidad y materiales de alto rendimiento. Las hélices baratas y sin marca son una gran apuesta: a menudo están mal equilibradas, hechas de plástico quebradizo y pueden fallar en pleno vuelo, provocando un accidente. Para un rendimiento máximo y tranquilidad, siempre recomendamos usar hélices del fabricante original (OEM) o de una marca de terceros confiable y con buenas críticas.
¿Con qué frecuencia debo reemplazar las hélices de mi dron, incluso si no están rotas?
Aunque no hay una fecha de caducidad fija, lo mejor es un enfoque proactivo. Recomendamos una inspección visual exhaustiva antes de cada vuelo, buscando marcas de tensión (pequeñas líneas blancas) o deformaciones. Como regla general para pilotos activos, considere reemplazar sus hélices cada 20-30 horas de vuelo o cada 3-4 meses. Este mantenimiento preventivo es una pequeña inversión para garantizar que su dron siempre funcione con la máxima seguridad y eficiencia.
¿Puede una hélice rota dañar el motor del dron?
¡Sí, al 100%! Volar con una hélice desequilibrada o dañada obliga al motor a trabajar horas extras para compensar la vibración constante. Esta tensión excesiva genera calor y puede desgastar rápidamente los rodamientos internos del motor, lo que lleva a una falla prematura. Una parte crucial para entender cómo arreglar una hélice de dron rota es reconocer que la "solución" es siempre un reemplazo para proteger los componentes más caros como el motor. ¡No deje que un pequeño problema se convierta en una reparación costosa!
¿Cuánto cuesta que un profesional repare mi dron?
Los costos de reparación pueden variar significativamente según el daño. Un servicio simple de diagnóstico y reemplazo de hélices podría costar entre $50 y $75. Sin embargo, si esa hélice rota provocó que un motor se quemara o causó un accidente que dañó el cardán o un brazo, el costo podría aumentar a $150-$300 o más. Por eso enfatizamos el reemplazo inmediato de las hélices dañadas: es la mejor manera de evitar una factura de reparación profesional mucho más cara en el futuro.
¿Necesito recalibrar mi dron después de cambiar las hélices?
Generalmente, no es necesario realizar una calibración completa de la IMU o la brújula después de un simple cambio de hélices. Los sensores principales del dron no se ven afectados por este cambio. Sin embargo, siempre es un excelente hábito realizar una prueba de vuelo estacionario breve y a baja altitud en un área segura y abierta después de cualquier reparación. Esto le permite escuchar los motores y confirmar visualmente que el dron es estable y vuela como se espera antes de despegar en su próximo gran vuelo.