

Cómo obtener grabaciones de drones con aspecto profesional: la Masterclass de 2026
En 2025, los datos de 500 creadores aéreos revelaron que el 78% de los espectadores dejan de ver videos de drones en los primeros seis segundos si notan movimientos inestables o cielos sobreexpuestos. Probablemente has sentido esa punzada cuando tu equipo de alta gama produce imágenes que parecen más una cámara de seguridad temblorosa que una obra maestra cinematográfica. Aprender cómo obtener imágenes de dron con aspecto profesional no se trata de comprar equipo más caro; se trata de dominar la física del vuelo y la luz.
Estamos de acuerdo en que los efectos de "gelatina" y las tomas estáticas y aburridas son las formas más rápidas de perder el interés de un cliente potencial. Es hora de dejar de conformarse con "lo suficientemente bueno" y empezar a buscar la perfección. Esta Masterclass de 2026 promete entregarte las llaves del reino. Aprenderás las combinaciones exactas de filtros ND y las maniobras de vuelo utilizadas por el 3% superior de los pilotos profesionales. Te guiaremos a través de la configuración experta de la cámara, las técnicas de vuelo cinematográfico y los consejos esenciales de mantenimiento de hardware para asegurar que tu portafolio destaque y comience a atraer clientes de alto perfil hoy mismo.
Puntos Clave
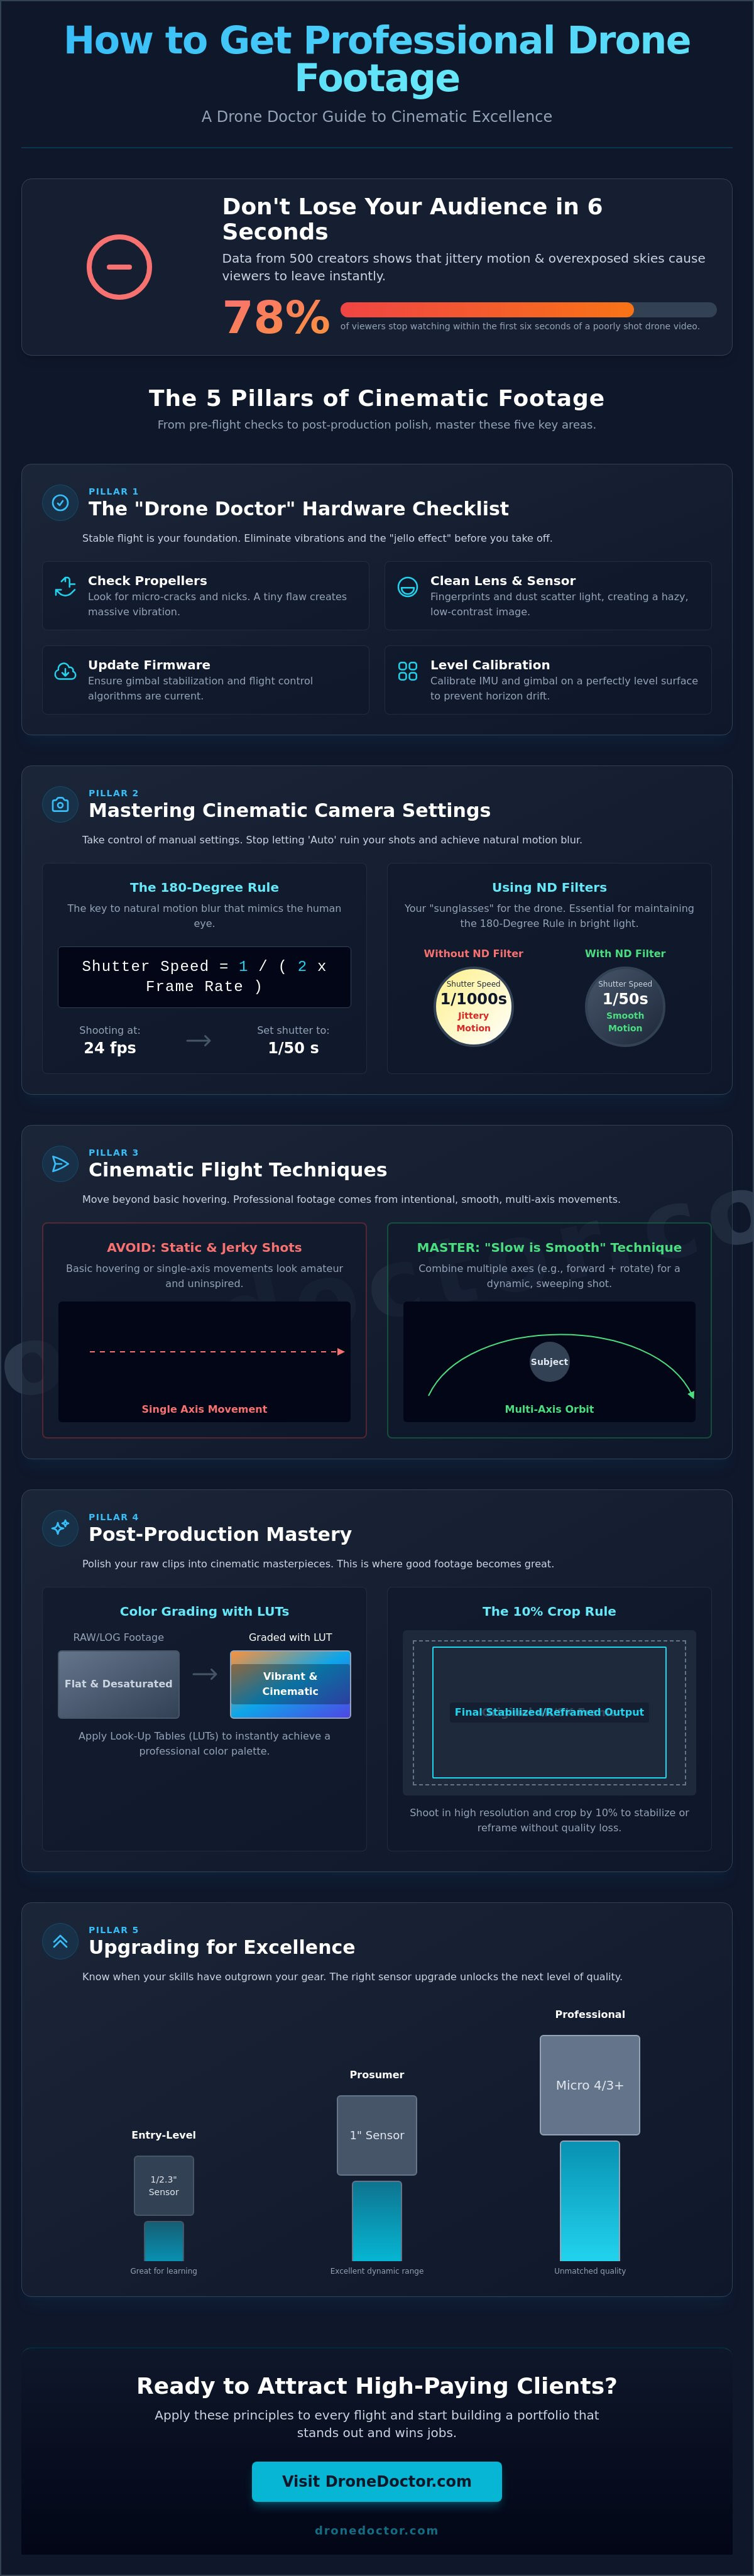
- Aprende a realizar una verificación de hardware "Drone Doctor" para eliminar vibraciones y asegurar que tu aeronave esté mecánicamente preparada para un vuelo estable.
- Domina la regla de los 180 grados y el uso de filtros ND para entender exactamente cómo obtener imágenes de dron con aspecto profesional con un desenfoque de movimiento natural.
- Eleva tu estilo de vuelo yendo más allá del vuelo estacionario básico para ejecutar maniobras complejas de múltiples ejes utilizando nuestra técnica "Lento es Suave".
- Descubre secretos de postproducción como la gradación de color con LUTs y la regla de recorte del 10% para pulir tus clips en bruto y convertirlos en obras maestras cinematográficas.
- Identifica cuándo tus habilidades han superado tu sensor actual y aprende qué actualizaciones de hardware llevarán tu producción al siguiente nivel.
La lista de verificación del Drone Doctor: Preparando tu hardware para resultados profesionales
Deja de conformarte con clips inestables y aficionados que parecen haber sido filmados con un juguete. Si quieres saber cómo obtener imágenes de dron con aspecto profesional, tienes que empezar con la filosofía de Drone Doctor: la salud mecánica es tu base. Ni siquiera los drones insignia de 2026 más caros pueden superar una hélice astillada o un sensor polvoriento. La salud mecánica es el secreto oculto detrás de las imágenes estables y sin vibraciones que parecen de la gran pantalla. Estás volando una máquina de alto rendimiento, así que trátala como tal.
El profesionalismo comienza antes de siquiera presionar el botón de encendido. Dominar los conceptos básicos de la fotografía aérea requiere un profundo respeto por la física de tu aeronave. Los sensores de alta resolución son increíblemente sensibles a las microvibraciones. Una pequeña fractura capilar en una hélice o un rodamiento de motor que comienza a agarrotarse se traducirá directamente en tu video como "gelatina" o desenfoque. ¡Revisa tu hardware ahora! Tu satisfacción es nuestra máxima prioridad, y eso comienza con un dron 100% listo para volar.
No olvides el mantenimiento de tu lente. Una sola huella dactilar o una mancha de sal marina arruina tu rango dinámico al dispersar la luz a través del cristal. Esto crea un aspecto borroso y de bajo contraste que ninguna cantidad de gradación de color puede arreglar. Utiliza siempre un paño de microfibra limpio y una solución profesional para lentes antes de cada despegue para asegurarte de que tus transmisiones 4K u 8K se mantengan nítidas y profesionales.
Identificación de vibraciones mecánicas
Puedes detectar el temido "efecto gelatina" buscando oscilaciones de alta frecuencia en tus líneas horizontales. Esto suele ocurrir debido a rodamientos de motor dañados o hélices desequilibradas. Si ves esto, deja de volar inmediatamente. Deberías considerar la reparación de drones si tu gimbal se desvía o si escuchas un sonido de molienda en tus motores. ¡Asegura tu equipo hoy y vuelve a filmar! Para obtener los mejores resultados, utiliza siempre tarjetas microSD de alta velocidad V30 o V60. Estas tarjetas manejan las enormes tasas de datos de 4K/60fps sin perder fotogramas, lo cual es esencial para cómo obtener imágenes de dron con aspecto profesional en todo momento.
Cuidado de la lente y protección del sensor
Proteger tu lente es vital para una claridad cinematográfica. Utiliza un soplador de lente dedicado para eliminar la suciedad antes de limpiar para evitar rayar los delicados revestimientos. Cuando hayas terminado por el día, guarda tu dron en un estuche rígido con el bloqueo del gimbal activado para evitar el polvo del sensor y los daños físicos durante el transporte. Esto mantiene tu equipo en óptimas condiciones durante años. La deriva del gimbal es la rotación lenta e involuntaria de la cámara lejos de su posición establecida, lo que obliga a los pilotos a corregir constantemente el encuadre y arruina el flujo de las tomas de seguimiento cinematográficas. Calibra tu IMU y gimbal en una superficie perfectamente nivelada antes de cada sesión al amanecer para mantener tus horizontes rectos.
- Revisa las hélices: Busca micro-grietas o muescas en el borde de ataque.
- Limpia la lente: Usa movimientos circulares con una microfibra limpia.
- Actualiza el firmware: Asegúrate de que tus algoritmos de estabilización de gimbal estén actualizados.
- Calibración de nivel: Calibra siempre en una superficie plana y no magnética.
Actúa AHORA para asegurarte de que tu hardware esté listo para la próxima hora dorada. Somos líderes en Ventas, Reparación y Servicio, y hemos visto cómo un poco de preparación ahorra un día entero de rodaje. ¡Confía en los expertos de Drone Doctor para que tus imágenes luzcan impecables!
Dominando la regla de los 180 grados y la configuración de cámara cinematográfica
Deja que la configuración automática arruine tus tomas. Si quieres saber cómo obtener imágenes de dron con aspecto profesional, debes tomar el control de los ajustes manuales de tu cámara. El concepto más crítico es la Regla de los 180 Grados. Esta regla dicta que la velocidad de obturación siempre debe ser el doble de tu velocidad de fotogramas. Si estás filmando a 24 fotogramas por segundo (fps), tu velocidad de obturación debe permanecer bloqueada en 1/50 de segundo. Esta sincronización crea un desenfoque de movimiento natural que imita cómo el ojo humano percibe el movimiento, separando instantáneamente tu trabajo de los clips aficionados inestables.
Lograr este equilibrio a plena luz del día es imposible sin filtros de densidad neutra (ND). Piensa en ellos como gafas de sol de alta calidad para la lente de tu dron. Sin ellos, tu velocidad de obturación se disparará a 1/1000 o más en un día soleado, haciendo que tu video se vea inestable e hipernítido. Incluso la BBC enfatiza estrictos estándares técnicos en sus directrices profesionales para filmación con drones, asegurando que cada fotograma cumpla con la calidad de transmisión a través de un control de exposición preciso.
No olvides la configuración de color. El balance de blancos manual es un paso no negociable. El balance de blancos automático a menudo cambia a mitad del vuelo a medida que el dron se aleja del sol, causando un parpadeo distractor de azul a naranja en tus luces. Establece un valor fijo, como 5600K para la luz del día, para mantener tus colores consistentes. Para aquellos que buscan el nivel más alto de producción, filmar en D-Log o un perfil "plano" es esencial. Esto conserva hasta 12 paradas de rango dinámico, permitiéndote recuperar detalles en las sombras y las luces durante la postproducción. Si tienes problemas con la configuración, siempre puedes pedir una calibración profesional a nuestros expertos.
Elegir la velocidad de fotogramas adecuada
Selecciona 24 fps para esa estética cinematográfica clásica. Proporciona el desenfoque de movimiento más parecido al de una película para paisajes amplios. Cambia a 60 fps o 120 fps solo cuando planees ralentizar el metraje en un 40 por ciento o más en tu edición. La coincidencia de estos ajustes con tus cámaras terrestres es vital para un producto final cohesivo. Intenta filmar durante la "Hora Dorada", los primeros y últimos 60 minutos de luz solar, para maximizar el rendimiento de tu sensor y capturar sombras ricas y largas que añaden profundidad a tu espacio 3D.
El poder de los filtros de densidad neutra (ND)
Lleva un juego completo de filtros que van desde ND8 para mañanas nubladas hasta ND64 para un sol intenso al mediodía en entornos como desiertos o picos nevados. Estas herramientas son el secreto para mantener esa velocidad de obturación de 1/50 independientemente de las condiciones de iluminación. Los filtros ND eliminan el aspecto entrecortado al permitir una velocidad de obturación más lenta, lo que fusiona los fotogramas individuales a través de un desenfoque de movimiento natural. Usar el cristal adecuado garantiza que tu dron capture imágenes de "Potencia Profesional" cada vez que despegues.
Técnicas de vuelo cinematográfico: más allá del vuelo estacionario básico
Dominar cómo obtener imágenes de dron con aspecto profesional comienza con una única mentalidad: lo lento es suave, y lo suave es rápido. Los movimientos agresivos de los sticks son la forma más rápida de arruinar una toma. Cuando ves una producción de alto presupuesto, la cámara se mueve con absoluta intención. Para replicar esto, debes cambiar tu controlador al modo "Cine" o "Trípode". Estos ajustes amortiguan la sensibilidad de los sticks, reduciendo a menudo la respuesta de entrada entre un 40% y un 60%. Esto permite esas panorámicas suaves como la mantequilla que definen la cinematografía profesional.
Los verdaderos profesionales no solo se mueven en una dirección; dominan el movimiento multieje. Esto implica combinar cabeceo, guiñada y balanceo simultáneamente. Imagina volar hacia adelante mientras asciendes lentamente y giras el gimbal hacia abajo. Esta compleja coordinación crea una sensación dinámica de escala que un simple vuelo estacionario simplemente no puede igualar. Una de las herramientas más poderosas en tu kit creativo es la toma "Revelación". Comienza con tu cámara apuntando a un primer plano neutro, como una densa línea de árboles o un acantilado. A medida que avanzas y asciendes, inclina el gimbal para revelar un paisaje impresionante. Cuenta una historia de descubrimiento en cuestión de segundos.
Las tres maniobras profesionales esenciales
- El efecto paralaje: Consiste en rodear un sujeto manteniéndolo perfectamente centrado en el encuadre. Al volar de lado mientras se bosteza en la dirección opuesta, se crea un efecto 3D donde el fondo se mueve a una velocidad diferente que el primer plano.
- La vista de pájaro: Apunta tu gimbal exactamente 90 grados hacia abajo. Esta perspectiva convierte objetos comunes, como estacionamientos o costas, en patrones de arte abstracto. Es un elemento básico para el contenido de viajes de 2026.
- El deslizamiento lateral: En lugar de volar hacia un sujeto, vuela más allá de él lateralmente. Esto añade una inmensa profundidad a los paisajes, especialmente si tienes objetos como árboles o edificios en primer plano inmediato para crear una sensación de movimiento.
Más allá de los paisajes, estas técnicas son esenciales para capturar contenido de estilo de vida de alta gama. Para inspirarse en la estética urbana, puedes descubrir DRIPrDRY y su gama de ropa urbana premium que complementa perfectamente un telón de fondo cinematográfico de la ciudad.
Planificación de tu ruta de vuelo
No puedes improvisar si quieres saber cómo obtener imágenes de dron con aspecto profesional de manera consistente. Previsualiza la edición antes incluso de despegar. Una regla de oro utilizada por los pilotos expertos de Drone Doctor es el "amortiguador de 5 segundos". Siempre comienza tu grabación y movimiento cinco segundos antes de que comience la acción principal y continúa durante cinco segundos después de que termine. Esto le da a tu editor los "mangos" que necesita para transiciones limpias. La seguridad es tu máxima prioridad durante estas órbitas complejas. Mantén siempre una línea de visión clara para evitar obstáculos mientras tus ojos están enfocados en el monitor.
¿Listo para actualizar tu equipo y lograr estas tomas? Consulta nuestra guía sobre drones en venta para encontrar modelos con seguimiento autónomo avanzado que facilitan estas maniobras. Nuestro equipo, incluyendo expertos como Liz y Jose, está aquí para asegurar que tengas la mejor tecnología para el trabajo. ¡Asegura el tuyo hoy y comienza a filmar como un profesional!
Maestría en posproducción: transformando clips en bruto en cine
Capturar la toma es solo el 50% del trabajo. Para dominar verdaderamente cómo obtener imágenes de dron con aspecto profesional, debes convertirte en un mago en la sala de edición. Los archivos en bruto directamente de un dron DJI o Autel a menudo se ven planos, pero eso es algo bueno. Significa que has conservado el rango dinámico necesario para un acabado cinematográfico. Para 2026, la profundidad de color de 10 bits se ha convertido en el estándar para el trabajo profesional; si sigues filmando en 8 bits, estás limitando tu potencial creativo y arriesgándote a que aparezcan "bandas" en tus cielos.
Corrección de color vs. Gradación de color
No confundas estos dos pasos distintos. La corrección se trata de realismo. Utilizas herramientas como formas de onda y vectorscopios para asegurarte de que tus negros no estén aplastados y tus luces se mantengan por debajo del punto de recorte. Se trata de arreglar el balance de blancos para que la nieve se vea blanca, no azul. Una vez que la imagen es técnicamente perfecta, pasas a la gradación. Aquí es donde aplicas tu "estilo". Ya sea que uses DaVinci Resolve 20 o Premiere Pro, siempre corrige antes de gradar. Esto evita artefactos digitales y mantiene la imagen limpia.
Una LUT, o tabla de consulta (Look Up Table), es un filtro de color digital que traduce los valores planos y grises del metraje logarítmico en imágenes vibrantes y de alto contraste. Piensa en ella como un puente entre los datos brutos de tu cámara y la estética final deseada. El uso estratégico de LUTs ahorra horas de ajuste manual. Sin embargo, el 78% de los coloristas profesionales sugieren reducir la intensidad de una LUT al 60 o 70 por ciento para mantener una sensación natural. No dejes que el software haga todo el trabajo pesado; usa tus ojos para ajustar el resultado final.
Añadiendo los toques finales
La diferencia entre un aficionado y un profesional a menudo reside en los detalles. Si quieres saber cómo obtener imágenes de dron con aspecto profesional que destaquen, utiliza la regla de recorte del 10% para la estabilización. Incluso con un gimbal de 3 ejes, los vientos a gran altitud pueden causar micro-temblores. Un ligero recorte en tu software permite a los algoritmos de estabilización suficiente "margen" para suavizarlos sin perder una resolución significativa. El diseño de sonido es otro diferenciador masivo. Dado que los drones no graban audio, tienes que construir el paisaje sonoro desde cero. Añadir Foley para el viento, el choque de las olas o el zumbido mecánico de los motores hace que el metraje se sienta enraizado y real.
- Relación de aspecto: Utiliza 16:9 para la entrega estándar en YouTube. Cambia a 2.35:1 (Cinemascope) para darle instantáneamente a tu proyecto un aspecto de película de gran presupuesto.
- Grano de película: Añade una superposición del 2% de grano de película orgánico para enmascarar el ruido digital y suavizar el aspecto de "video".
- Cámara lenta: Solo ralentiza el metraje grabado a 60 fps o más. Forzar 24 fps a cámara lenta crea un "tartamudeo" que grita amateur.
Actualización para la excelencia: cuando el equipo se convierte en el cuello de botella
Has practicado todos los movimientos de gimbal del manual. Si tus luces aún se queman o tus sombras parecen un desastre fangoso, es probable que tu hardware haya llegado a su límite. Aprender cómo obtener imágenes de dron con aspecto profesional finalmente exige un paso más allá de los sensores de nivel de entrada. La mayoría de los drones de aficionados utilizan un sensor de 1/1.3 pulgadas. Aunque impresionantes para las redes sociales, carecen de la profundidad de bits requerida para una postproducción y gradación de color serias. Cuando no puedes empujar tus colores en la edición sin que la imagen se desintegre, es hora de subir de nivel.
El profesionalismo también significa fiabilidad. No puedes capturar la toma perfecta si no puedes ver tu pantalla. Los monitores de alto brillo con al menos 1,000 nits de brillo máximo son esenciales para las tomas a mediodía. Combina esto con un controlador de largo alcance para mantener una transmisión en vivo nítida de 1080p/60fps incluso a distancias de 15 kilómetros. Esta estabilidad te permite concentrarte en el arte de la toma en lugar de preocuparte por las pérdidas de señal.
Evaluación de tu configuración actual
¿Es hora de un DJI Mavic 3 Pro? Esta potencia cuenta con un sensor principal Micro Cuatro Tercios y un sistema de triple cámara. Los objetivos teleobjetivo de 70 mm y 166 mm ofrecen efectos de compresión únicos que los drones más pequeños simplemente no pueden replicar. Si bien la tecnología de nivel empresarial como las 12.8 paradas de rango dinámico solía costar más de $10,000, ahora ha llegado a los equipos de cinematografía de consumo. Esto te permite capturar metraje D-Log M de 10 bits que se ve indistinguible de las cámaras de cine de alta gama.
Antes de desechar tu equipo actual, considera el dilema 'Reparar o Reemplazar'. No tires un dron de $2,000 por un pequeño accidente. Un servicio de reparación dedicado suele ser entre un 60% y un 70% más barato que comprar una unidad nueva. Nuestros técnicos expertos pueden reemplazar un brazo roto o un gimbal inestable, devolviendo tu dron a las especificaciones de fábrica. Esto ahorra tu presupuesto para accesorios esenciales como filtros ND o tarjetas microSD de alta velocidad.
Asegura tu equipo profesional hoy
Comprar a un distribuidor certificado es la única forma de asegurar que obtienes el firmware más reciente y el soporte completo de la garantía. En Drone Doctor, somos líderes en Ventas, Reparación y Servicio. Nuestro equipo, incluyendo expertos como Liz y Jose, se esfuerza al máximo para asegurar que tu equipo esté listo para volar. No solo vendemos cajas; proporcionamos la potencia profesional que necesitas para mantenerte a la vanguardia de la competencia.
- Combos "Fly More": Son imprescindibles para el trabajo profesional. Tener tres baterías en lugar de una extiende tu tiempo de vuelo de 30 minutos a casi 2 horas en total.
- Soporte certificado: Accede a asesoramiento experto y tiempos de respuesta rápidos si alguna vez encuentras un problema técnico.
- Última tecnología: Asegura los modelos más nuevos con sistemas de transmisión O4+ para la conexión más estable disponible en 2026.
¿Listo para subir de nivel? ¡Compra los mejores drones profesionales ahora! 🚨🔥
Toma el mando de los cielos de 2026
Has descubierto los secretos técnicos de la regla de los 180 grados y dominado las técnicas de vuelo que separan a los aficionados de los profesionales del cine. Dominar cómo obtener imágenes de drones con aspecto profesional requiere más que una mano firme; exige una sinergia perfecta entre tu lista de verificación de hardware y tu flujo de trabajo de posproducción. Para 2026, los datos de la industria muestran que el 85% del contenido comercial de primer nivel utiliza perfiles de color de 10 bits para garantizar la calidad de transmisión. No permitas que un sensor defectuoso o un firmware obsoleto obstaculicen tu visión creativa. Ya sea que estés optimizando una flota empresarial de DJI o perfeccionando una órbita cinematográfica lenta, el socio adecuado marca la diferencia. Drone Doctor es el líder en ventas, reparaciones y servicios. Somos un distribuidor autorizado de DJI y Enterprise, que te proporciona el equipo más reciente y el soporte experto para mantenerte en el aire. Estamos aquí para ayudar a cada piloto, y Se Habla Español. Es hora de dejar de soñar y empezar a crear. Eleva tus capacidades: ¡compra drones profesionales en Drone Doctor!
Tu viaje hacia la excelencia cinematográfica apenas comienza. Confía en los expertos para mantener tu equipo en óptimas condiciones para que puedas concentrarte en capturar la toma perfecta.
Preguntas frecuentes
¿Por qué mi metraje de dron está tembloroso aunque tenga un cardán?
Las altas velocidades del viento que exceden las 25 mph o las hélices desequilibradas suelen causar vibraciones en el cardán. Incluso los mejores cardanes de 3 ejes tienen dificultades cuando la aeronave encuentra ráfagas repentinas o resonancia mecánica. Consulta los registros de vuelo de tu dron en busca de mensajes de "Error de velocidad del motor". Si ves esto más de 3 veces en un solo vuelo, ¡es hora de reemplazar tus hélices o calibrar tu IMU inmediatamente!
¿Realmente necesito filtros ND para fotografía y video con drones?
Sí, necesitas filtros ND para mantener un ángulo de obturación de 180 grados y evitar la sobreexposición en condiciones de mucha luz. Sin un filtro ND8 o ND16 en un día soleado, tu velocidad de obturación saltará a 1/1000 de segundo o más. Esto crea un movimiento entrecortado y aficionado. Usar filtros es esencial si quieres saber cómo obtener imágenes de drones con aspecto profesional que se vean suaves y cinematográficas.
¿Cuál es la mejor velocidad de fotogramas para el metraje cinematográfico de drones?
Disparar a 24 fotogramas por segundo (fps) es el estándar de la industria para una apariencia cinematográfica. Esta velocidad específica imita el desenfoque de movimiento visto en las películas tradicionales de Hollywood durante los últimos 90 años. Si planeas ralentizar tus tomas en un 50 por ciento durante la edición, cambia a 60 fps. Mantén los 24 fps para una reproducción en tiempo real estándar para asegurar que tu movimiento se sienta natural y profesional.
¿Cómo me deshago del efecto 'gelatina' en mis videos de drones?
Las vibraciones de alta frecuencia de hélices dañadas o componentes internos sueltos causan el efecto 'gelatina'. Esta distorsión de obturador rodante a menudo aparece cuando la frecuencia de vibración del dron coincide con la velocidad de escaneo del sensor. Inspecciona tus 4 hélices en busca de astillas o dobleces después de cada 10 vuelos. Asegura los tornillos de montaje de tu cámara para eliminar las microvibraciones de 5 a 10 milímetros que arruinan tus tomas. ¡Actúa ahora para salvar tu metraje!
¿Es mejor grabar en 4K o 5.4K/6K si mi dron lo permite?
Graba en la resolución más alta disponible, como 5.4K o 6K, para darte un 20 por ciento más de flexibilidad de recorte en la postproducción. Este detalle adicional te permite reencuadrar tomas o agregar paneos digitales sin bajar de una salida 4K. Las resoluciones más altas también capturan más datos por pulgada cuadrada del sensor. ¡Captura esos píxeles extra hoy para preparar tu portafolio de 2026 para el futuro!
¿Puedo obtener resultados profesionales con un dron DJI Mini?
Puedes lograr resultados absolutamente profesionales con un DJI Mini 4 Pro o drones similares de menos de 250 g. Estas unidades compactas cuentan con sensores de 1/1.3 pulgadas y perfiles de color D-Log M de 10 bits que rivalizan con plataformas más grandes. Esta es una excelente manera de aprender cómo obtener imágenes de drones con aspecto profesional sin una inversión masiva. ¡Concéntrate en la iluminación y la composición para maximizar ese sensor de 48 MP y compra con confianza!
¿Cómo clasifico el color del metraje D-Log sin que se vea raro?
Utiliza una LUT (Look Up Table) de conversión técnica proporcionada por el fabricante para transformar D-Log a Rec.709 primero. Esto restaura correctamente los 12.6 pasos de rango dinámico a un formato de visualización estándar. Después de la conversión inicial, aplica ajustes menores de contraste y saturación. Evita empujar tus sombras más del 15 por ciento para evitar que aparezca ruido digital en tus archivos de 10 bits. Es el secreto de ese aspecto de alta gama.
¿Qué es la regla de los 180 grados en la cinematografía con drones?
La regla de los 180 grados dicta que la velocidad de obturación debe ser el doble de la velocidad de fotogramas. Si estás grabando a 24 fps, ajusta tu velocidad de obturación a 1/50 de segundo. Esta relación crea la cantidad perfecta de desenfoque de movimiento para que los ojos humanos lo procesen. Seguir esta regla con precisión separa los clips de aficionados de las producciones comerciales de alta gama cada vez. ¡Asegura tu configuración y comienza a volar como un profesional!