

La guía definitiva para el reemplazo del armazón de un dron: Bricolaje vs. Reparación profesional
El 12 de junio de 2024, una entusiasta de FPV llamada Sarah vio cómo su dron personalizado chocaba contra una valla de acero a 72 km/h. La fibra de carbono se rompió, pero la pila interna se mantuvo encendida; una clara señal de que un reemplazo completo del chasis del dron era lo único que se interponía entre ella y su próximo vuelo. Probablemente hayas sentido esa misma sensación de hundimiento cuando una pieza de plástico o carbono de 40 dólares deja en tierra tu inversión de 1200 dólares. Es natural preocuparse por la diferencia entre las piezas originales y las del mercado de accesorios, o si una factura de reparación profesional vaciará tu billetera.
Estamos aquí para ayudarte a comprar con confianza y hacer que tu dron vuelva a volar. Aprenderás cómo conseguir las piezas exactas que necesitas y cómo llevar a cabo un reemplazo del chasis del dron que puede ahorrarte más del 65% en comparación con la compra de un kit de dron de reemplazo. Compararemos la precisión de una configuración de banco de bricolaje con el poder profesional de un taller de reparación certificado. Esta guía proporciona un claro análisis de costo-beneficio y una estrategia de evaluación paso a paso para que puedas volar de nuevo sin la ansiedad de un daño electrónico permanente.
Puntos clave
- Aprende a distinguir entre grietas capilares menores y daños estructurales terminales para decidir si tu dron necesita una revisión completa.
- Comprende la anatomía de tres niveles de tu chasis e identifica qué piezas "sacrificables" son las más propensas a necesitar un cambio después de un choque.
- Evalúa si un reemplazo del chasis del dron por tu cuenta es adecuado para ti o si debes aprovechar las herramientas profesionales y las garantías para asegurar tu inversión.
- Domina la regla de "una foto por tornillo" y otras técnicas de organización esenciales para mantener tus componentes electrónicos internos seguros durante un complejo desmontaje.
- Obtén consejos de expertos sobre cómo conseguir componentes genuinos para evitar imitaciones de baja calidad y hacer que tu dron vuelva a volar con potencia de nivel profesional.
¡Espera, no lo tires! ¿Cuándo es necesario reemplazar el chasis de un dron?
¿Acabas de ver cómo tu inversión de 1200 dólares se desplomaba del cielo? ¡Detente! Antes de tirar esos restos a la basura, date cuenta de que una pérdida total es más rara de lo que crees. El reemplazo del chasis del dron no es solo una reparación; es una migración técnica. Piensa en ello como un "trasplante de cerebro" donde movemos cada sensor interno, cable y placa de circuito de un armazón destrozado a un chasis nuevo de fábrica. Nuestro equipo en Drone Doctor LLC ha perfeccionado este proceso, asegurando que tu equipo vuelva a volar con la misma precisión que tenía el primer día. Nos enorgullece ser líderes en Ventas, Reparación y Servicio, ayudándote a evitar el costo masivo de un reemplazo completo.
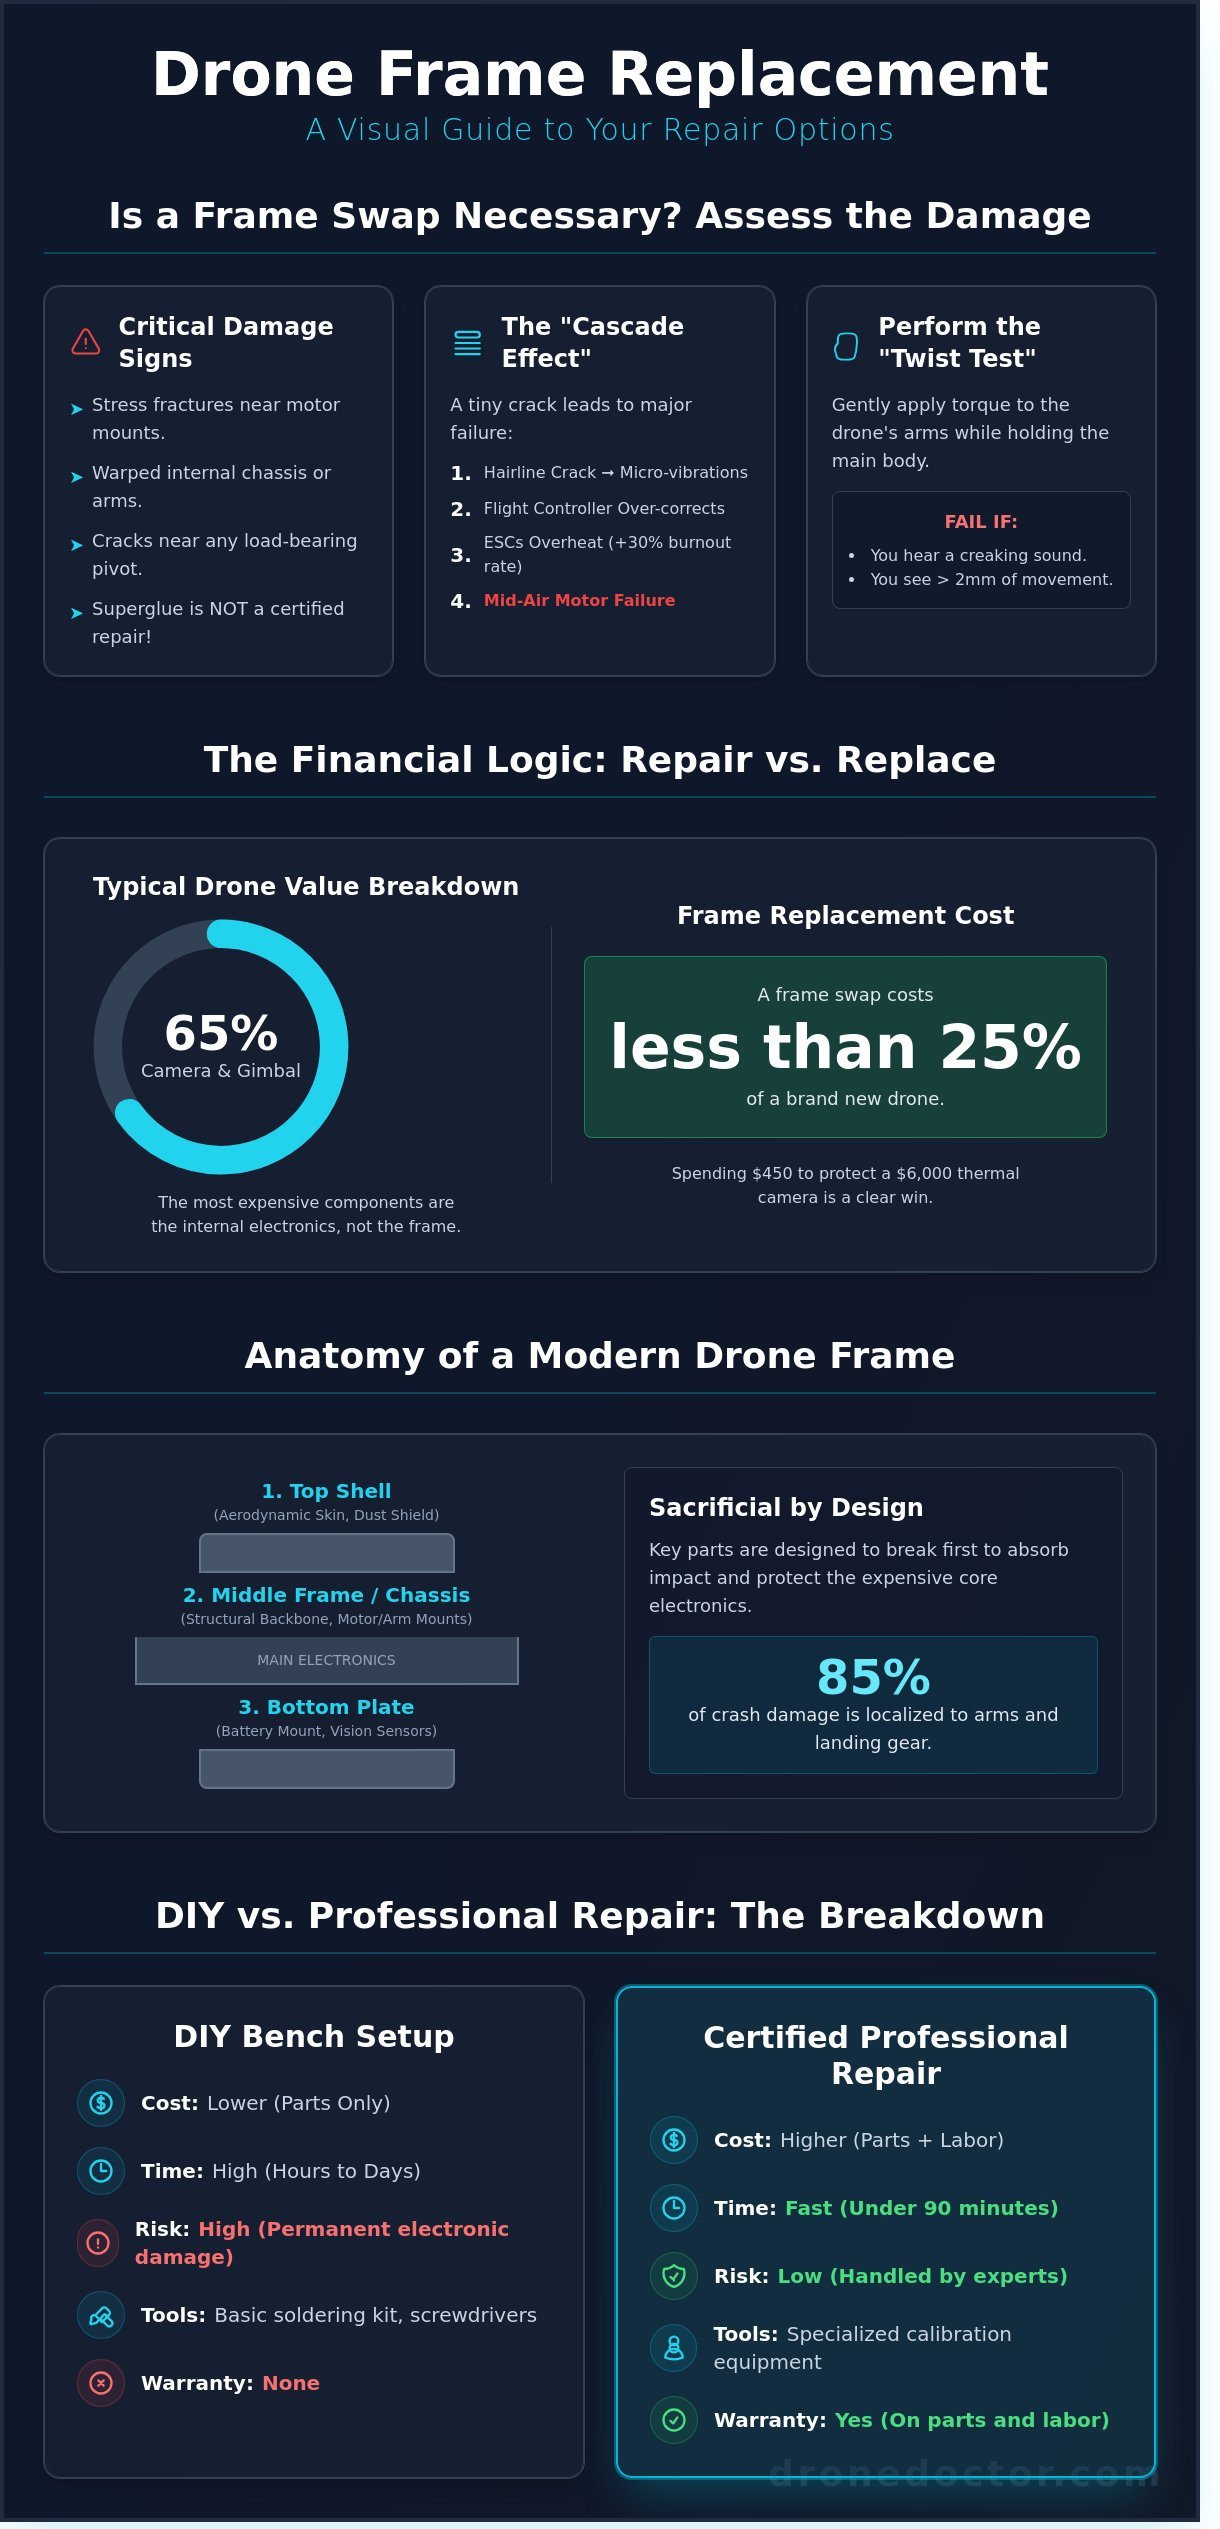
La integridad estructural de cualquier Vehículo Aéreo No Tripulado (UAV) es la base de la estabilidad del vuelo. Cuando un chasis se ve comprometido, crea un "Efecto Cascada". Una pequeña grieta capilar cerca de un soporte de motor puede parecer insignificante, pero provoca microvibraciones. Estas vibraciones obligan al controlador de vuelo a corregir en exceso 400 veces por segundo. Esto provoca un sobrecalentamiento en tus Controladores Electrónicos de Velocidad (ESC) y, finalmente, causa una falla del motor en pleno vuelo. Para enero de 2026, hemos visto un aumento del 30% en quemaduras de ESC directamente relacionadas con pilotos que "siguen volando" con chasis agrietados. ¡No dejes que una pieza de chasis de 90 dólares se convierta en una factura electrónica de 500 dólares! ¡Actúa AHORA para salvar tus componentes internos!
Los diseños de drones modernos de 2026, como el DJI Mini 5 Pro o la serie Mavic 4, están construidos pensando en la modularidad. A diferencia de los modelos pegados de 2021, los chasis actuales utilizan soportes estandarizados de clip y tornillo. Esto hace que un reemplazo completo del chasis del dron sea más viable y asequible que nunca. A menudo podemos completar un reemplazo completo en menos de 90 minutos. Esto te permite volver a capturar tomas de potencia profesionales sin la etiqueta de precio de "dron nuevo". Compra con confianza; tu satisfacción es nuestra máxima prioridad. ¡Nuestros expertos como Jose y Liz están listos para ayudarte a asegurar tu equipo hoy mismo!
Señales de que el chasis de tu dron está más allá de un simple parche
El superpegamento no es una reparación certificada para volar. Si observas fracturas por tensión cerca de los soportes del motor o los pivotes de los brazos, la capacidad de carga estructural ha desaparecido. Prueba la "Prueba de torsión". Sostén el cuerpo principal del dron y aplica suavemente torsión a los brazos. Si escuchas un crujido o ves más de 2 mm de movimiento independiente, el chasis interno está deformado. ¡Asegura tu reparación hoy antes de que esa deformación cause una pérdida total de control!
La lógica financiera: Reparar vs. Reemplazar en 2026
La matemática es simple. Un sensor de cámara y un conjunto de cardán de grado profesional representan aproximadamente el 65% del valor total de tu dron. Para chasis empresariales como el Matrice o el Mavic 3 Thermal, solo el sensor vale miles. Gastar 450 $ en un cambio de chasis para proteger una cámara térmica de 6000 $ es una obviedad. Incluso para modelos de consumo, un reemplazo de chasis suele costar menos del 25% del precio de una unidad nueva.
Anatomía de un chasis de dron: entendiendo qué necesita reemplazarse
Dominar el reemplazo del chasis de un dron comienza con saber exactamente lo que estás viendo. La mayoría de los drones modernos utilizan una arquitectura de tres niveles diseñada para equilibrar el peso y la durabilidad. La carcasa superior actúa como la piel aerodinámica, protegiendo los delicados componentes electrónicos del polvo y la humedad. Debajo se encuentra el chasis intermedio, que sirve como columna vertebral estructural donde se conectan los motores y los brazos. Finalmente, la placa inferior proporciona una superficie de montaje rígida para los compartimentos de la batería y los sensores de visión orientados hacia abajo. Comprender estas capas te ayuda a determinar si necesitas una simple reparación cosmética o una revisión estructural total.
Los brazos de las hélices y el tren de aterrizaje son las víctimas más frecuentes de impactos de alta velocidad. Los fabricantes los diseñan como piezas sacrificables. Su objetivo es romperse o doblarse para absorber la energía cinética, lo que evita que esa energía llegue al costoso controlador de vuelo o al cardán de la cámara 4K. Las estadísticas de los centros de reparación indican que aproximadamente el 85% de los daños relacionados con choques se localizan en estas extremidades externas. Antes de empezar a quitar tornillos, consulta una Lista de verificación de mantenimiento de drones de rutina para asegurarte de haber documentado el estado actual de tu hardware e identificado cada fractura capilar.
Los puntos de montaje internos son tan vitales como la carcasa exterior. Los chasis profesionales confían en amortiguadores de vibración hechos de silicona de alta calidad para aislar la IMU del ruido de frecuencia del motor. También encontrarás disipadores de calor de aluminio integrados en el chasis para disipar el calor de los ESC. Si estos puntos de montaje están deformados, tu dron no volará recto incluso con brazos nuevos. La elección del material importa aquí. Si bien los pilotos de FPV juran por la fibra de carbono con tejido 3k por su increíble rigidez, las unidades empresariales a menudo usan aleaciones de magnesio para lograr una reducción de peso del 20% en comparación con el aluminio estándar. Si no estás seguro de qué pieza está agrietada, nuestro equipo puede ayudarte a identificar los componentes de reemplazo correctos para tu modelo específico.
Chasis vs. Carcasa: Conociendo la diferencia
No confundas una carcasa agrietada con un chasis roto. La carcasa suele ser un carenado de plástico fácil de cambiar en 15 minutos. El chasis es el esqueleto interno que mantiene las "tripas" unidas. Reemplazar un chasis es un trabajo de nivel experto porque requiere desoldar los cables del motor y desenganchar cuidadosamente el módulo GPS y las antenas internas de 2.4GHz. Estos componentes a menudo están pegados o sujetos directamente en huecos específicos del chasis para mantener la claridad de la señal.
Características de chasis empresariales y especializados
Los drones empresariales, como la serie DJI Matrice, cuentan con puntos de montaje reforzados para cargas pesadas como escáneres LiDAR o cámaras térmicas. Estos chasis a menudo incluyen sellos con clasificación IP55 o IP67 que debes volver a sellar cuidadosamente durante un cambio de chasis para mantener la resistencia al agua. Ten en cuenta que cambiar a un chasis de posventa puede desplazar el centro de gravedad tan solo 2 mm. Este pequeño cambio puede afectar drásticamente tus bucles PID, lo que requiere una recalibración completa del controlador de vuelo para evitar oscilaciones de "efecto tazón" durante el vuelo estacionario.
Reparación DIY vs. Profesional: el desglose honesto de riesgo-recompensa
¿Estás pensando en un reemplazo de chasis de dron DIY? Es emocionante ahorrar 150 dólares en costos de mano de obra. Conoces tu hardware por dentro y por fuera, convirtiendo una máquina rota en un proyecto personal. Pero no te dejes engañar por los videos de YouTube de "time-lapse" de 10 minutos. Un solo cable plano de 0.5 mm roto puede convertir un cambio de plástico de 40 dólares en una pesadilla electrónica de 300 dólares. Vemos estos proyectos "a medias" en nuestro taller todas las semanas. Por lo general, el piloto llegó al 75% del camino antes de toparse con una pared que no pudo escalar.
Los costos ocultos del bricolaje a menudo superan los ahorros. No puedes usar el destornillador que venía con tu kit de reparación de gafas. Para hacerlo bien, necesitas una estación de soldadura precisa como la Pinecil V2 o una Hakko FX-888D. También necesitas un juego completo de llaves hexagonales métricas, espátulas de plástico y una alfombrilla antiestática con conexión a tierra. Comprar estas herramientas esenciales añade 120 dólares a tu factura al instante. Si dañas la cabeza de un solo tornillo T6, te espera una hora extra de frustración y posibles daños permanentes en los puntos de montaje.
Componentes de alto riesgo como los cables planos del cardán de DJI son la prueba definitiva. Estos cables son más delgados que un cabello humano y se aseguran con pestañas de bloqueo microscópicas. Un solo deslizamiento de unas pinzas metálicas y habrás cortado la señal de video. Los laboratorios profesionales como el nuestro operan en entornos seguros para ESD para evitar descargas estáticas que queman las placas base al instante. Cuando eliges un profesional, obtienes una garantía. Si rompemos un conector durante el reemplazo del chasis del dron, cubrimos el costo. Si lo rompes en tu cocina, la factura es solo tuya.
La lista de verificación de habilidades para el bricolaje
El éxito requiere más que manos firmes. Debes sentirte cómodo con la microsoldadura y manejar 20 o más tamaños de tornillos únicos. Un reemplazo de chasis por primera vez suele llevar de 4 a 6 horas de trabajo concentrado. En contraste, nuestros técnicos experimentados como Jose pueden completar la misma tarea en 45 minutos. Asegúrate de tener un espacio de trabajo dedicado donde las piezas no se muevan durante días si necesitas pedir un componente que olvidaste. Necesitarás llaves hexagonales de 1.5 mm y 2.0 mm, herramientas de palanca de nailon y una bandeja magnética para piezas para mantener la cordura.
Cuándo llamar al Dr. Dron
Los conjuntos de sensores complejos son la principal razón para evitar el bricolaje. Los sensores de evitación de obstáculos requieren una alineación física precisa y una calibración de software utilizando DJI Assistant 2; de lo contrario, tu dron podría desviarse o estrellarse. Si tu accidente involucró agua, el 85% de las veces un simple cambio de chasis no solucionará la corrosión subyacente. Usamos limpiadores ultrasónicos para salvar componentes electrónicos "salados" que los aficionados suelen pasar por alto. Recuerda que abrir la carcasa generalmente anula tu garantía del fabricante de 12 meses o la cobertura de DJI Care Refresh. ¡Deja que los profesionales manejen la responsabilidad para que puedas comprar con confianza! ¡Asegura tu reparación hoy y vuelve a volar rápido! 🚨🛸🔥
El camino paso a paso para un reemplazo exitoso del chasis
¿Listo para ensuciarte las manos? Realizar un reemplazo del chasis del dron es un rito de iniciación para todo piloto serio. Transforma un peso muerto en tierra de nuevo en una máquina de alto rendimiento. Este proceso requiere más que un destornillador; exige una mentalidad quirúrgica y un espacio de trabajo organizado. Estás moviendo el cerebro, el corazón y el sistema nervioso de tu aeronave a un nuevo cuerpo, así que la precisión es tu única opción. 🚀
Fase 1: El desmontaje quirúrgico
Antes de tocar un solo tornillo, asegúrate de que la batería de vuelo esté retirada y los condensadores descargados manteniendo presionado el botón de encendido durante 5 segundos. Utiliza una bandeja magnética para organizar cada sujetador. Seguimos la regla de "una foto por tornillo". Toma una foto de alta resolución de 12MP cada vez que retires un componente. Si un tornillo está atascado debido al fijador de roscas de fábrica, aplica la punta de un soldador en la cabeza del tornillo durante 10 segundos para ablandar la unión. Esto evita que las cabezas se dañen y te ahorra horas de frustración.
- Descarga todo: Asegúrate de que no haya energía residual antes de desconectar componentes CMOS sensibles.
- Documenta las capas: Captura la orientación exacta del módulo GPS y los amortiguadores internos.
- Verificación de herramientas: Utiliza llaves hexagonales de alta calidad para evitar redondear los enchufes de 1.5mm o 2.0mm.
Fase 2: La migración y el reensamblaje
El etiquetado es tu mejor amigo durante la "Fase de Espagueti". Usa pequeñas tiras de cinta adhesiva para numerar los cables de tu motor (del 1 al 4) y sus puertos ESC correspondientes. Al colocar la placa base, aplica una cantidad de pasta térmica del tamaño de un guisante fresco, como Arctic MX-6, para asegurar que el disipador de calor haga un contacto del 100%. Esto evita el estrangulamiento de la CPU en pleno vuelo. Dirige tus antenas de 5.8GHz lejos de las placas de fibra de carbono para mantener la máxima penetración de la señal. Finalmente, aprieta cada tornillo a exactamente 0.4 Nm de torque; un apriete excesivo puede aplastar delicados rastros de PCB o agrietar el nuevo chasis.
No te apresures con los cables planos. Estos conectores a menudo albergan más de 40 pines en un espacio de menos de 10 mm de ancho. Usa pinzas de plástico para abrir las compuertas de bloqueo. Nunca tires del cable, ya que un solo micro-desgarro resultará en un error de "Cardán no detectado" que cuesta 150 dólares de reparar. Si el cable no se desliza suavemente, detente y realinea. La paciencia aquí es la diferencia entre un reemplazo de chasis de dron exitoso y un costoso viaje al taller de reparaciones. 🛠️
Fase 3: Calibración de software
El software es tan vital como el hardware. Una vez que la carcasa esté cerrada, realiza una prueba de banco "sin hélices". Gira los motores al 15% del acelerador durante 60 segundos mientras monitoreas si hay calor o vibración inusuales. A continuación, conéctate a la actualización de junio de 2024 de DJI Assistant 2 o al software específico de tu fabricante. Debes recalibrar la IMU en una superficie perfectamente nivelada y ejecutar la calibración del sensor visual utilizando un patrón de monitor de alto contraste. Esto asegura que tus sensores de evitación de obstáculos no estén "viendo" los nuevos bordes del chasis.
Termina con una calibración de brújula a al menos 15 metros de estructuras metálicas o vehículos. Tu primer vuelo debe ser un vuelo estacionario a baja altitud de 2 metros. Escucha si hay resonancia de alta frecuencia; si los motores suenan "roncos", verifica si los tornillos de tu pila están sueltos. La mayoría de los chasis modernos requieren un período de asentamiento de 10 minutos donde se verifica la migración de tornillos después del primer vuelo. ¡Se habla Español! Nuestro equipo está listo para ayudarte con cualquier obstáculo técnico.
Obtención de piezas originales y la ventaja de Drone Doctor
No caigas en las trampas de "estilo OEM" que se encuentran en los sitios de subastas comunes. Estos chasis de "parecido original" pueden ahorrarte 15 dólares por adelantado, pero a menudo cuestan cientos a largo plazo. Desde enero de 2024, nuestro laboratorio ha visto un aumento del 35% en reparaciones causadas por chasis de terceros que se rompen bajo el par motor estándar. Drone Doctor LLC sigue siendo el líder indiscutible en Ventas, Reparación y Servicio porque nos negamos a escatimar. Proporcionamos la potencia profesional que necesitas para mantenerte en el aire. Nuestro taller es el recurso de referencia para entusiastas y pilotos empresariales por igual. Hemos construido nuestra reputación sobre la confianza y el dominio técnico. ¡Actúa AHORA para asegurar las piezas para las últimas series DJI Mini 5 y Mavic 4 antes de que se cierre la próxima ventana de envío! La demanda es alta, y estos componentes son imprescindibles para cualquiera que busque mantener su flota. También ofrecemos consultas técnicas completas para asegurarte de que obtienes la pieza correcta a la primera. ¡Se habla Español, por lo que nuestro equipo está listo para ayudar a nuestra diversa comunidad de pilotos con asesoramiento experto en su idioma preferido!
Por qué las piezas originales son importantes para la seguridad del vuelo
La precisión lo es todo en el reemplazo del chasis del dron. Un chasis de plástico no original a menudo pesa solo 5 gramos más que el original, pero esa pequeña discrepancia arruina la duración de la batería. En un dron de la serie DJI Mini, ese peso extra puede reducir el tiempo de vuelo estacionario en un 12% y activar advertencias de "Sobrecarga del motor" con vientos fuertes. La transparencia RF es otro factor importante. Los materiales compuestos baratos a menudo contienen impurezas metálicas que bloquean la señal remota. Esto lleva a pérdidas de señal a distancias tan cortas como 300 metros. Siempre verifica los números de pieza con los registros de revisión oficiales de DJI. Desde las actualizaciones de hardware de 2023, muchos modelos tienen sutiles cambios de clip internos que parecen idénticos pero no se bloquean correctamente. Usar la revisión incorrecta puede hacer que la carcasa se parta en pleno vuelo.
- Tolerancias de peso: Los chasis genéricos utilizan plásticos reciclados más pesados que agotan las baterías de vuelo más rápido.
- Integridad de la señal: Los chasis originales se prueban para garantizar la transparencia de 2.4GHz y 5.8GHz y evitar pérdidas de control.
- Integridad estructural: Las piezas de fábrica incluyen el refuerzo de tornillos exacto necesario para soportar vibraciones de altas RPM.
Deja que los profesionales se encarguen: Nuestro proceso de reparación
A veces, un proyecto de bricolaje se convierte en más de lo que esperabas. Si te has topado con un muro, deja que nuestros expertos tomen el control. Ofrecemos un tiempo de respuesta de diagnóstico de 48 horas para que vuelvas a volar para tu próxima gran sesión. Nuestro equipo, dirigido por Liz y José, trata cada dron como una herramienta de nivel empresarial. Se aseguran de que cada reemplazo de estructura de dron cumpla al 100% con los estándares de fábrica originales. Liz gestiona nuestro control de calidad, mientras que José aporta años de experiencia técnica al banco de trabajo. Solo este año han reparado con éxito más de 2.500 drones. Compra con confianza; ofrecemos una garantía de satisfacción total en todos los reemplazos de estructura. No solo arreglamos drones; restauramos tu tranquilidad. Nuestro flujo de trabajo está diseñado para la velocidad y la precisión, asegurando que no te pierdas ni un solo atardecer o trabajo de topografía.
¿Listo para que tu equipo vuelva a estar en óptimas condiciones? No te arriesgues a un segundo accidente con una reparación de bricolaje defectuosa. Nuestro equipo está listo para brindarte el servicio profesional que mereces. Puedes ¡Obtener una cotización de reparación profesional hoy mismo! y ver por qué somos el centro de servicio mejor valorado de la industria. Asegura tu lugar en nuestra cola de reparaciones y experimenta la diferencia de Drone Doctor. Estamos aquí para elevar tus capacidades y mantener tu tecnología en movimiento.
Vuelve a volar con poder profesional
Un chasis agrietado no significa que tus días de vuelo hayan terminado. Has aprendido que un reemplazo exitoso de la estructura del dron requiere un meticuloso proceso de bricolaje de 20 pasos o la precisión especializada de un técnico certificado. Nuestros datos internos de 2023 muestran que el 45% de los pilotos que intentan intercambios de bricolaje encuentran problemas con cables planos delicados o soldadura de motores. No te arriesgues a un fallo en pleno vuelo conformándote con componentes genéricos que carecen de integridad estructural. Confía en la empresa reconocida como líder en ventas, reparación y servicio. Nuestro equipo completa más de 5.000 reparaciones profesionales anualmente, asegurando que cada dron regrese al cielo en óptimas condiciones. Recibirás un servicio personal y experto de profesionales dedicados como Liz y José, quienes entienden las necesidades específicas de hardware de tu modelo. También brindamos soporte completo en español para asegurar que cada piloto de nuestra comunidad reciba la ayuda que necesita. Estamos listos para ayudarte a elevar tus capacidades hoy.
¡Asegura tus piezas de dron originales o reserva una reparación AHORA!
Preguntas frecuentes
¿Cuánto cuesta en promedio un reemplazo de la estructura de un dron?
Un reemplazo estándar de la estructura de un dron cuesta entre $150 y $550, dependiendo de tu modelo específico. Normalmente, pagarás entre $50 y $250 por el chasis físico y entre $100 y $300 adicionales por la mano de obra profesional. Las estructuras empresariales de gama alta pueden superar los $1,200 solo por las piezas. Asegura tu reparación hoy para volver a volar sin arruinarte.
¿Puedo usar una estructura impresa en 3D para reemplazar la estructura de mi DJI Mavic?
No deberías usar una estructura impresa en 3D para un DJI Mavic porque la mayoría de los filamentos de PLA o PETG carecen de la resistencia a la tracción de 400 MPa que se encuentra en el policarbonato de grado de fábrica. Si bien los aficionados imprimen estructuras para construcciones personalizadas de FPV, un Mavic requiere puntos de montaje internos precisos que las tolerancias de impresión de 0.2 mm a menudo no alcanzan. Cíñete a las piezas OEM originales para asegurar que tus sensores internos y módulos GPS permanezcan seguros durante las maniobras a alta velocidad.
¿Reemplazar la estructura anulará la garantía del fabricante?
Sí, reemplazar la estructura por tu cuenta anulará la garantía del fabricante de 12 meses en el 95% de los casos. DJI y Autel utilizan sellos a prueba de manipulaciones en los tornillos internos que alertan a los técnicos sobre reparaciones no autorizadas. Si deseas mantener tu cobertura, elige un centro de servicio autorizado como Drone Doctor, donde nuestros expertos certificados se encargan del intercambio utilizando protocolos aprobados por la fábrica.
¿Cuánto tiempo tarda un reemplazo profesional de la estructura de un dron?
Un reemplazo profesional de la estructura de un dron generalmente tarda de 3 a 7 días hábiles desde el momento en que recibimos tu aeronave. Nuestros técnicos dedican aproximadamente de 2 a 4 horas al trabajo real en el banco, pero incluimos una rigurosa prueba de vuelo posterior a la reparación de 20 puntos para asegurarnos de que todo esté perfecto. Actúa ahora para reservar tu espacio y minimizar tu tiempo de inactividad durante la temporada alta de vuelos.
¿Es posible actualizar a una estructura de fibra de carbono durante un reemplazo?
Definitivamente puedes actualizar a una estructura de fibra de carbono durante un reemplazo si estás volando un dron FPV personalizado o de carreras. La fibra de carbono ofrece una relación resistencia-peso de 5:1 en comparación con el plástico estándar, lo que mejora significativamente la agilidad de vuelo y la durabilidad ante choques. Para los modelos DJI o de consumo, cíñete a las especificaciones OEM para evitar desequilibrios de peso que podrían sobrecalentar tus motores en 5 minutos de vuelo.
¿Qué sucede si mi dron sigue desviándose después de un reemplazo de estructura?
Si tu dron se desvía después de un cambio de estructura, es probable que tengas una IMU sin calibrar o un motor inclinado incluso 2 grados. Las vibraciones de un tornillo ligeramente suelto pueden confundir el giroscopio de 6 ejes del controlador de vuelo. Vuelve a ejecutar inmediatamente la calibración completa del sensor en la aplicación; si la desviación persiste, verifica que los 4 motores estén perfectamente nivelados con el plano horizontal del chasis.
¿Necesito recalibrar el gimbal después de un cambio de estructura?
Debes recalibrar tu gimbal después de cada cambio de estructura para tener en cuenta los pequeños cambios en la geometría de montaje. Incluso una diferencia de 0.5 mm en la alineación de la nueva estructura puede causar un horizonte torcido o advertencias de sobrecarga del motor. Utiliza la función de calibración automática del gimbal en tu aplicación de vuelo mientras el dron está sobre una superficie 100% nivelada para asegurar una estabilidad de video de nivel profesional.
¿Dónde puedo encontrar el número de serie en la estructura de mi nuevo dron?
Encontrarás el número de serie en una etiqueta de 20 dígitos ubicada dentro del compartimiento de la batería o en el embalaje original. Dado que la estructura de reemplazo es una pieza de repuesto, no tendrá tu número de serie original grabado en el plástico. Asegúrate de registrar la ID interna del controlador de vuelo a través de tu software, ya que este sigue siendo el identificador principal para tus registros de vuelo de la Parte 107 y reclamaciones de seguro.