

Broken Drone Arm Repair: The Complete DIY vs. Pro Guide
That sickening crunch. The heart-stopping moment your high-tech marvel tumbles from the sky, followed by the sight of a dangling, broken arm. We get it. Your mind is probably racing with questions: Is my investment a total loss? Do I have the skills to fix this? The world of broken drone arm repair can seem intimidating, but grounding your passion isn't an option. Don't panic-you've come to the right place!
As the leader in drone service, we're here to put the power back in your hands. This is your complete guide to making the right call between a DIY fix and trusting a pro. We’ll break down the real costs, the hidden risks, and the essential steps for a successful home repair. We’ll also show you exactly when to call in the experts for a guaranteed, flight-ready fix. By the end, you’ll feel confident in your decision and have a clear flight path to getting your drone back in the air safely and reliably. Let's get you flying again!
Key Takeaways
- Discover the critical first steps to take immediately after a crash to assess the damage and prevent making it worse.
- Learn the key factors that determine whether a DIY fix is a smart move or a risky gamble that could cost you your drone.
- While our guide covers minor fixes, understand why a professional broken drone arm repair is the safest way to guarantee flight stability.
- Uncover how expert technicians spot hidden internal damage that a simple visual check will miss, protecting you from a future crash.
First Steps After a Crash: How to Assess a Broken Drone Arm
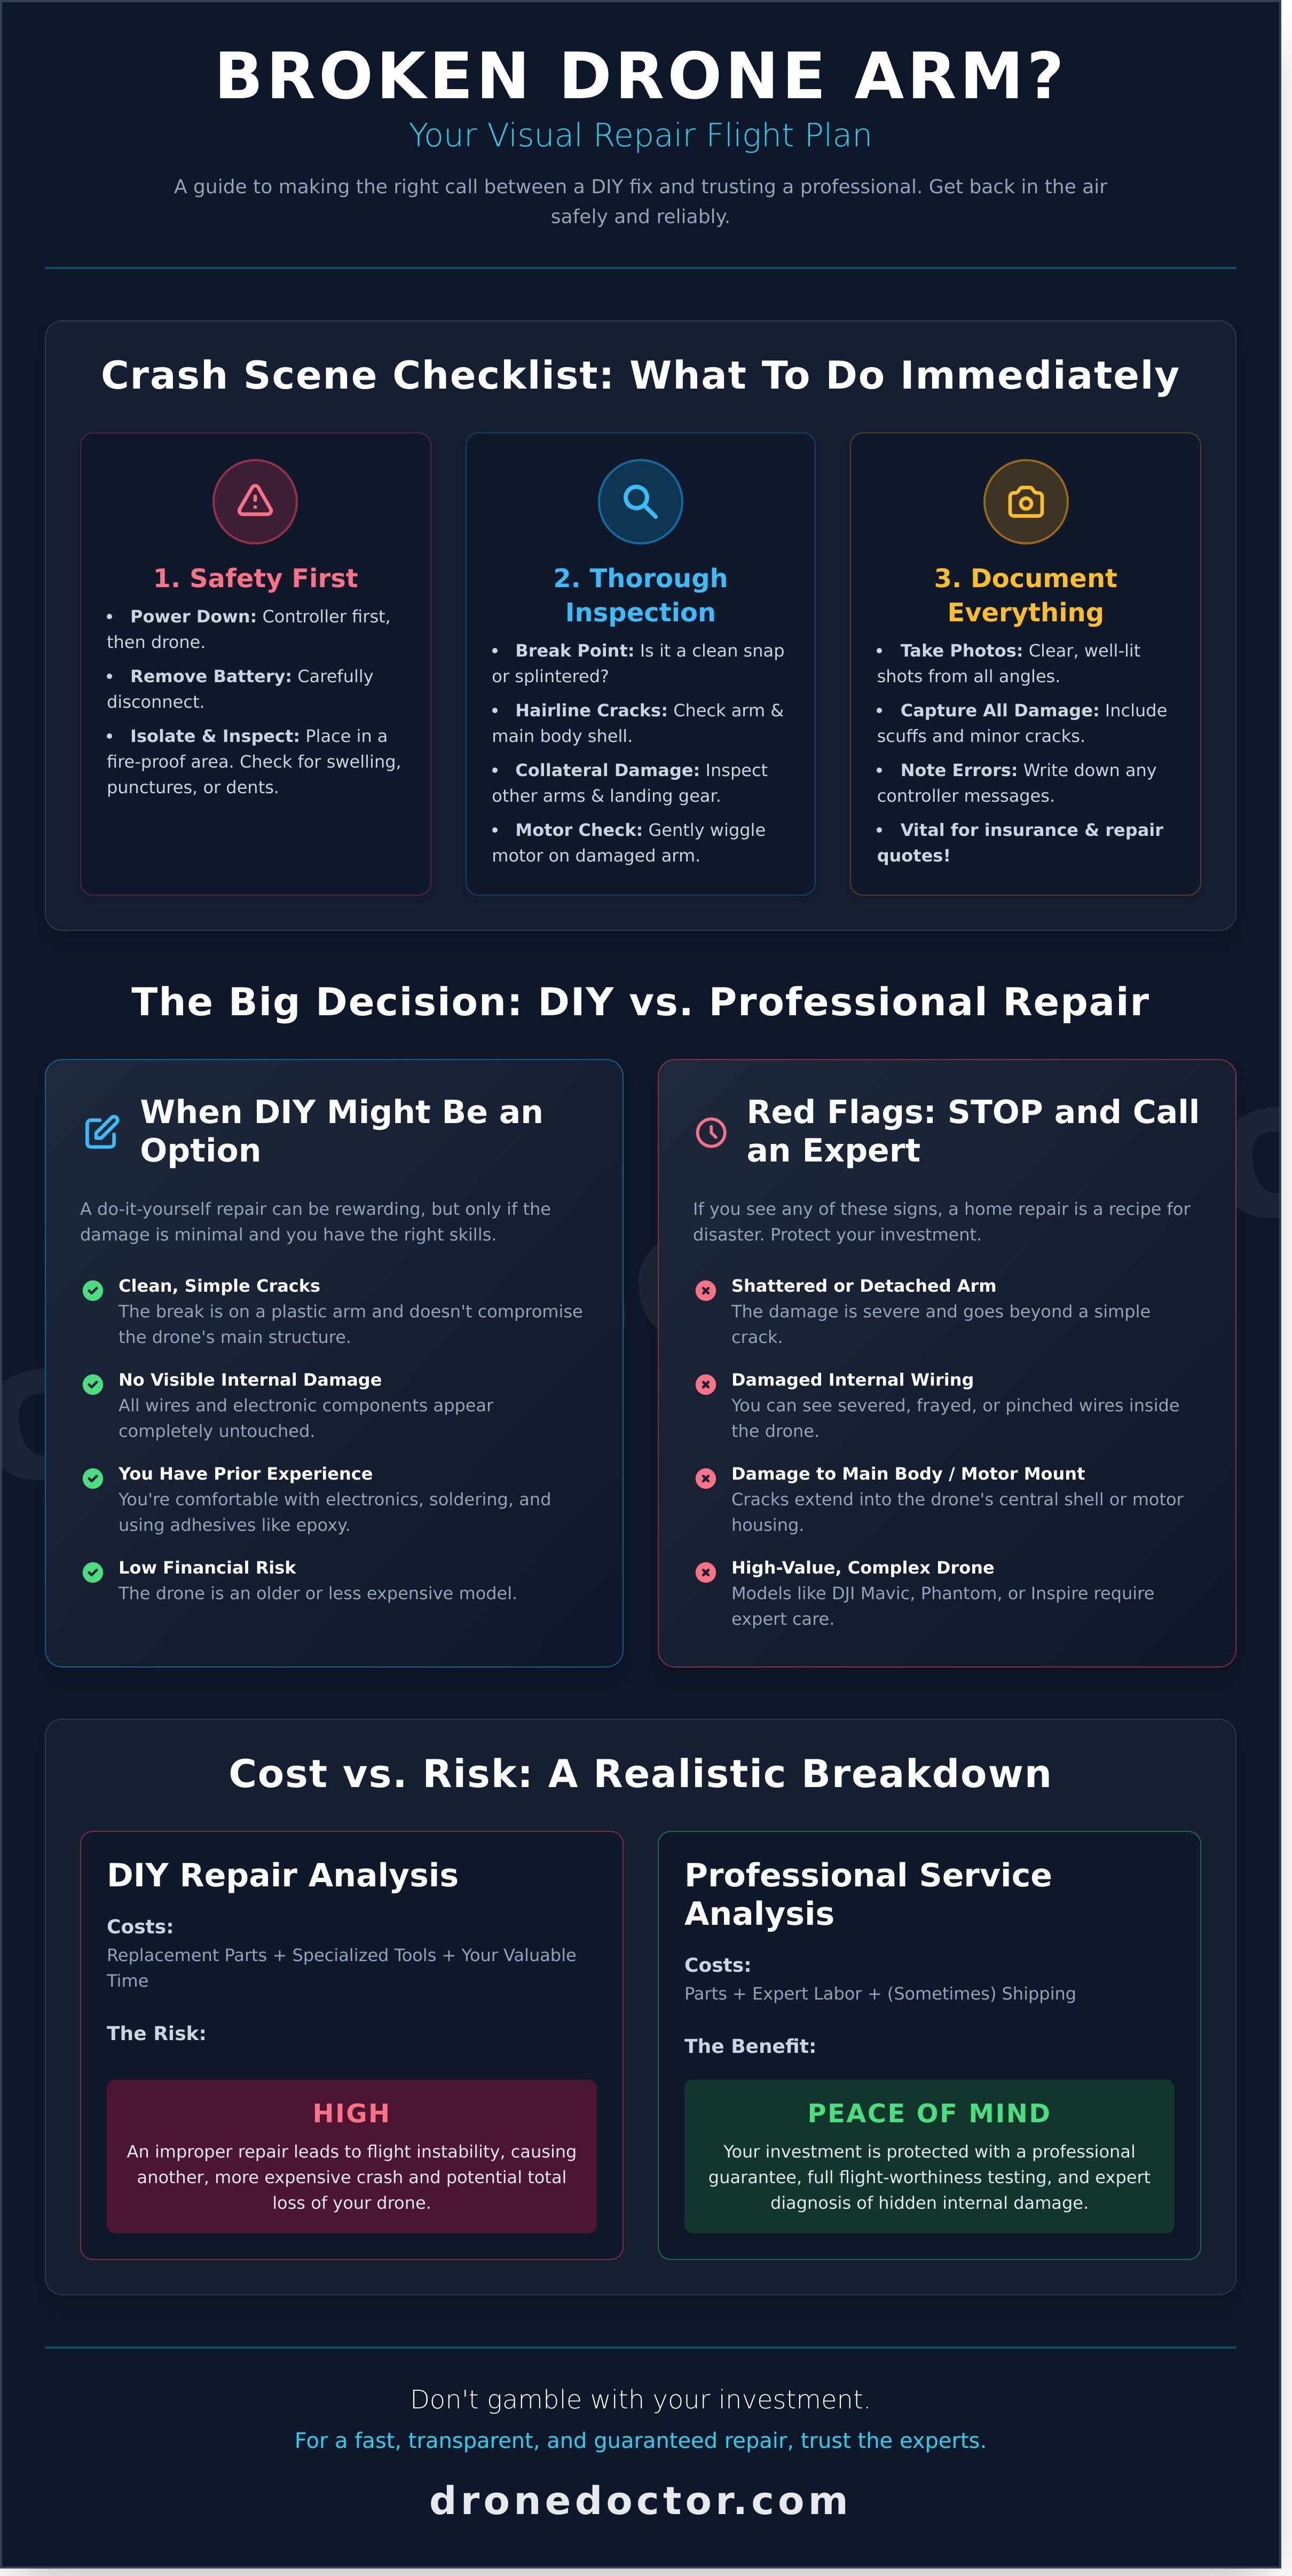
That sinking feeling in your stomach as your drone spirals to the ground is something no pilot wants to experience. But don't panic! What you do in the first 10 minutes after a crash is critical and can prevent further damage. Your high-tech Unmanned Aerial Vehicle (UAV) is tough, but a methodical assessment is the first step toward a successful broken drone arm repair. This initial inspection will determine whether you're looking at a simple part swap or a more complex fix. Let’s get you back in the air!
Safety First: Power Down and Isolate the Battery
Before you even think about the damage, prioritize safety. A compromised Lithium Polymer (LiPo) battery is a serious fire hazard. Act NOW and follow these steps immediately:
- Power Down: Turn off your controller first, then the drone itself.
- Remove the Battery: Carefully disconnect and remove the battery from the drone’s body.
- Isolate and Inspect: Place the battery in a safe, fire-proof location (like a LiPo bag or on a concrete surface) away from flammable materials. Check it for any signs of damage like swelling, deep dents, or punctures. If you see any of these, do not use it again.
Conducting a Thorough Visual Inspection
With the drone powered down, it’s time to play detective. A careful visual check will reveal the full extent of the damage. Grab your phone for light and look closely for these common issues:
- The Break Point: Examine the broken arm itself. Is it a clean snap, or is it splintered?
- Hairline Cracks: This is a big one. Look for tiny cracks extending from the broken arm into the main body shell. This can complicate the repair.
- Collateral Damage: Check all other arms, the landing gear, and the gimbal for stress marks or cracks.
- Motor Check: Gently try to wiggle the motor on the damaged arm. Any looseness could indicate damage to the motor mount or the motor itself.
Documenting the Damage for Repair or Insurance
Don't skip this step! Proper documentation is your best friend, whether you're filing an insurance claim or ordering parts for a DIY broken drone arm repair. Take clear, well-lit photos of the break from every angle. Be sure to also photograph any other scuffs, cracks, or damage you found during your inspection. If the drone displayed any error messages on your controller before crashing, write them down. This evidence is vital for getting accurate repair quotes and ensuring a smooth claims process.
DIY vs. Professional Repair: Making the Smart Choice
After a crash, deciding how to handle a broken drone arm repair is the most critical choice you'll make. Get it right, and you're back in the air. Get it wrong, and you risk a catastrophic failure on your next flight, potentially leading to a total loss. Don't worry-we're here to help you make the smart call. Let's break down the key factors: your budget, your timeline, the potential risks, and your technical skill level.
When DIY Drone Arm Repair Might Be an Option
Feeling confident? A do-it-yourself repair can be a great option, but only if the damage is minimal. You might be a good candidate for a DIY fix if:
- You're dealing with a clean, simple crack in a plastic arm.
- There is absolutely no visible damage to internal wires or electronic components.
- You have previous experience with electronics, soldering, and using strong adhesives like epoxy.
- The drone is an older, less expensive model where the financial risk is low.
Red Flags: When to STOP and Call an Expert Immediately
This is non-negotiable. If you see any of these warning signs, attempting a home repair is a recipe for disaster. Put the tools down and contact a professional if:
- The arm is completely shattered or detached from the drone body.
- You can clearly see severed, frayed, or otherwise damaged internal wiring.
- The crack or damage extends into the main drone body or the motor mount.
- Your drone is a high-value, complex model like a DJI Mavic, Phantom, or Inspire.
Cost vs. Risk: A Realistic Breakdown
Let's talk numbers and sense. A DIY broken drone arm repair might seem cheaper upfront, but you must account for the hidden costs and risks.
DIY Repair: Your costs include replacement parts, specialized tools you may need to buy, and your valuable time. The biggest risk is flight instability from an improper repair, which could cause another, more expensive crash.
Professional Service: The cost covers parts, expert labor, and sometimes shipping. The massive benefits are a professional guarantee, tested flight-worthiness, and the peace of mind that comes from expert service. Your investment is protected.
Still on the fence? Let the experts take a look. Unsure about the damage? Get a free expert diagnosis from us. We'll give you an honest, no-obligation assessment so you can fly with confidence!
The DIY Guide: How to Fix a Cracked Plastic Drone Arm
Ready to tackle that crack and get back in the air? Awesome! This guide is your ticket to a successful DIY fix. But first, a critical heads-up: this method is designed for minor, clean cracks only-not for arms that are shattered or severely damaged. Attempting a complex broken drone arm repair without the right experience can lead to bigger problems and unsafe flights. This process demands precision and patience. If you feel even a little unsure at any point, stop immediately. Your satisfaction and safety are our top priority, so don't hesitate to contact our expert technicians for professional service.
Essential Tools and Materials
Having the right gear is non-negotiable for a lasting repair. Don't cut corners here! Grab these must-haves before you start:
- High-Strength Epoxy: Use a 2-part plastic bonding epoxy. Super glue is NOT strong enough for flight vibrations.
- Cleaning Supplies: Isopropyl alcohol (90%+) and clean microfiber cloths.
- Clamps or Zip Ties: To hold the arm securely while the epoxy cures.
- Soldering Iron (Optional): Only if you find a minor, disconnected wire during disassembly.
Step-by-Step Arm Repair Process
Precision is key. Follow these steps exactly for a rock-solid repair that will hold up under pressure.
- Disassemble: Carefully open the drone's shell to get full, unobstructed access to the cracked arm. Keep your screws organized!
- Prep the Surface: Thoroughly clean both sides of the crack and the surrounding area with isopropyl alcohol. A clean surface is essential for a strong bond.
- Apply Epoxy: Mix your 2-part epoxy according to the manufacturer's instructions. Apply a thin, even layer inside the crack and along the surface for reinforcement.
- Clamp and Cure: Firmly clamp the arm together, ensuring perfect alignment. Use zip ties if clamps won't fit. Wipe away any excess epoxy and let it cure for the full recommended time-don't rush it!
Critical Post-Repair Calibration and Testing
You're not done yet! A successful broken drone arm repair is only confirmed after rigorous testing. This final phase ensures your drone is safe and stable for flight. Do not skip these checks!
- Reassemble and Check: Put your drone back together, making sure every screw is snug.
- Calibrate Everything: Perform a full IMU and compass calibration from your controller or app.
- Hover Test: In a safe, open area with no wind, perform a short (1-2 minute) hover test at a low altitude (3-5 feet).
- Listen and Look: Pay close attention to any unusual motor sounds, vibrations, or drifting. If anything seems off, land immediately.
Why Professional Drone Repair is Safer and More Reliable
While a DIY fix might seem like a quick and cheap solution, a cracked arm is often just the most obvious symptom of a much bigger problem. The impact that broke the arm sent a shockwave through the entire aircraft, potentially causing hidden damage that glue and tape can't fix. Before you risk your drone's safety, consider the key advantages of trusting the experts at Drone Doctor LLC for your broken drone arm repair.
Diagnosing Hidden Internal Damage
Our expert technicians see beyond the visible crack to ensure total flight safety. A hard impact can easily compromise sensitive electronics. We perform a complete diagnostic check because we know that a safe repair involves more than just the broken part. We inspect for:
- Damage to the ESC or flight controller.
- Micro-tears and connection issues in internal cables.
- Stressed or damaged motor bearings from the impact.
- Hairline fractures in the main chassis or other arms.
Access to OEM Parts and Proper Shell Replacement
Epoxy is a patch, not a structural replacement. A DIY repair can throw off your drone's delicate balance, affecting flight performance and stability. We use only genuine, manufacturer-grade replacement arms and shells. This guarantees a perfect fit, restores the original aerodynamic profile, and ensures your drone flies exactly as it was designed to-meeting original factory specifications.
The Value of a Professional Warranty
What happens if your home repair fails mid-flight? Every repair performed by Drone Doctor LLC is backed by our comprehensive service warranty. This guarantee provides total peace of mind that a DIY fix simply can't offer. If anything related to our repair goes wrong, we'll make it right. Fly with confidence knowing your investment was restored by certified professionals.
When you need a broken drone arm repair that you can truly count on, professional service is the only answer. Get a fast, free repair estimate from the experts at Drone Doctor LLC today!
The Drone Doctor Repair Process: Fast, Easy, and Transparent
While a DIY fix can be rewarding, sometimes you need the guaranteed results and speed of a professional. If a broken drone arm repair feels too complex or you simply want to get back in the air with zero hassle, Drone Doctor is your go-to partner. We've engineered a streamlined repair service designed for your complete convenience and confidence. From the moment you contact us, you’ll know exactly what to expect. Your satisfaction isn't just a goal-it's our top priority.
Step 1: Get Your Free Online Quote
Kickstart your repair in minutes! Just fill out our simple online form with your drone's model and a quick description of the damage. For the most accurate estimate, upload the photos you took of the affected area. Our expert technicians will review the details and send you a free, no-obligation initial quote. It’s that easy.
Step 2: Ship Your Drone to Our Experts
Once you approve the initial quote, we’ll provide clear, step-by-step instructions for safely packing and shipping your drone. Send it off to our secure, state-of-the-art repair facility, and rest easy. We’ll send you an immediate notification the moment our team receives your package, so you're always in the loop.
Step 3: Diagnosis, Repair, and Return
This is where our certified technicians work their magic. We don’t just fix the obvious issue; we perform a comprehensive diagnostic to ensure your drone is in peak condition. Here’s what happens next:
- Full Inspection: We conduct a thorough diagnostic to identify all issues.
- Final Confirmation: We contact you with a final, detailed repair cost. No work begins without your explicit approval. No surprises!
- Expert Repair: Once approved, we complete the broken drone arm repair using high-quality parts.
- Flight Testing: We rigorously test-fly and calibrate your drone to guarantee it performs flawlessly.
- Secure Return: We pack your drone securely and ship it right back to your doorstep, ready for its next flight.
Your Drone's Next Flight is Just a Click Away!
A snapped propeller arm feels like a catastrophe, but it’s a problem with a clear solution. As we've covered, while a DIY patch-up might seem tempting for a small crack, the hidden risks-from flight instability to total failure-are huge. The smartest and safest path for a complete broken drone arm repair is always with a professional. It's the only way to guarantee your drone is perfectly calibrated and truly airworthy.
Don't gamble with your expensive gear! At Drone Doctor, our certified technicians for top brands like DJI get the job done right, fast. We back our work with a full warranty and pride ourselves on rapid turnaround times because we know you're itching to fly. Take the guesswork out of your repair. Don't risk your drone. Get a fast, professional repair quote from Drone Doctor today!
We'll get you back in the sky in no time. Happy flying!
Frequently Asked Questions
How much does it cost to professionally repair a broken drone arm?
Professional repair costs can vary, but you can typically expect a range from $150 to $350, depending on your drone model and the extent of the damage. For high-end models like a DJI Inspire, the cost might be higher. This price usually includes parts and expert labor, ensuring your drone flies like new. At Drone Doctor, we provide a transparent quote upfront, so you know exactly what to expect. Get a professional fix without the guesswork!
Is it worth fixing a broken arm on an older drone like a DJI Phantom or Mavic Pro?
Absolutely! Fixing a broken arm on a trusty DJI Phantom or Mavic Pro is often a fantastic, cost-effective choice. These drones are still powerful tools, and parts are generally available. Repairing them is much cheaper than buying a new model and extends the life of a drone you already know and love. It’s a great way to get your reliable workhorse back in the air without breaking the bank. Don't give up on it yet!
Can you repair carbon fiber drone arms, or just plastic ones?
Yes, you can repair both! The process just differs. Carbon fiber arms, common on FPV and racing drones, are typically repaired using specialized epoxy and carbon fiber patches, which creates an incredibly strong bond. For most consumer drones with plastic arms, the best solution is often a full shell or arm replacement to guarantee structural integrity. Both methods are effective when done correctly, getting your drone flight-ready again. We handle both with expert precision!
How long does a typical drone arm repair take at Drone Doctor?
We get you back in the air FAST! A typical drone arm repair at Drone Doctor is completed within 3-5 business days after we receive it. This can sometimes vary based on the specific part's availability, but we pride ourselves on our quick turnaround. Our expert technicians have the parts and skills on hand to get the job done right and efficiently. We'll always keep you updated throughout the process so you know exactly when to expect your drone back.
Will a repaired drone arm be as strong as the original?
A repaired arm can absolutely be as strong as the original, provided the job is done right. A full arm or shell replacement restores the drone to factory specifications. When performing a broken drone arm repair with high-quality epoxy on carbon fiber, the repaired joint can even be stronger than the surrounding material. The key is using the correct materials and techniques, which is why a professional repair often provides the most durable and reliable result for long-term confidence.
What's the difference between using epoxy and replacing the entire drone shell?
The main difference is scope and cost. Using epoxy is a targeted fix, ideal for a single clean crack. It's a cost-effective solution that reinforces the damaged area. A full shell replacement is a more comprehensive approach that addresses widespread damage. It's the best choice when there are multiple cracks or stress fractures, as it replaces the entire chassis for a factory-fresh structure. Your choice depends entirely on the severity of the crash damage.