

Drone Controller Repair: Your Ultimate Guide to Getting Back in the Air
That sinking feeling when your drone is ready for takeoff, but the controller is dead, unresponsive, or just plain broken? It’s every pilot’s nightmare, instantly grounding your high-flying ambitions and leaving you stuck on the sidelines. You’re left wondering: Can I fix this myself without causing more damage? Is it even worth it, or should I just buy a new one? The world of drone controller repair can seem complicated and slow, but it doesn't have to be.
Get ready to take control! This is your ultimate guide to getting back in the air-fast. We’ll walk you through simple diagnostic checks you can perform right now to pinpoint the problem. You'll discover safe, step-by-step DIY fixes for common issues that will save you time and money. And for those bigger problems? We’ll show you exactly when to call in the pros at Drone Doctor, demystifying the process so you know what to expect. Let's get you flying again!
Key Takeaways
- Quickly pinpoint common controller problems like connection drops and unresponsive sticks before they ruin your flight.
- Discover simple DIY fixes you can perform safely at home to solve many controller issues instantly.
- Understand the critical signs that indicate you need professional drone controller repair to avoid causing more expensive damage.
- Get a clear framework for deciding whether it's more cost-effective to repair or completely replace your damaged controller.
First Look: Diagnosing Common Drone Controller Problems
Nothing grounds a pilot faster than a malfunctioning controller. It's your command center, the critical link between your vision and your drone's flight. When it fails, your entire operation is on standby. But don't panic! Identifying the symptom is the first, most powerful step toward a solution. Your controller is a complex piece of technology, essentially a handheld UAV ground control station, and its issues can range from simple software glitches that need a reset to hardware failures that require professional drone controller repair. Let's break down the most frequent problems pilots face so you can get back in the air, fast.
Connection & Signal Issues
These are some of the most frustrating problems because the cause isn't always visible. If you're experiencing connection issues, you're likely seeing one of these warning signs:
- Failure to Pair: The controller and drone simply refuse to connect, no matter how many times you try.
- Weak or Dropped Signal: You get constant weak signal warnings, or the connection drops entirely, even at close range.
- Laggy Video Feed: The live video (FPV) feed stutters, freezes, or displays a 'no signal' error, making it impossible to fly safely.
Physical Damage & Control Stick Problems
Accidents happen. A single drop can lead to obvious external and internal damage. These hardware issues are usually easy to spot and are a clear sign you might need replacement parts or expert service.
- Unresponsive Controls: Joysticks feel loose, sticky, or don't respond accurately. Buttons, dials, or switches are physically broken, stuck, or do nothing when pressed.
- Cracked Casing: The controller's body has visible cracks or a broken antenna from an impact.
- Broken Mount: The holder for your phone or tablet is damaged and can no longer secure your device.
Power & Battery Failures
Without reliable power, your controller is just a paperweight. Battery and charging issues can develop over time or appear suddenly, posing a serious safety risk if they occur during flight.
- Won't Turn On: The controller is completely unresponsive, even when plugged in.
- Poor Battery Life: The battery dies extremely quickly or doesn't hold a full charge.
- Unexpected Shutdowns: The controller turns off without warning, potentially mid-flight.
- Charging Problems: The charging port feels loose, or the device shows no indication of charging when connected to a power source.
DIY Drone Controller Fixes: A Pilot's Pre-Flight Checklist
Controller on the fritz? Don't send it in for service just yet! Many common drone controller issues are surprisingly easy to fix right at home. Before you assume you need a costly professional drone controller repair, run through this simple pre-flight checklist. We've ordered these steps from easiest to most involved to help you get back in the air fast, saving you both time and money. Let's get started!
Step 1: Software Resets & Firmware Updates
Software glitches are the number one cause of controller malfunctions. Before you touch a single screw, tackle the digital side first. These simple steps resolve a huge number of connection and performance problems.
- Perform a Full Restart: The classic IT fix works for a reason. Power down both your drone and the controller completely. Wait 30 seconds, then turn them back on to clear any temporary errors.
- Update Your Firmware: Manufacturers constantly release firmware updates to fix bugs. Open your drone's flight app and check for updates for both the aircraft and the controller. Always install the latest version!
- Re-bind the Controller: Sometimes, the secure link between your drone and controller can be lost. Follow your manufacturer’s specific instructions to re-link, or "bind," the two devices for a fresh connection.
Step 2: Calibration and Settings Check
If a reset didn't do the trick, your controller's settings might be the culprit. Incorrect calibrations or settings can lead to erratic flight behavior or a total loss of control. These checks ensure your controller is speaking the right language to your drone.
- Recalibrate the Sticks: If your drone is drifting or the controls feel unresponsive, use the flight app's built-in calibration tool. This resets the joysticks' neutral points and range of motion.
- Reset to Factory Settings: This is a more powerful step that can eliminate corrupted data. Find the "Reset to Factory Settings" option in your app's menu. Remember to re-configure any custom settings afterward.
- Check Your Cable: For controllers that connect to a phone via a cable, a faulty wire is a common point of failure. Ensure you are using a high-quality, manufacturer-approved cable that isn't frayed or damaged. This is also a great time to ensure all your pre-flight procedures align with current FAA drone regulations for safe operation.
Step 3: Basic Physical Inspection
Finally, it's time for a quick hands-on inspection. A little physical TLC can often solve issues that software fixes can't touch. No need to open the controller up-just check the externals.
- Clean Joysticks and Buttons: Use a can of compressed air to gently blow dust and debris from around the gimbals, buttons, and switches. A sticky button can cause major problems.
- Inspect Battery Contacts: If your controller has a removable battery, take it out and check the metal contacts on both the battery and inside the controller for dirt or corrosion. Clean them with a dry microfiber cloth.
- Secure the Antennas: Make sure your controller’s antennas are screwed on tightly and positioned correctly for optimal signal strength as recommended in your user manual.
If you've worked through this entire checklist and your controller is still acting up, it may indicate a more serious hardware issue. At this point, it's time to consider a professional drone controller repair to diagnose the internal components safely.
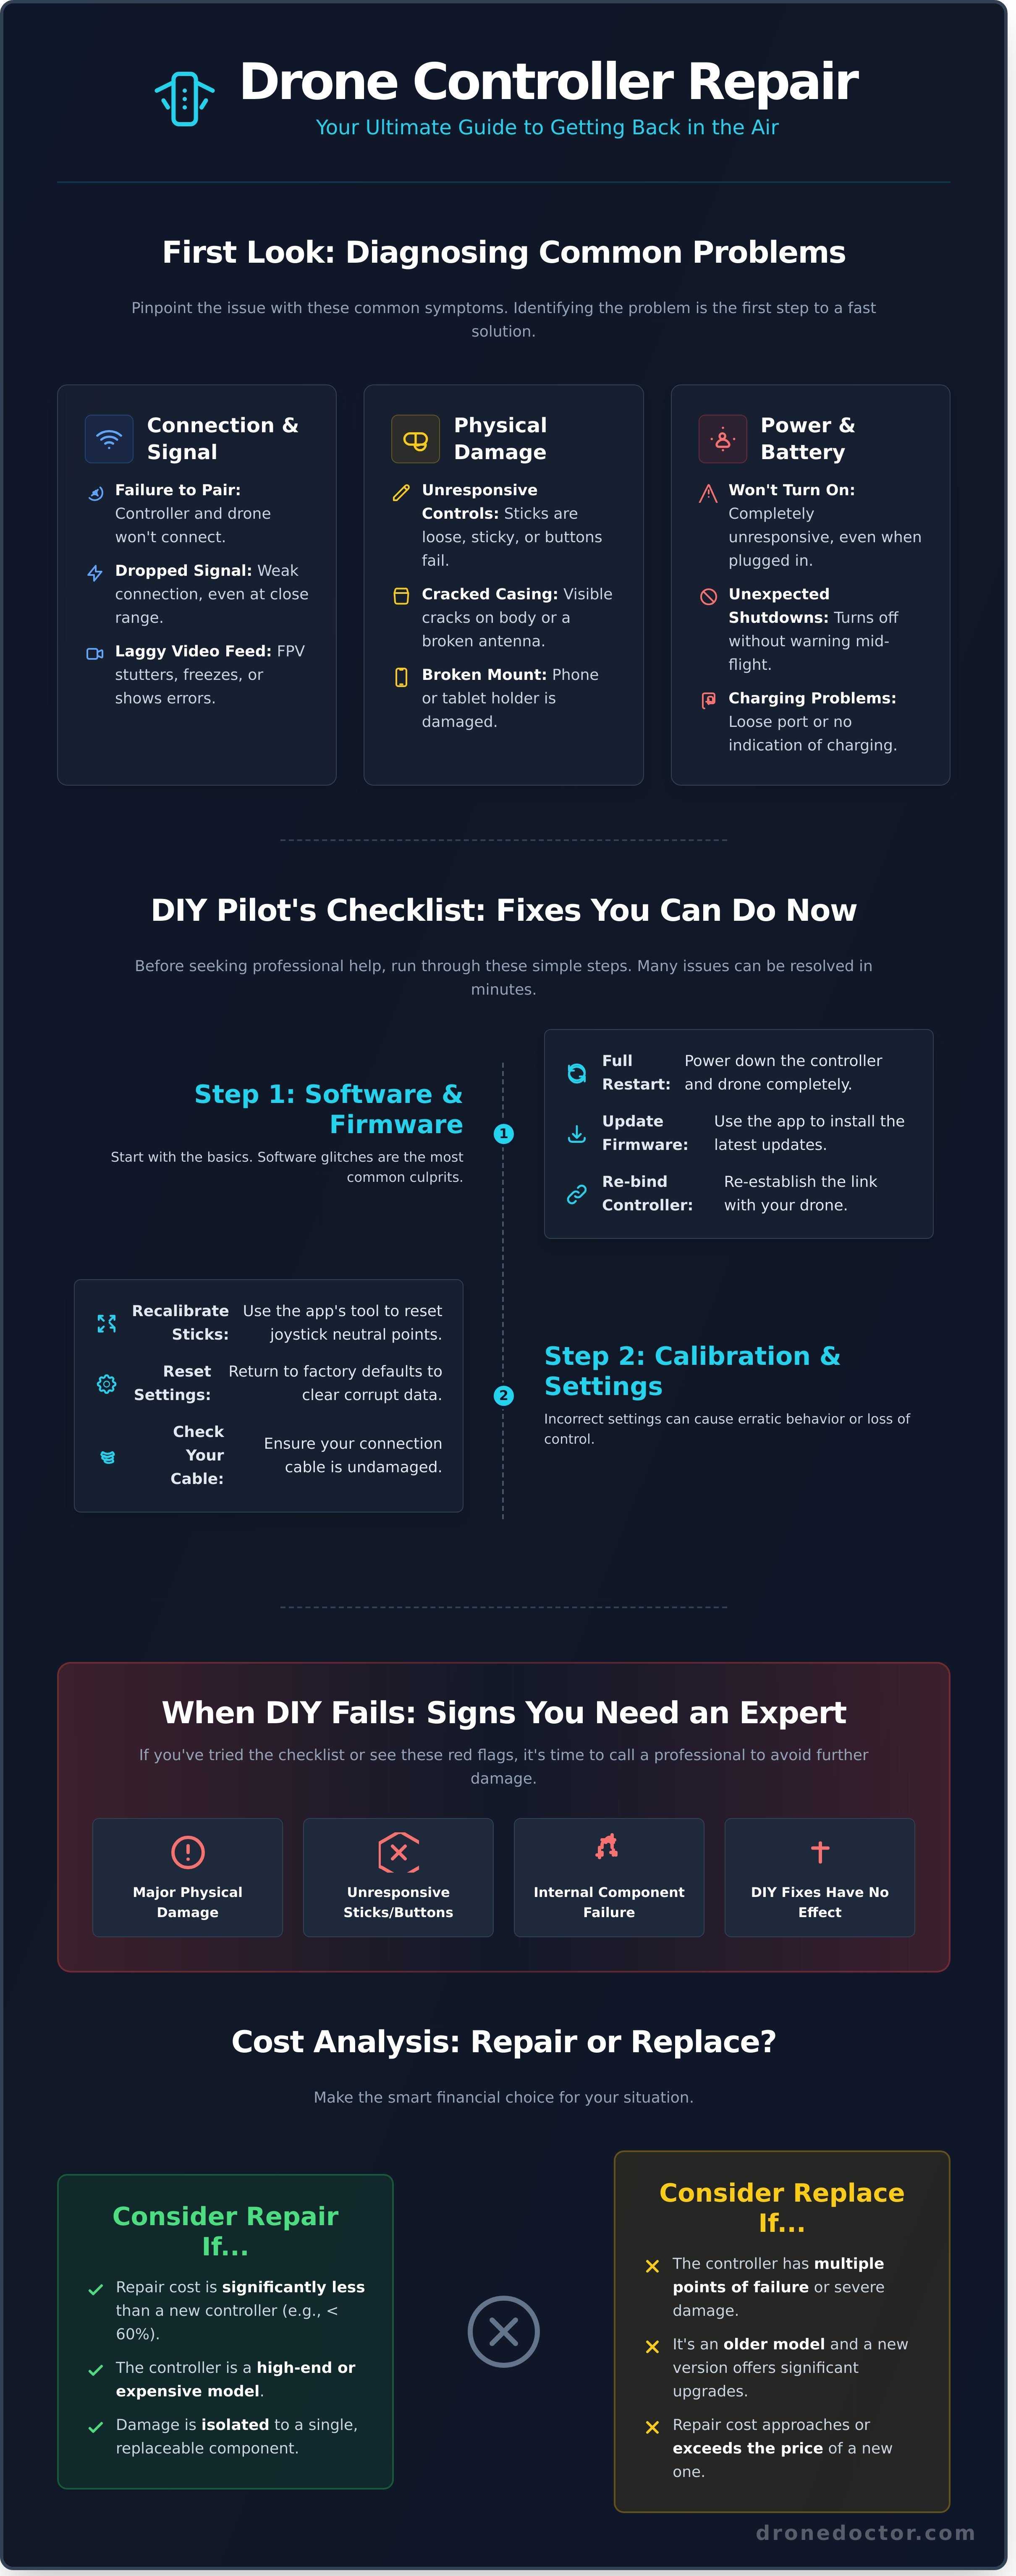
When to Call the Pros: Signs You Need Expert Repair
While a DIY fix can be incredibly satisfying, the complex electronics inside modern drone controllers mean some problems require a professional touch. Attempting to fix intricate internal issues without the right tools or knowledge can quickly turn a minor hiccup into a major disaster. Certified technicians work with specialized diagnostic equipment and follow established professional drone maintenance standards to ensure every repair is done right the first time. Knowing when to step back is key to protecting your investment. If you see any of the following red flags, it’s time to stop troubleshooting and call in an expert for your drone controller repair.
Clear Signs of Internal Hardware Failure
Internal components are delicate and can fail without warning. If you spot any of these critical issues, it's time to ground your controller and seek professional help immediately. These symptoms often point to a problem with the mainboard or power systems that can't be fixed with a simple part swap.
- The controller is completely dead. It shows no signs of life, won't charge, and won't power on, even with a known-good battery.
- You smell burning plastic or see smoke. This is a critical warning! Unplug it immediately and do not attempt to power it on again.
- A key component is physically broken. A snapped-off gimbal dial, a shattered antenna mount, or a broken control stick requires precise replacement.
- The controller fails after a major crash or impact. Even if it looks fine externally, a hard drop can dislodge internal components or create hairline cracks in the circuit board.
Damage Beyond Simple Fixes
Some damage is simply too complex for a home workshop. These issues often require micro-soldering skills, proprietary software, or access to OEM replacement parts that aren't available to the public. Attempting a drone controller repair in these cases is a major gamble.
- Any signs of water or liquid damage. Corrosion can start immediately and spread unpredictably. A professional needs to perform a deep clean and component-level inspection.
- The screen is cracked or malfunctioning. On a DJI Smart Controller or RC Pro, screen replacement is a delicate procedure that can damage other systems if done incorrectly.
- A charging port or other I/O port is physically broken. A damaged USB-C or HDMI port that is loose or pushed inside the casing requires expert soldering to fix without damaging the mainboard.
See these signs? Don't risk further damage! Get a free repair quote from our experts!
The Drone Doctor Repair Process: What to Expect
When your controller malfunctions, you need a fix that’s fast, reliable, and completely transparent. At Drone Doctor, we’ve engineered our entire process around one goal: getting you back in the air with confidence. Forget the guesswork and long wait times. We are the leader in drone service and support, and our industry-leading drone controller repair service is designed for maximum efficiency and your total satisfaction. No surprises, just expert service and clear communication every step of the way.
Here’s how our simple, three-step process works:
Step 1: Initial Diagnosis & Free Quote
Getting started is easy! Simply fill out our secure online form, describing the issues you're facing with your controller-whether it's a broken gimbal wheel, connectivity problems, or a faulty stick. Based on your description, we’ll provide a free, no-obligation preliminary quote. If you’re ready to proceed, just mail your controller to us using our secure, trackable shipping process. It’s the first step to a stress-free repair.
Step 2: Expert Repair & Testing
Once your controller arrives, our certified technicians get straight to work. We perform a full diagnostic analysis to pinpoint the exact cause of the problem, ensuring we fix it right the first time. Our team uses only high-quality, manufacturer-approved parts for every drone controller repair. After the repair, your controller undergoes a rigorous, multi-point testing protocol to guarantee it performs flawlessly and meets original factory standards.
Step 3: Fast Return & Flight
Your mission is to fly, and our mission is to get your gear back to you ASAP! As soon as your controller passes our final quality checks, we package it securely and ship it directly back to you. You’ll receive tracking information immediately, so you can monitor its journey home. Unbox your expertly repaired controller and get back to capturing incredible aerial footage with the confidence that your equipment is ready for action.
Ready to get your gear back in peak condition? Start your repair process and get a free quote today!
Cost Analysis: Is It Better to Repair or Replace Your Controller?
It's the ultimate question every pilot faces when their gear fails: should I fix it or just buy a new one? The answer isn't always simple and depends heavily on your controller's model, age, and the extent of the damage. Don't guess! Making an informed choice is the key to saving money and getting back in the air faster. We're here to break down the costs so you can make the smart call.
Cost of Common Repairs
For many common issues, a professional drone controller repair is an absolute no-brainer and far more affordable than buying new. These fixes typically offer huge savings and can get your trusted controller back in your hands quickly:
- Joystick/Gimbal Replacement: A broken or drifting stick is frustrating, but the fix is often very cost-effective.
- Battery Replacement: If your controller won't hold a charge, a new internal battery is a simple, inexpensive solution compared to a new unit.
- Antenna or Button Repair: A snapped antenna or a sticky button can usually be replaced for a fraction of the cost of a brand new controller.
When Replacement Makes More Sense
Sometimes, replacement is the smarter long-term investment. While we can fix almost anything, it's time to start shopping for a new controller if any of these situations apply to you:
- There's major board-level damage: Severe liquid damage or a cracked main logic board can lead to complex and expensive repairs.
- The repair cost is too high: Our rule of thumb? If the repair quote exceeds 60-70% of a new controller's price, replacement offers better value.
- It's an older, unsupported model: Parts may be scarce or discontinued, making a reliable repair impractical.
- You're ready for an upgrade: A broken controller can be the perfect excuse to get that new model with advanced features you've been wanting!
Ultimately, the decision comes down to a simple cost-benefit analysis. For minor to moderate issues, repair is almost always the winner. For catastrophic failures or outdated tech, a replacement will serve you better. Still not sure? The expert technicians at Drone Doctor can give you a fast, accurate diagnosis and a clear quote to help you decide. We're the leaders in sales, service, and drone controller repair-let us help you make the right move!
Your Flight Plan to Get Back in the Air, FAST!
A malfunctioning controller doesn't have to mean the end of your flying adventures. You're now equipped with the essential knowledge to troubleshoot common issues, perform crucial pre-flight DIY fixes, and confidently weigh the costs of repairing versus replacing your gear. This power puts you in command, ensuring a small technical glitch doesn't ground your passion.
When you've hit the limits of a DIY fix, it’s time to call in the professionals. For expert drone controller repair that you can depend on, look no further than Drone Doctor. As the undisputed leader in Drone Sales, Repair, and Service, our certified technicians are the best in the business, servicing all major brands with precision and care. Don't just take our word for it-our glowing reviews from pilots just like you prove our commitment to getting you airborne again.
Ready to fly with confidence? Your next aerial masterpiece is waiting. Don't stay grounded! Get a FAST and FREE repair quote now!
Frequently Asked Questions
What is the average turnaround time for a drone controller repair?
We work fast to get you back in the air! Our typical turnaround time is just 3-5 business days after we receive your controller. For more complex issues or if we need to special-order a rare part, it might take a bit longer. We pride ourselves on clear communication and will provide a precise timeline with your free, no-obligation quote. Our goal is always a speedy, expert fix!
Do you repair all brands of drone controllers, like DJI, Autel, and Skydio?
You bet! As the leader in drone service, our expert technicians are equipped to handle all the major brands, including DJI, Autel, and Skydio. We have extensive experience with their unique systems and access to high-quality replacement parts. If you have a controller from a different brand, contact our support team! We love a challenge and are ready to get your gear flying right.
Can you fix a water-damaged drone controller?
Water damage can be serious, but don't give up hope just yet. We have a high success rate with liquid-damaged electronics, but success depends on the extent of the corrosion. Our first step is a complete diagnostic to assess the damage. Based on our findings, we’ll provide a transparent quote for the drone controller repair. Act NOW-the sooner we get it, the better the chance of a full recovery!
Is there a warranty on the repair work you perform?
Shop with confidence! Your satisfaction is our top priority, and we stand behind our work 100%. Every repair performed by our certified technicians comes with our comprehensive 90-day warranty, which covers both the parts we install and the labor we perform. If you experience any issues related to the original repair within that period, we’ll make it right, guaranteed.
How do I ship my controller to you safely for repair?
Protect your investment! To ensure your controller arrives safely, pack it in a sturdy box with at least two inches of bubble wrap or other padding on all sides. Please remove any non-essential accessories like lanyards or sunshades before packing. We strongly recommend using a shipping service that provides a tracking number so you can monitor its journey to our service center.
My DJI Smart Controller screen is cracked. Is that repairable?
Absolutely! A cracked or shattered DJI Smart Controller screen is a very common issue, and our technicians are experts at fixing it. We can professionally replace the screen and digitizer assembly, restoring its crystal-clear view and flawless touch functionality. Don’t let a broken screen keep you grounded. This is a standard drone controller repair for our team, so get your free quote today!