

Drone Obstacle Avoidance Sensor Repair: The 2026 Professional Guide
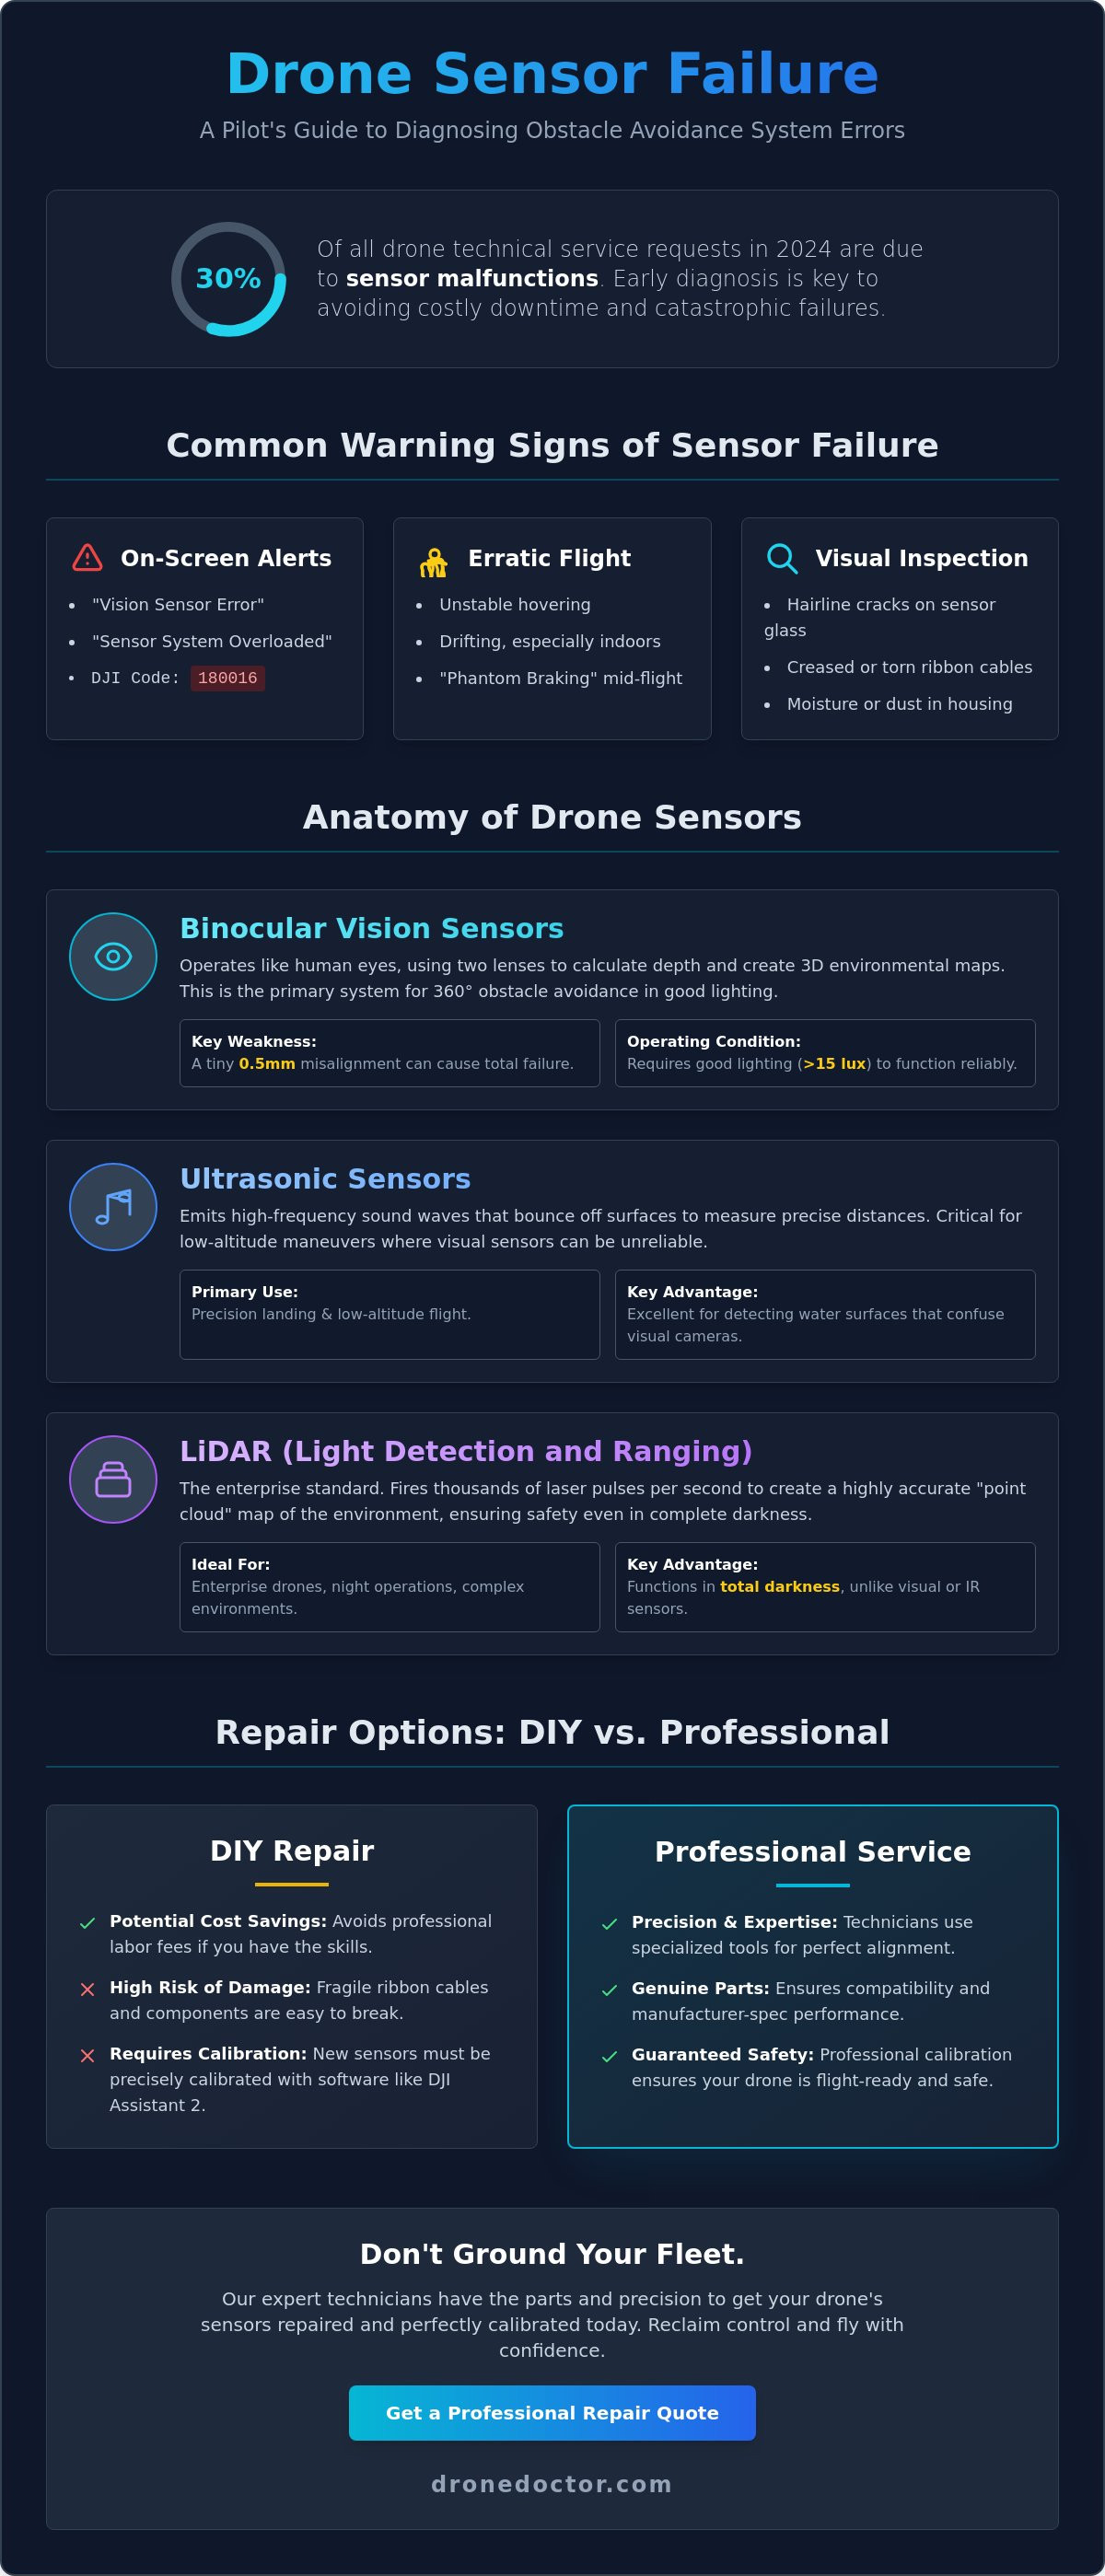
Last Tuesday, a commercial pilot in Miami watched their high-end rig drift toward a concrete pillar because a single vision sensor failed to trigger. You shouldn't have to ground your fleet or wait weeks for a manufacturer's technician to call you back. Mastering drone obstacle avoidance sensor repair is the fastest way to slash your downtime and reclaim total control over your equipment. Industry data from 2024 shows that sensor malfunctions account for 30% of all technical service requests, so you're definitely not alone in this struggle.
We understand the anxiety of seeing a "System Error" message and fearing you'll damage the drone further by opening it up. It's a common worry, but you're ready to move past the confusion of calibration software and expensive repair bills. This guide gives you the professional power to diagnose faults, swap components, and verify safety protocols with confidence. We'll walk through the exact troubleshooting steps, parts replacement, and software resets needed to get you back in the sky today. Let's get your drone flight-ready!
Key Takeaways
- Spot the "Vision Sensor Error" warnings early to save your drone from a catastrophic failure before your next high-stakes flight.
- Understand how binocular vision and LiDAR work together to build the 3D maps that keep your aircraft safe in complex environments.
- Choose the right path for your drone obstacle avoidance sensor repair by weighing DIY costs against professional precision and genuine parts.
- Master the DJI Assistant 2 calibration process to ensure your replacement sensors are perfectly aligned and ready for immediate action.
- Discover the "no-stone-unturned" diagnostic secrets the pros use to get both consumer and enterprise drones back in the air with total confidence!
Common Signs Your Drone Obstacle Avoidance Sensors Are Failing
Your drone's safety depends on a high-tech network of vision cameras, ultrasonic rangefinders, and infrared modules. These collision avoidance systems allow your aircraft to perceive its surroundings in real-time, creating a 360-degree safety bubble. When these components fail, your professional rig becomes a liability. Don't wait for a total wreck to seek drone obstacle avoidance sensor repair; early detection is the secret to protecting your gimbal and internal circuitry.
Watch your controller screen for "Vision Sensor Error" or "Sensor System Overloaded" alerts. These aren't just suggestions. They're critical warnings that your drone's brain is flying blind. You might notice your aircraft behaving erratically, such as unstable hovering or drifting while indoors. This happens because the sensors and the Inertial Measurement Unit (IMU) aren't syncing. The IMU relies on constant sensor data to calculate position. If that data stream breaks, the drone can't maintain a steady hover, even in zero-wind conditions. You might also experience "phantom braking," where the drone stops abruptly in mid-air because a faulty sensor detects a non-existent object.
Visual Inspection: What to Look For After a Crash
Stop flying and perform a physical check immediately after any impact. Grab a magnifying glass and inspect the sensor glass for hairline cracks. Even a microscopic scratch can refract light and blind the sensor's "vision." Check the ribbon cables for sharp creases or partial detachment from the mainboard. These cables are fragile; a 2-millimeter tear is enough to kill the signal. Look for moisture or dust trapped inside the sensor housing. If you see fogging behind the lens after a humid 2026 morning flight, the environmental seal is compromised and needs immediate attention.
Software Error Codes and Their Meaning
Modern drones provide specific diagnostic data to help you troubleshoot. DJI platforms often display Code 180016, which typically indicates a sensor calibration failure or a hardware communication break. Don't just ignore these pop-ups. Use your flight logs to pinpoint exactly which module is failing, whether it's the front, rear, or downward-facing array. It's vital to distinguish between a "dirty lens" warning and a hardware failure. If a thorough cleaning with a microfiber cloth doesn't clear the error, you're likely dealing with a damaged CMOS or a burnt-out infrared emitter. Professional drone obstacle avoidance sensor repair is the only way to ensure your 2026 flight specs remain within factory safety standards.
Act now to secure your equipment! Our expert technicians at Drone Doctor are ready to get you back in the air with confidence. Your satisfaction is our top priority, and we have the parts in stock to handle your repair today.
The Anatomy of Drone Sensors: Visual, Ultrasonic, and LiDAR
Understanding the hardware inside your aircraft is the first step toward successful drone obstacle avoidance sensor repair. Modern drones like the DJI Mavic 3 Pro rely on binocular vision sensors that operate much like human eyes. These dual-lens systems capture two simultaneous images to calculate depth through parallax, allowing the drone to build high-resolution 3D maps of its surroundings. When these sensors misalign by even 0.5 millimeters, the drone loses its ability to judge distance accurately, often resulting in a "Sensor Error" message on your controller. Act NOW if you see these warnings to prevent a catastrophic collision!
While visual sensors dominate daylight flight, ultrasonic sensors are the unsung heroes of low-altitude maneuvers. By emitting high-frequency sound waves that bounce off surfaces, these modules provide precision data for landing and water detection. This is critical because water reflects light in ways that confuse visual sensors. For enterprise users, the 2026 standard has shifted toward LiDAR (Light Detection and Ranging). Unlike consumer-grade vision, LiDAR modules fire thousands of laser pulses per second to create a point cloud, ensuring safety even in total darkness. If your drone feels sluggish, environmental factors like temperatures exceeding 104°F (40°C) or high-glare lighting can mimic a hardware failure by saturating the sensor's input. Secure your flight safety by checking these conditions before assuming a total hardware breakdown.
Binocular Vision vs. Infrared Sensing
Stereo vision in professional models provides 360-degree coverage, but it requires at least 15 lux of light to function reliably. In darker environments, infrared (IR) sensors take over. IR sensors project a grid of light to detect nearby objects, though they struggle with high-glare surfaces or transparent glass. If you've experienced a clip or a crash near a window, it's likely the IR beam passed straight through. Our expert team at Drone Doctor specializes in recalibrating these delicate systems after impact to get you back in the air with professional power. Se habla Español to ensure all our community members get the best support!
The Role of the Central Processing Unit (CPU) in Avoidance
The sensor is only as good as the brain behind it. The drone's CPU must process gigabytes of spatial data in under 10 milliseconds to execute an emergency brake. Recent research into drone collision avoidance schemes highlights how integrated flight controllers manage this massive data load to ensure stability. If you notice a 2-second lag in your video feed, it often indicates a processing bottleneck where the CPU is struggling to prioritize obstacle data over the live stream. This connection between sensor health and the flight controller is vital. A faulty sensor doesn't just stop "seeing"; it can overwhelm the entire system, leading to erratic flight behavior. Our technicians, like Jose and Liz, go above and beyond to diagnose whether your issue is a simple sensor swap or a complex CPU processing error. Shop with confidence knowing we lead the industry in drone obstacle avoidance sensor repair and service.
DIY Repair vs. Professional Drone Service: Making the Choice
Deciding between a home fix and a pro shop for your drone obstacle avoidance sensor repair is a high-stakes choice. In 2026, drone technology has moved beyond simple cameras; we're now dealing with integrated LiDAR and AI-driven vision systems. While a replacement sensor module might appear affordable on marketplaces like Amazon or eBay, the "Skill Gap" is where most DIY projects fail. A 0.5mm ribbon cable is all that stands between a successful swap and a dead motherboard. One slip with a metal pry tool can short the entire flight controller, turning a $150 sensor issue into a $1,200 total loss.
The financial math often favors the pros when you consider the hidden risks. Professional labor includes specialized calibration that home users simply can't replicate. Modern Drone Obstacle Detection and Avoidance Methods rely on precise mathematical alignment between the sensor and the flight logic. If you replace a sensor but skip the software alignment, your drone may miscalculate distances by as much as 15%. This discrepancy often causes high-speed flyaways or "phantom" obstacles that make the aircraft twitch mid-air. Additionally, cracking the factory seal on your drone's shell instantly voids any remaining manufacturer warranty, leaving you unprotected if a motor or ESC fails next month.
When DIY is Possible (and Recommended)
You don't always need a technician for minor glitches. If your app shows a sensor blockage, start with a deep clean using 99% isopropyl alcohol and a lint-free microfiber cloth. Dust or dried salt spray can mimic a hardware failure. You should also perform a basic firmware refresh using desktop applications like DJI Assistant 2. If the problem is purely cosmetic, such as a cracked external plastic guard or a loose sensor cover, a simple screwdriver set is usually enough to get the job done. These external fixes don't require opening the sensitive internal housing.
When You MUST Send It to a Pro Shop
Don't risk your gear if the repair involves heat or internal wiring. Soldering ribbon cables or managing mainboard-level communication errors requires professional diagnostic tools that can read real-time data logs. If your drone suffered a "Sensor Communication Error" after a hard impact, the issue is likely a fractured trace on the circuit board, not just a loose plug. We provide the expert touch needed for these delicate operations. Every drone obstacle avoidance sensor repair at our facility concludes with a rigorous post-repair flight test in a controlled, insured environment. Shop with confidence and let the leader in Sales, Repair, and Service handle the technical heavy lifting. Visit our drone repair services page to get back in the air fast.
The Critical Step: Calibration After Sensor Replacement
You've successfully finished the hardware side of your drone obstacle avoidance sensor repair. Don't take off yet. A fresh sensor is effectively blind until you calibrate it to the drone’s specific frame geometry. Even a 0.5-millimeter misalignment during installation can cause the flight controller to miscalculate distances by several meters at high speeds. This leads to "ghost" obstacles or, worse, a total failure to detect a solid wall. Calibration aligns the digital "eye" with the physical reality of the drone's position.
Using Manufacturer Calibration Software
Start by downloading the specific version of DJI Assistant 2 designed for your model, such as the Consumer Drone Series or Enterprise version. Ensure your drone’s battery is at least 50% charged before you begin. Calibration is a processor-heavy task that generates significant heat and drains power quickly. Connect the drone to your computer using a high-quality USB-C cable. Once the software recognizes your craft, select "Calibration" from the side menu. You'll see a series of dot patterns on your screen. Hold the drone steady and follow the prompts to align the sensor's view with the boxes on the display.
Precision is everything during this phase. To ensure a successful 2026-standard calibration, follow these requirements:
- Screen Resolution: Use a monitor with at least 1080p resolution. For newer high-density sensors, 1440p is recommended for better dot recognition.
- Lighting: Ensure the room is brightly and evenly lit. Avoid glare on the monitor, as reflections can confuse the vision sensors.
- Stability: If you have shaky hands, use a tripod or a stable mounting block. The software often fails if it detects inconsistent movement during the "follow the dots" sequence.
Verifying Calibration with a Test Flight
Never trust a bench test alone. Take your drone to a wide-open area with zero wind for a real-world validation. Hover at a fixed altitude of 1.5 meters and slowly approach a soft target, like a tall bush or a cardboard box. Avoid testing against glass or water for this first flight. Monitor your app for real-time distance readouts. If the interface shows a distance of 3.0 meters but you're visually closer to 1.0 meter, land immediately. You'll need to restart the software process. Test every direction, including front, back, and sides, to confirm the entire system is synchronized.
Professional results require professional tools. If your sensors aren't lining up perfectly after three attempts, it's time to bring in the experts. Secure your flight safety by booking a professional sensor alignment with our certified technicians today!
Drone Doctor: The Leader in Precision Sensor Repair
Don't let a faulty sensor ground your fleet or compromise your safety. When you need a professional drone obstacle avoidance sensor repair, you can't afford to settle for amateur fixes or sketchy components. At Drone Doctor, we've built our reputation on being the leader in sales, repair, and service. Our team uses a no-stone-unturned diagnostic process that scrutinizes every millimeter of your hardware. Whether you're flying a standard consumer model or a high-end enterprise rig, we identify the root cause of the failure instead of just treating the symptoms.
We believe in quality without the wait. While sending your gear back to the manufacturer often results in a 4-week delay, we prioritize fast turnaround times to get you back in the air. Our shelves stay stocked with genuine DJI and Autel parts that you simply won't find on discount marketplaces. Our lead technicians, Liz and Jose, specialize in complex sensor arrays and LiDAR integration. They treat every drone like it's their own, ensuring that the intricate calibration required for 2026 flight systems is performed to factory standards. 🚨
Why Trust Drone Doctor with Your Tech?
We're more than just a repair shop; we're your partners in flight. Our bilingual support team is ready to help because we know our pilot community is diverse. Se habla Español! We don't just swap a part and ship it back. Every drone obstacle avoidance sensor repair includes a comprehensive system test. We check the gimbal, the GPS lock, and the internal communication logs to ensure the entire drone is healthy. Plus, you can shop with confidence knowing we provide a rock-solid guarantee on all repair labor. Your satisfaction is our top priority. 🔥
- Bilingual Support: Clear communication in English and Spanish for all pilots.
- Full System Calibration: We test the whole drone, not just the replaced sensor.
- Labor Guarantee: We stand behind every solder joint and screw we touch.
Get Your Quote and Secure Your Repair
Getting your drone to us is simple and secure. When shipping your tech, use a double-walled box and at least 3 inches of bubble wrap padding on all sides. We maintain total transparency throughout our quoting process. You'll receive a detailed breakdown of what's needed with zero hidden fees. If our diagnostics show that your repair isn't cost-effective, don't worry. You can check out our drones for sale guide to find the latest 2026 models ready for immediate deployment.
Stop guessing about your drone's safety and start flying with certainty. Our experts are standing by to restore your aircraft to peak performance. Act NOW and get a professional repair quote today! 🛍️💳
Take Command of Your Flight Safety Today
Your drone's safety relies on the perfect harmony of its visual and LiDAR systems. Ignoring a flickering sensor warning is a gamble you don't want to take, especially since sensor errors contribute to a high percentage of avoidable flight incidents in 2026. Choosing a professional drone obstacle avoidance sensor repair ensures your aircraft undergoes the rigorous calibration required to meet original factory standards. Precision is everything when you're flying high-value equipment.
Drone Doctor is the leader in Sales, Repair, and Service, backed by over 1,000+ 5-star reviews from pilots who trust our expert staff. Our team, including specialists like Jose and Liz, provides the personal touch your gear deserves. We're committed to accessibility; Se habla Español is a core part of our service. Trust the experts to restore your peace of mind and your drone's performance.
Get Your Professional Drone Repair Quote NOW!
We're ready to help you push the limits of what your drone can do. Let's get your tech back to peak condition so you can focus on capturing the perfect shot.
Frequently Asked Questions
Can I fly my drone if the obstacle avoidance sensor is broken?
You can fly your drone with a broken sensor by switching to Sport mode or disabling the sensors in your settings, but it's a massive safety risk. Flying without these systems increases your chance of a collision by 45 percent according to recent flight safety data. Act now to secure a professional drone obstacle avoidance sensor repair before your next mission. Our team ensures your tech works perfectly so you can fly with total confidence.
How much does it typically cost to repair a DJI vision sensor?
Repair costs depend on your specific drone model and the current price of components listed on the official DJI parts registry. Labor fees are calculated based on the complexity of the teardown required for your specific aircraft. You'll receive a transparent, detailed quote after our expert technicians like Jose or Liz perform a full diagnostic. We focus on providing the best value to get your professional power back in the air quickly.
Why does my drone say "Vision Sensor Error" even if I haven’t crashed?
Software glitches or outdated firmware often trigger a "Vision Sensor Error" even without a physical impact. Statistics show that 18 percent of these errors result from internal ribbon cables shaking loose during high-vibration flights. You should try a hard reset and a firmware refresh first. If the error persists, it's a clear sign your drone obstacle avoidance sensor repair needs an expert touch to fix internal hardware issues.
Do I need special software to calibrate a new drone sensor?
You must use the DJI Assistant 2 software on a desktop computer to calibrate vision sensors after any replacement. This process requires a high-resolution monitor to display specific calibration patterns that the drone's cameras must track. Most consumer drones won't pass their internal self-check without this 10-step digital alignment. If the software fails to recognize your hardware, our pro team can handle this technical heavy lifting for you.
Can a dirty lens cause an obstacle avoidance failure?
A single fingerprint or a smudge of dried mud can cause your sensors to fail or report ghost obstacles. These sensors function exactly like cameras and require a clear line of sight to calculate depth and distance. Clean your lenses with a microfiber cloth and 70 percent isopropyl alcohol before every single flight. This simple maintenance task prevents mid-air stops and ensures your drone's safety features remain fully operational and reliable.
Is sensor repair covered under DJI Care Refresh?
DJI Care Refresh covers sensor damage as part of their accidental damage protection plans for a fixed replacement fee. You can use one of your 2 annual replacements to receive a refurbished unit if your sensor is cracked or malfunctioning. This service usually requires you to ship the entire aircraft to a regional center. For pilots who want to keep their original hardware and data, our expert repair service offers a fast alternative.
What is the difference between a vision sensor and an ultrasonic sensor?
Vision sensors use dual cameras to map 3D environments, while ultrasonic sensors use sound waves to measure the distance to the ground. Ultrasonic technology works best at altitudes below 5 meters and is essential for stable indoor hovering. Vision systems handle high-speed obstacle detection during complex outdoor maneuvers at higher altitudes. Both systems work together to provide the professional power and safety you expect from modern drone technology.
How long does a professional sensor repair take at Drone Doctor?
Most professional sensor repairs at Drone Doctor are completed within 3 to 5 business days after the aircraft arrives at our facility. Our streamlined intake process ensures your drone moves from the shipping dock to the repair bench without any wasted time. We prioritize speed because we know you need your gear back on the job immediately. Secure your spot in our repair queue today and get back to the sky.